Safely Migrating To Google Tag Manager

This is a guide for technically-proficient users who are looking to safely migrate from on-page Google Analytics code to Google Tag Manager. You should be comfortable with JavaScript, web applications, and web servers.
Google Tag Manager offers an elegant solution for quickly adding marketing-specific tracking without cluttering up source code or backlogs. The process isn’t all roses, there’s a certain level of technical expertise needed and security concerns are often brought up (though GTM offers a lot of features to address these concerns!). However, the benefits of better and more agile data collection far outweigh these potential negatives.
Migrating a very large site to GTM can pose some serious challenges: if done incorrectly, data collection can stop while the code is switched (bad), become dirtied by conflicting code (very bad), or cease altogether (extremely bad). The end goal of this process is that your data in Google Analytics remains constant, without any disruption when you make the transition.
This migration guide is a result of our many hours consulting on Google Analytics and Google Tag Manager, and what we collectively have found to be the best way to manage the process. We also present this guide
This guide assumes you have a working knowledge of Tags, Triggers, and Variables and doesn’t stop along the way to explain the ins-and-outs. If you’d like to take a crash course, we offer a full-day Google Tag Manager workshop in cities all across the United States.
Step #1: Duplicate Your Current Configuration
Create a new Property in your Google Analytics account, then copy all of the configurations from your primary Property and View. If you’re currently using Google Analytics Classic (your code uses the _gaq.push([ ... ]); syntax, you will also be migrating to Universal Analytics.

Step #2: Create Your Google Tag Manager Container & Add A Pageview Tag
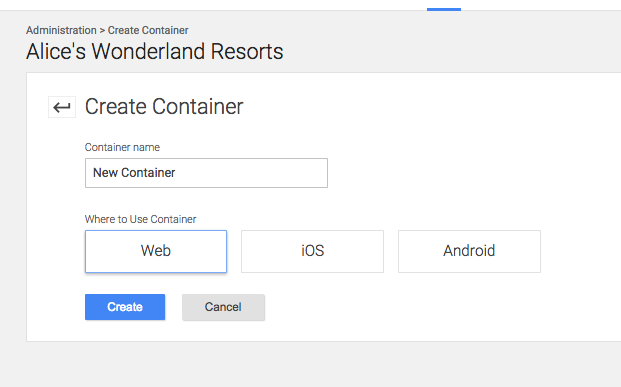
If you haven’t already, sign up for an account at tagmanager.google.com. Create a new container and add the GTM snippet to your site.
Ideally, this should be placed immediately after the opening tag and should not be nested in another HTML element (more).
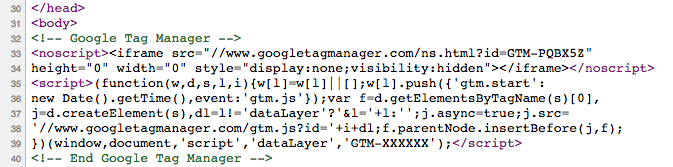
On some browsers, having an iframe in the <head> can cause issues; this is why GTM is placed in the body. For enhanced performance, or if placing the tag within the body is not possible, place the <noscript> section of the snippet in your footer and the <script> section of the snippet as close to the top of your <head> as possible.
Inside the Google Tag Manager interface, select the Variables section from the left-hand menu, then click the New button. Select the Constant Variable type, and paste the UA Number from the Google Analytics Property you created. Name the Variable GA Tracking ID.

Next, click the Tags menu item, and again click New. Select Google Analytics, then Universal Analytics. In the Configuration section, enter {{GA Tracking ID}}. Click Continue, and then All Pages, then Save. You will now track pageviews in two Properties; one from your on-page code, and the other from your Google Tag Manager container.
Step #3: Locate Other Tracking
Most IDEs and text editors will allow you to search through all of the files involved in your site or application; search for _gaq.push( if you’re using Classic code or ga( if you’re using Universal Analytics code. Map out every instance of on-page tracking on your site, what it does, and when it fires.
In this step, we’re looking for things like Events that track user interactions, as well as more crucial things like Ecommerce Tracking.
Step #4: Recreate Other Tracking in GTM
In Google Tag Manager, recreate all of the other tracking you discovered hardcoded on your site. Sending information to Google Analytics can be replicated using the built-in Universal Analytics tag. You may have custom JavaScript to help track certain events, like PDF downloads, etc. These custom scripts can often be replaced using Triggers, for instance, a Click trigger that is enabled on all pages and fires when the {{Click URL}} contains “pdf”. (More info about Triggers).
For advanced features, refer to the GTM Documentation or site search us. The goal is to have both properties receive identical tracking, with your Test Property receiving its hits from Google Tag Manager.
Step #5: Collect Data & Verify
Remember that you can use the Preview feature to test as you go, looking at your live site to make sure Tags are firing at the appropriate times. Once all tracking has been duplicated in your Google Tag Manager container, publish the container on your site. Collect data for a few days, and then compare major numbers between your old Property and your test Property. Look at metrics like:
- Users
- Pageviews
- Sessions
- Top Pages
- Top Events
- Bounce Rate
- Conversion Rate
- Goals/Transactions
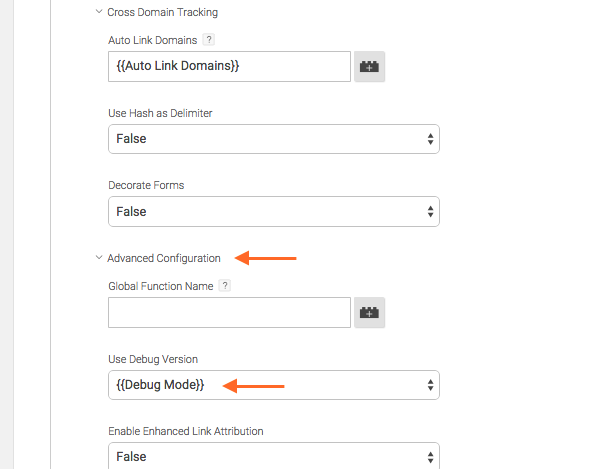
These numbers should be within 1-2% of each other; they will not match exactly. If they appear to be out of sync, investigate your implementation and see if you can spot where things are different. Setting the Advanced Configuration -> Debug Mode to {{Debug Mode}} will cause Google Analytics to print detailed information about the hits it is sending to the Developer Console.
If you discover discrepancies, continue to test until they are resolved.
Step #6: Remove On-Page Code & Switch GTM To Using Production UA Number
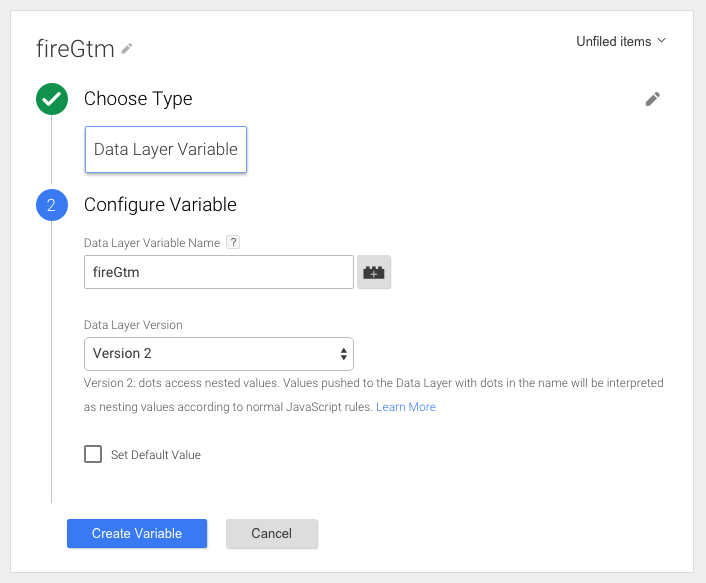
Once your test Property data matches what you see in your production Property, it’s time to remove the old code from the page. In Google Tag Manager, first, create a new Data Layer Variable. Name it fireGtm, and set the Data Layer Variable Name field to the same thing.
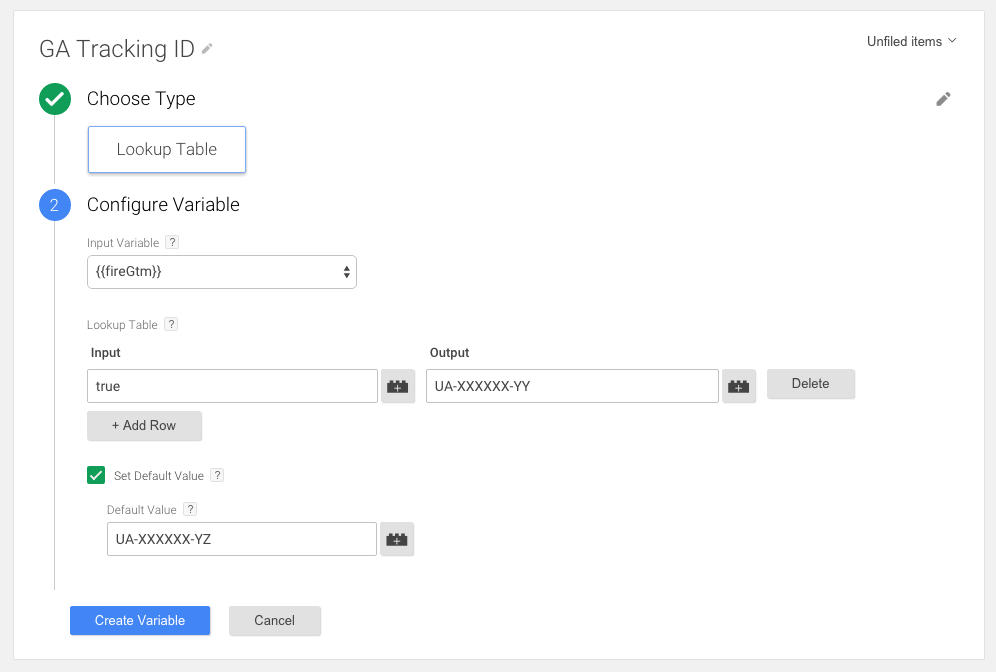
Next, change your Google Analytics UA number from a Constant to a Lookup Table Variable. Select fireGtm as the Input Variable. Add one row and set the input to true. In the Output field, enter in the UA number of your original on-page Property (UA-XXXXXX-YY in the example below). Finally, check the Set Default Value box and enter in the UA number of your testing Property (UA-XXXXXX-YZ in the example below). It should look something like this:
You can now publish your container. At this point, your Test Property will still be receiving data. Next, replace the old on-page GA snippet with the below and remove any other on-page code left on the site, simultaneously. The snippet below must be placed above the GTM snippet, or this will not work.
<script type="text/javascript">
var dataLayer = window.dataLayer = window.dataLayer || [];
dataLayer.push({
  'fireGtm': true
});
</script>
Push your changes into production. Google Tag Manager will begin to fire tracking to your production Google Analytics account as soon as it detects the fireGtm Data Layer Variable, which it will only see if the GA code has been removed. This prevents any out-of-sync page loads from dirtying your data, either by firing both, or neither.
After a week or two, after you’ve definitely removed the old code from every page on your site, you can change your GA Property ID Variable back to a Constant, and this time, you can set it to your Production UA number, and then publish a new version of your container. You can then remove the fireGtm.
Make sure to add an annotation to your Google Analytics to mark the transition!
If you have questions about the process or are looking for additional technical guidance, drop me a line in the comments.
News & Insights
Related Perspectives