Deploying Google Tag Manager On Multiple Website Environments
Google Tag Manager drastically reduces the difficulty of adding tags to websites with its straightforward interface and built-in debug mode. The ability to test out tags on a live site before publishing is a priceless tool for streamlined deployment of advertising pixels, analytics tracking code and more.
With the latest release of the Environments feature in GTM, we now also have the ability to publish versions of our GTM containers only to specific environments – giving us even greater control over how tags are deployed and allowing additional opportunity to test for quality control prior to publishing updates to live websites.
Control over tag deployment is crucial for many reasons, such as:
- Ensuring that advertiser pixels only fire on the production site for real visitor traffic
- QA of robust analytics and custom scripts prior to launch
- Routing analytics data to the appropriate GA property depending on which environment the hits are sent from
- Transitioning from hard-coded tags to GTM cleanly, without firing duplicate tags before on-page code is removed
- And so on…
Thankfully, GTM offers a variety of methods that could be used to deploy tags to different environments, such as:
Many of these methods can be used together or independently for optimal tag deployment. In this post, we’ll review each of these methods and provide some basic examples on how to take advantage of them. Skip ahead to the Environments section by clicking the link above.
1. Blocking Triggers
Blocking triggers can be used as exceptions in GTM to prevent tags from firing if they meet a certain set of criteria. Where triggers tell tags when to fire, blocking triggers tell tags when not to fire – and they overrule any existing triggers applied to tags. We use blocking triggers to separate the functionality of the tag and trigger from the environment; so the tag and trigger remain exactly the same for our staging site and our production site, for example, and blocking triggers are added and removed as needed to control tag deployment. This means you do not need to create a separate set of tags and triggers per environment.
Block by Hostname
For example, if you have GTM on your staging environment but do not want your advertising tags firing there, you can set up blocking triggers that will prevent your ad tags from firing based on the URL being that of your staging site.
I won’t go into detail about this example because my colleague Jon Meck wrote a great article about this topic already – take a look at his blog post for more information on how you can use blocking triggers in GTM.
Block by Version
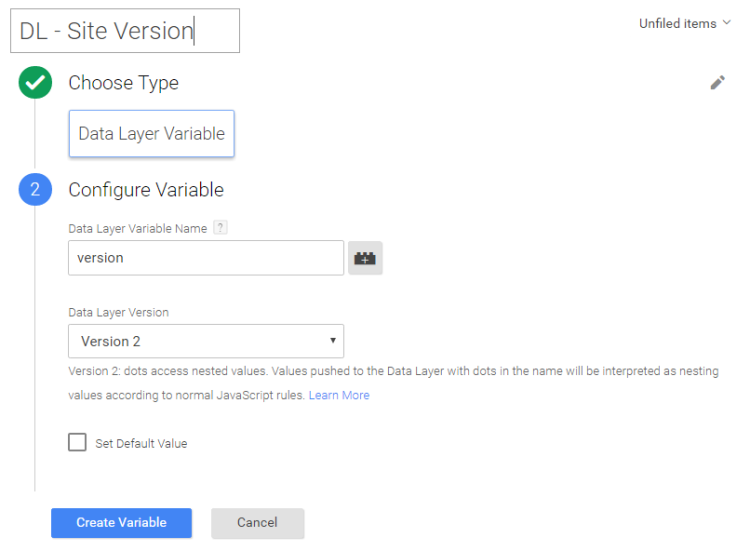
Another way to use blocking triggers is to base them on a version number that you assign to your website when you publish updates. If you set a data layer variable across the website and increment the value each time you start editing and testing new changes, you can set up GTM to look for that version number in order to determine whether or not certain tags should fire.
For example, if the live site is set to version 4, and you know your version 5 changes are only being tested on the dev environment, you can create a blocking trigger to use as an exception for all new tags that you want to test that says ‘do not fire this tag on any version less than 5’ which essentially means they will not fire unless you’re on the dev environment (for testing purposes) or if version 5 is published to the live site. They will not fire on the live site until the production ‘version’ variable has been updated to ‘5’.
The code on your site would look like this:
The data layer variable in GTM would look like this:
The blocking trigger would look like this:
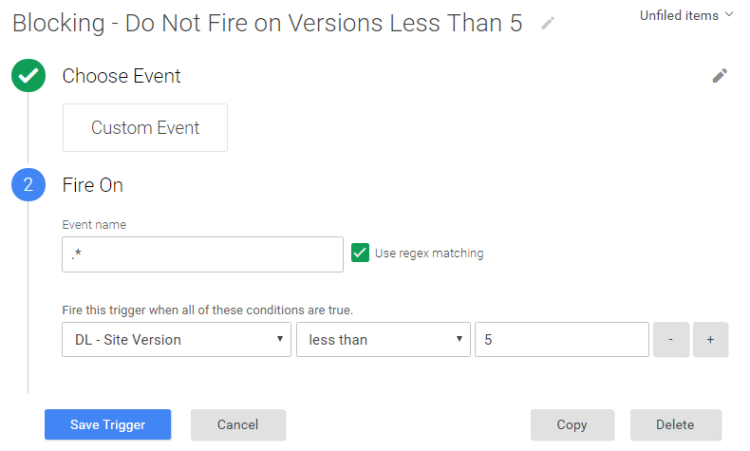
This will also allow your tags to be ready and fully functional the moment the live site’s version variable is set to 5 (when your changes are published) – so you won’t have to remember to go back into GTM to publish anything after the site updates are launched. This saves you the trouble of waking at up 4am for a site launch just to update GTM (believe me, it’s not fun!)
2. Lookup Tables
While blocking rules help us determine what environment we’re in, lookup tables in GTM are particularly useful for helping us direct data to the right place based on the environment.
We typically use these for directing Google Analytics data to the appropriate Google Analytics property based on certain criteria. There are a variety of ways we could do this – a couple examples are below.
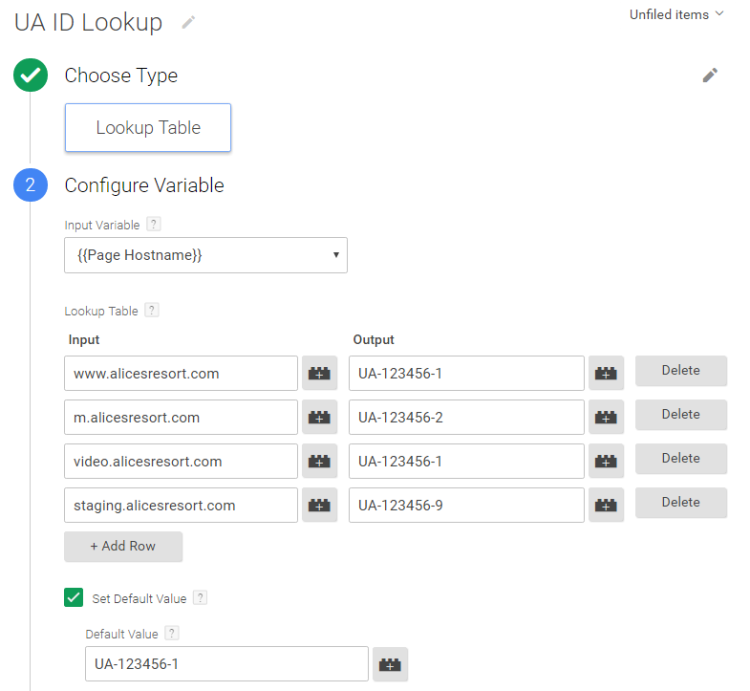
By Hostname
We can specify that data collected by Google Analytics tags should be sent to a reporting property if the hostname matches the live site, for example, and that the data should be sent to a test property if on the staging site. To do this, we would create a lookup table like this:
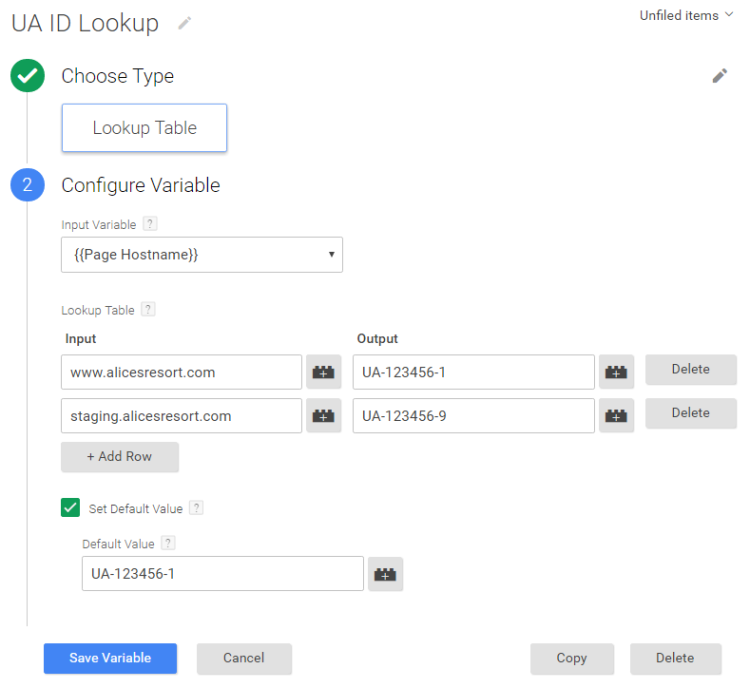
And then we would use that lookup table variable in our Google Analytics tags as the Tracking ID field:
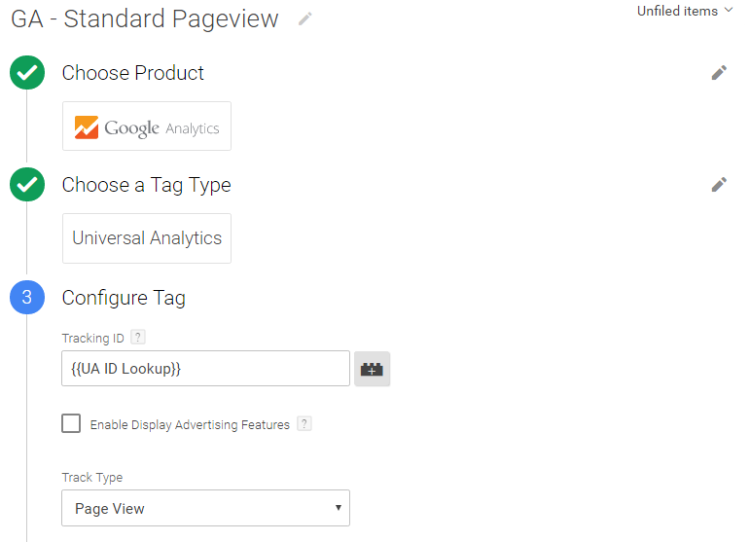
If you have a variety of subdomains that are being tracked with separate GA properties, you can set up the lookup table to account for all of those as well. For example:
Debug Mode
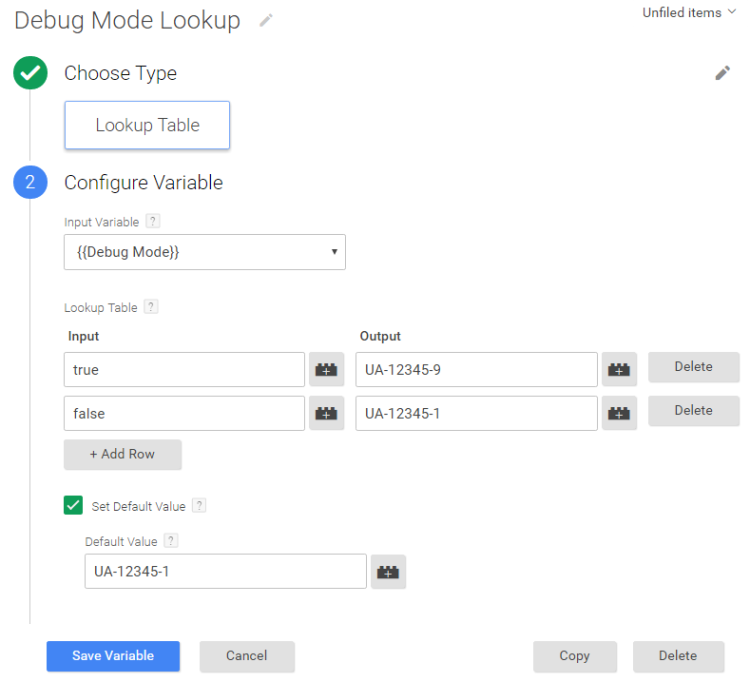
We can also use lookup tables to account for testing in debug mode within GTM by enabling the debug mode variable and using it in a lookup table variable, which you would assign to your Google Analytics tags as the Tracking ID:
Combination
You can also use this Debug Mode Lookup table to determine when to use the UA ID Lookup table from above:
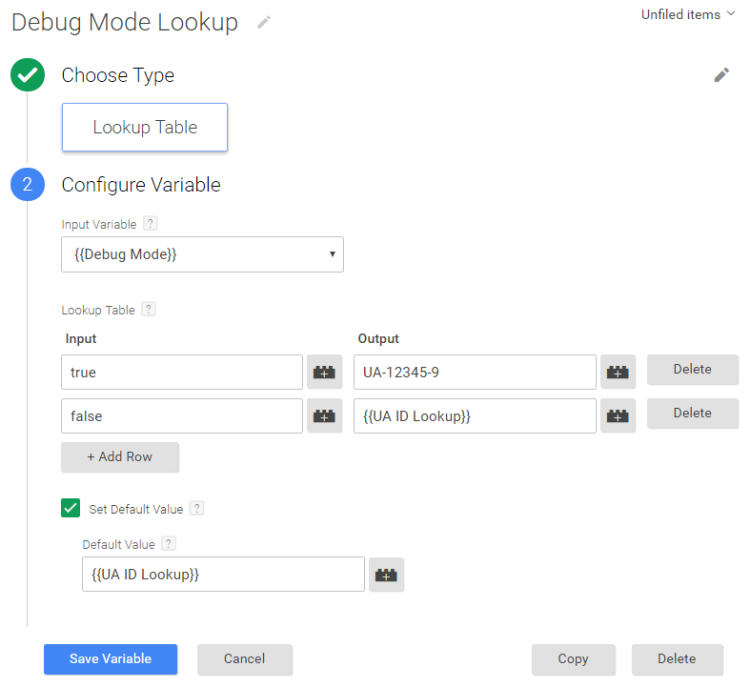
With this variable as your Google Analytics tags’ Tracking ID field, GTM will first check if you are in debug mode – if so, the data will be sent to your test property in Google Analytics. If you are not in debug mode, GTM will then go to the UA ID Lookup table to determine what property to send the data based on the hostname.
Data Layer Variable
You could also create a lookup table based on a data layer variable. This is especially helpful when attempting to safely transition from hard-coded analytics tracking to implementation in GTM. In a manner similar to that of the version number recommendation for the blocking trigger above, you would basically determine where to send the Google Analytics data based on the data layer variable status. Take a look at Dan’s post to learn more.
3. Separate Containers
Having a separate container for a dev or staging environment used to be fairly common practice (until Environments were announced anyway – more on that below!). As long as you work hard to manage the separate containers and make sure the configurations are mirrored as closely as possible, this can be a helpful solution to deploying certain tags on certain environments.

The challenge with this method is that you need to make sure the configuration in the test container is exactly mirrored by the live container.
You can export and import container configurations in order to ensure everything stays exactly the same, rather than manually making the same updates in the live container as in the staging container, for example. And for the bold, the GTM API can help with this as well.
4. GTM Environments
Environments in GTM have been a long-awaited feature and we’re excited to put them to use! With environments, we can now tell GTM that we are working with additional environments other than just a live website(s), and we can deploy container versions to specific environments. This makes testing much more manageable than working with multiple containers because it ensures that the tags, triggers and variables that you’re testing are exactly the same on each environment you’re testing on.
Most companies utilize separate environments throughout the process of building and updating their websites, such as with staging or pre-production environments, QA and even dev environments, in order to test changes before publishing them to their production site. You can imagine the benefits to testing robust tracking solutions and custom code implemented within GTM in pre-production environments just as you already do with your usual website updates.
Before we jump into creating environments though, it is important to recognize that we likely do not need to test all of our tags in GTM for compatibility with each and every environment we may have. For advertiser tags, for example, the standard preview and debug mode available in GTM will likely suffice. For more complex tags, however, there are many reasons why we may want to more thoroughly test in a staging environment. For these, we would likely want to test in an environment that closely mirrors the production site in order to keep the GTM container manageable (dev environments change frequently and would be very hard to keep up with).
The Basics
I’ll provide a basic rundown to setting this up, but Simo Ahava already provided a very in-depth look at how this feature works so I encourage you to go check out his article.
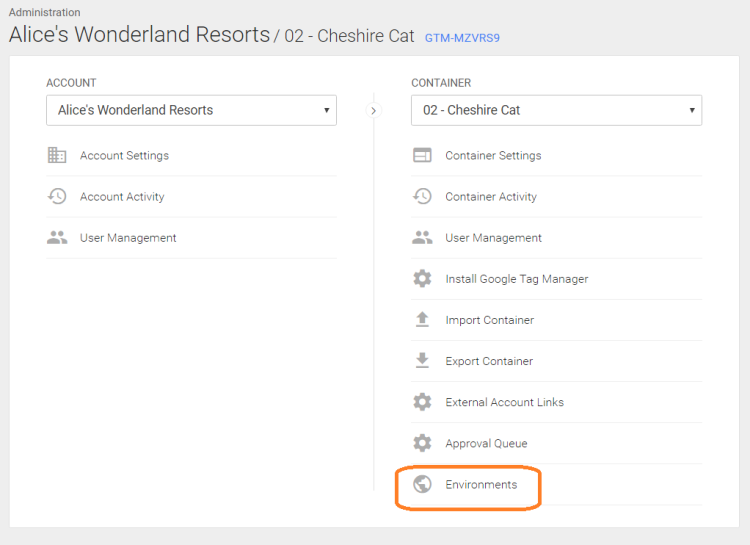
To get started, navigate to the Environments section from within the GTM Admin:
When open your Environments, you’ll immediately see three default environments:
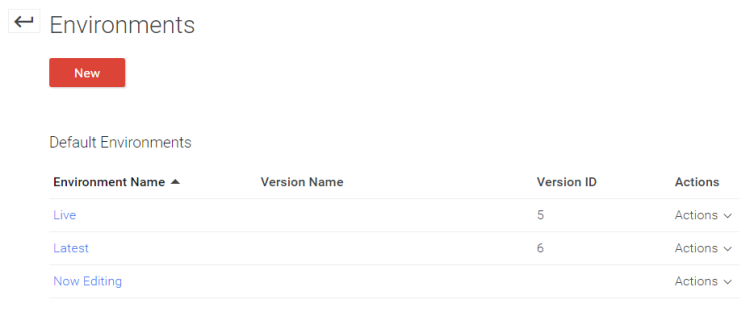
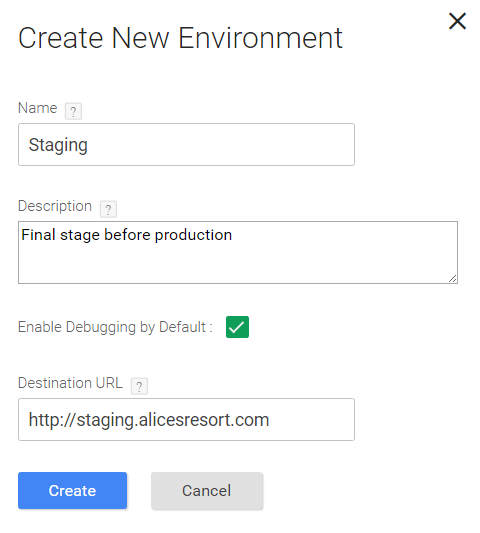
These correspond to the current live container version, the newest created version and the current draft of your container. These are not editable and exist for the functionality of the GTM container that you are used to. To set up your own environments, such as a staging environment, you need to create a new one. Click the red NEW button and name your new environment:
When you create a new environment, you’ll get another message that tells you how to start using your new environment:
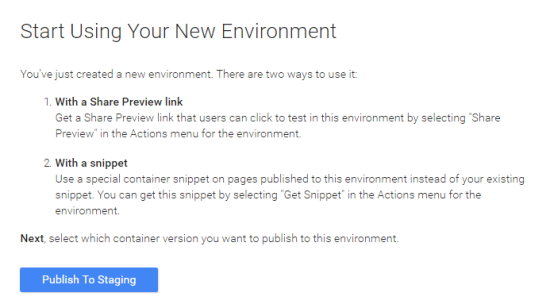
This message explains the two primary means of testing tags in your environment: by either sharing a preview link or updating your GTM container script for that environment. I’ll walk through these in a minute. First, we have to decide which container version should be initially published to this environment so we can have something to work with.
Click the Publish To Staging button from this popup window to select a container version. You will probably select the latest version you have available so that your new environment mirrors your live environment to get started.
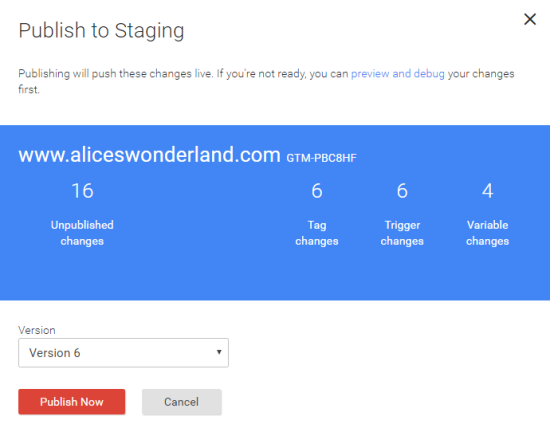
Now that we’ve done that, let’s look at how we use this environment. You’ll see now that the Environments overview screen shows your new environment and you have a variety of actions you can take with that environment:
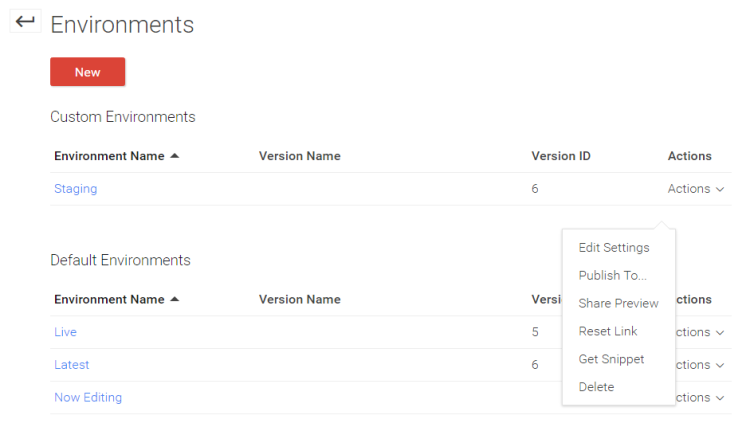
As I mentioned earlier, there are two ways to use your new environment:
Share Preview
This option allows you to share the environment’s container configuration with a link. When you do this, you should select the Turn on debugging when previewing option before sharing the link with your colleagues so that they are able to use the built-in GTM debug console to evaluate your updates:
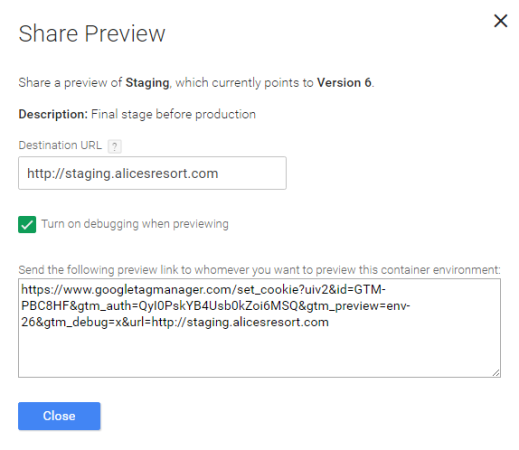
When someone opens this link they’ll see the message that they are now in preview and debug mode for your Staging environment for your GTM container:
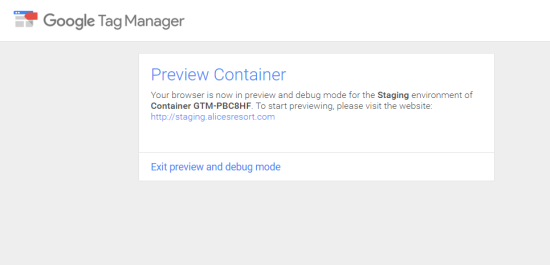
They can click the link in the message to check out your website in preview and debug mode to review your changes.
Get Snippet
The second way to use your new environment is to publish directly to it, instead of publishing to your live environment. To do this, you need to enable ‘publish to’ feature by customizing the actual GTM container script for your new environment. When you select the Get Snippet option from the Actions drop down, a popup will appear with your updated GTM container script:
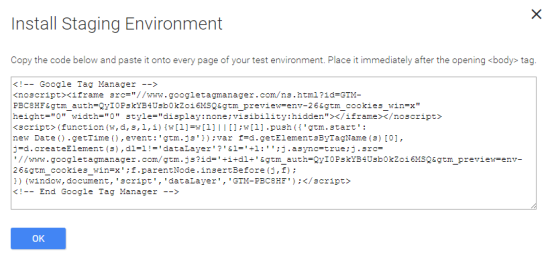
You may notice that this is the exact same container ID that you’re using on your live site – but this script has been modified to include an authentication token (check out Simo’s post linked to earlier if you want to learn how that works). You will want to replace the GTM container on your selected environment (probably your staging site) with this new code.
Once you’ve made this update to your selected environment, you will be able to publish updates in GTM directly to that environment.
So in your container, after you’ve made some updates and you select the big red Publish button to publish your updates, you’ll now have the option to publish your changes live or publish them to your new environment via the Environment drop down:
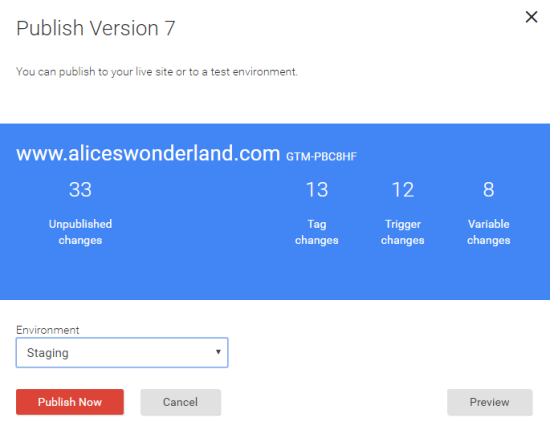
Creating new environments also provides you with the opportunity to enable the Environment Name variable, which you can use to set up a blocking trigger as shown above to prevent tags from firing on the wrong environments in a manner similar to the examples we talked about earlier.
Side note – If you have shared preview links with your colleagues and you would like to reset that link, you can do so from the environment’s Actions drop down – but note that if you do this you will also invalidate the corresponding container snippet (if you have one installed) and you will need to re-install a new one on that environment if you want to continue to use the publish to functionality (because it will have a new authentication token associated with it).
Summary
These are some basic ways to manage GTM tags across different environments – you might customize one or more of these methods to best suit your needs.
We generally prefer to use blocking triggers and environments over separate containers for deploying tags across different environments because they eliminate the need to create separate tags and triggers per environment, which could be challenging to maintain and present the opportunity to configure them differently on accident. Using separate containers also presents the opportunity for the dev or staging container to be published to the live site on accident, which can cause serious problems.
If separate containers are your preferred option, however, you can import and export container configurations to help make them easier to replicate.


