Tracking Very Large Transactions With Google Analytics and Google Tag Manager
Google Analytics will allow you to send 8192 bytes of data with a single request. By default, it will switch from a GET request to a POST request once you’ve crossed a threshold of about 2000 bytes, which is where certain browsers begin to get upset with the length of the GET’s query string. However, sometimes 8192 just isn’t enough.
This issue is particularly thorny when the hit in question contains Transaction information. Believe it or not, this issue has come up with my clients – so I’m sharing my solution in case anyone else finds themselves in this, admittedly, very niche situation.
Unlike product impressions, which lend themselves nicely to chunking, transactions have associations that need to be preserved (the products in the purchase to the purchase ID). The good news is, we can trick Google Analytics into letting us break a transaction into several hits and still report on it as a cohesive unit. We do this by breaking the transaction into chunks, then changing the data very slightly between hits.
Unfortunately, this approach has some downsides – our Transactions metric will be wildly inflated, for example. With a little creativity, though, we can use Custom Metrics or Goals in order to replicate the transaction counts we would normally expect in the interface.
We have a few options to solve this problem:
Send Less Data
I can hear your booing and hissing. Hear me out – ask yourself if you really need all of the data you want to send along with your Transaction. You do? Alright, read on.
Use Data Import
Data Import is an advanced feature of Google Analytics that lets us bring in extra data to the interface without sending the data along with the hit. There are two types of Data Import – Query Time (Analytics 360 née Premium only) and Process Time. Using Data Import, we can whittle our transaction and product data down to the bare minimums – just IDs and hit/session/user-specific data.
Break Up the Transaction into Sub-transactions with Different IDs
Instead of sending the Transaction with just one hit, break it into multiple hits and append an index to the end of the Transaction ID, e.g. ‘T12345’ becomes ‘T12345-1, T12345-2, . . .’. This approach gets the data into Google Analytics, but can lead to high-cardinality problems for large organizations with lots of transaction IDs, and it inflates the count of transactions in the interface. Then there’s all the nasty side effects that we have to watch for, like revenue changes – in short, it’s a messy fix.
Break Up The Transaction into Sub-transactions with the Same ID

I know, I know. You’re saying “Dan, that’s not going to work – Google Analytics de-duplicates transactions with the same ID within the same session. Go home, kid, you’re drunk.” Well, you’re right – Google Analytics does de-duplicate duplicate transactions fired within the same session. However, the de-duplication isn’t at the Transaction ID level – it’s at the transaction level. If any data you send with the transaction changes – for example, the coupon field – the transaction will not be de-duplicated. Neat, right?
How Does It Work?
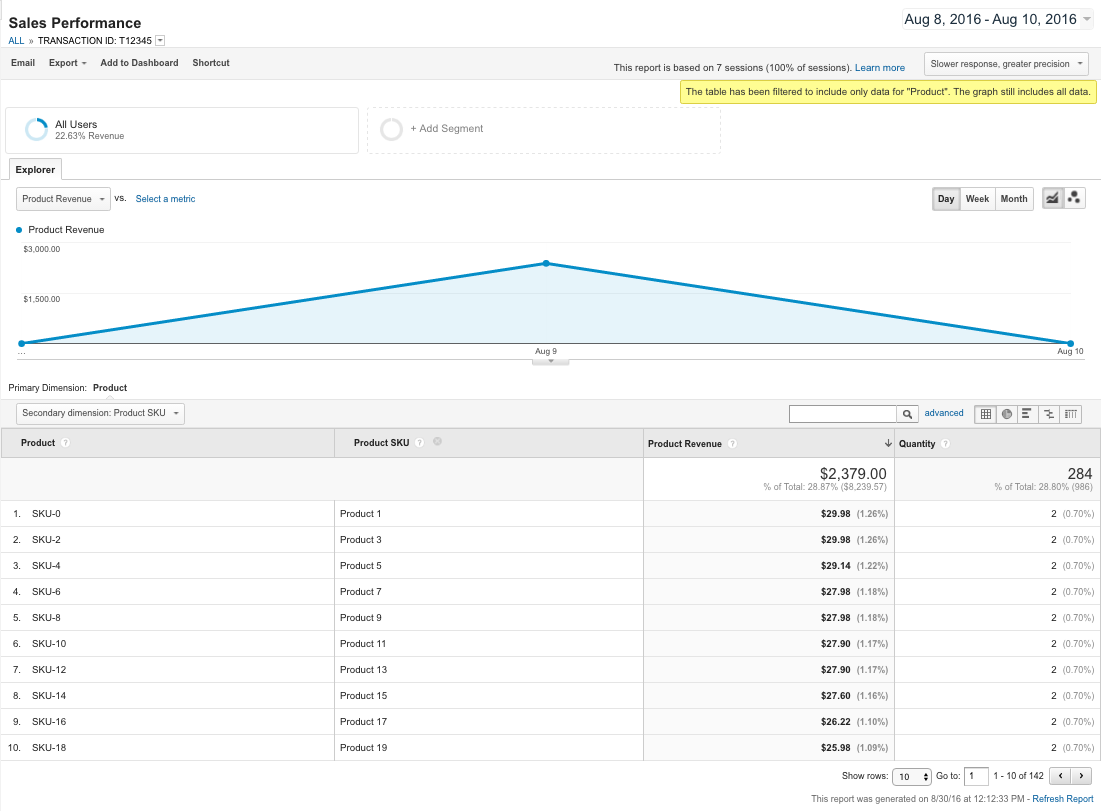
You read right! If you change any of the data about a transaction, it will not be de-duplicated – Google Analytics will only ignore transactions that are exactly the same. So, if you were to send a transaction with ID 1234 and revenue $12.50, and then immediately send a transaction with ID 1234 and revenue $12.51, guess what? You’ll see the Transaction ID 1234 in your reports, with a total of 25.01 in revenue. Go on, try it yourself. I’ll wait.
Okay, satisfied?
Armed with this knowledge, we can see that if we were cut our very large transaction into 8000 byte chunks and change an unused field between each hit, we could track the transaction using the same ID. This would allow us to view our transactions in the interface as Google intended – we’ll see the correct total for the correct Transaction ID, and we can click on that ID to see all the products associated with the purchase.
Interested? Great! We’ve already got a Container file ready for you to use. Here’s how to install the chunker.
Note: This solution is for Enhanced Ecommerce only with Google Tag Manager. File this solution under “Google Analytics Hacks” and test everything thoroughly!
Step 1 – Download & Import the Container File
This step is pretty easy. If you’re not sure how to import a container file, check out my colleague Jim Gianoglio’s rundown on how to do so.
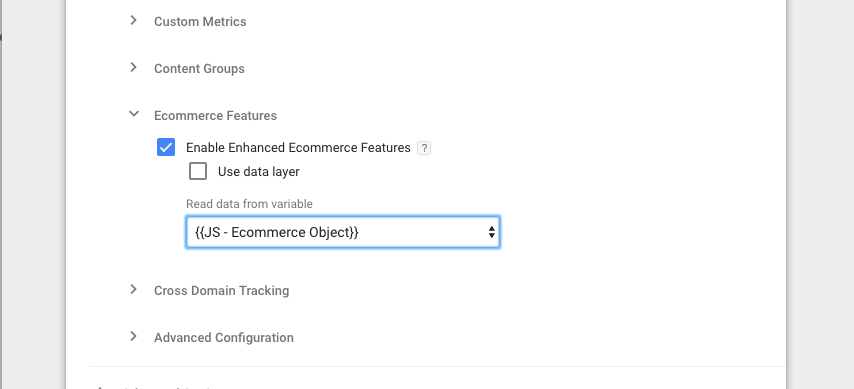
Step 2 – Change Your Existing Ecommerce Tag
You’ll need to locate your tag that you’re using to carry in your Enhanced Ecommerce data and adjust the Ecommerce settings. This might be your Pageview tag that fires on all pages, or it might be a separate Pageview or Event Tag. In this tag, uncheck the “Use data layer” box, and from the dropdown that appears, select “JS – Ecommerce Object”. This Variable will detect if the transaction needs to be chunked, and if so, it will return an empty ecommerce object. Otherwise, the ecommerce object that was supposed to be in place at this step will be returned, as usual.
Note: If you’re already using a Variable for this step, you’ll need to do some tinkering inside of the Variable. You should be able to swap DLV - Ecommerce - v1 Variable with the Variable you’ve been using. As always, test extensively before publishing!
Step 3 – Adjust The Firing Trigger
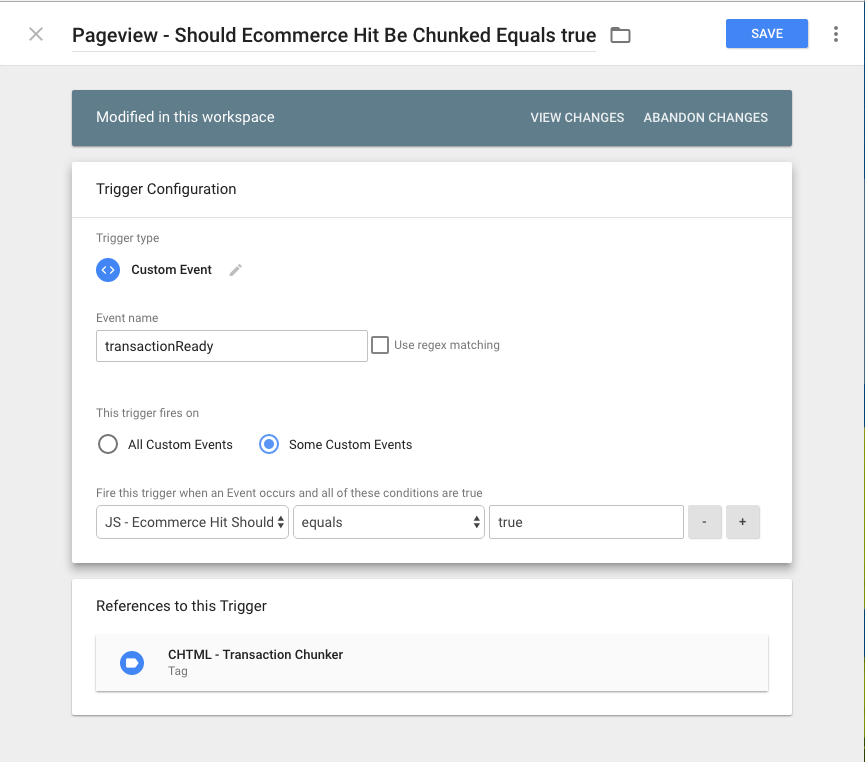
When there is a large transaction that needs be chunked, we’ll use a Custom HTML Tag to do the work. By default, this Custom HTML tag will fire on “Pageview” on any page where the result of {{JS - Ecommerce Hit Should Be Chunked}} is true. This assumes that your data layer is loading before GTM, with the right ecommerce information loaded on the page. If you’re firing your transactions using a custom event, like below, you’ll need to tweak the firing trigger.
dataLayer.push({
  event: 'transactionReady',
  ecommerce: {
     ... // etc
  }
});
To fix this complication, change the Trigger {{Pageview - Should Ecommerce Hit Be Chunked Equals true}} to use the trigger type “Custom Event” and change the Event name field to match your event, e.g. “transactionReady”.
Step 4 – Add Your Google Analytics Tracking ID
So now your page has loaded, the transaction has been determined to be too large, so our Custom HTML Tag is going to split it into chunks and then use data layer pushes to fire in the chunked Transactions using a Google Analytics Event tag. The tag and trigger are all set up for you, but you need to go into the tag called GA - Event - Transaction Chunk and update your Tracking ID to match your other Google Analytics tags.
Step 5 – Test!
That’s it! Once you’ve got the above configurations in place, run a test transaction that would overflow the 8000 byte limit. You should see several transChunk events appear in the Debug panel.
Downsides & Considerations
Of course, there are still some downsides to this approach. For starters, each chunk is going to count as a separate transaction. In turn, the Conversion metrics in your other reports are going to go way, way up. Consider anywhere you see Conversions (Google Analytics, Google AdWords, etc.) and think if this will affect those numbers. That means you’re going to need to make it clear to stakeholders that the Transaction metric is no longer going to cut the mustard.
We use the Coupon field to make sure each transaction is slightly different. If you’re currently using the Coupon field, you’ll need to do some tweaking.
If we’re using Events for all of our transaction tracking, we can set up a Goal to track the purchases instead. Goals are fired once or zero times per session, so if a session can include multiple purchases, this may not be the solution we’re looking for. If we can’t use Goals, we can configure our tags to use Custom Metrics instead. No matter what we do, since this solution breaks standard reporting in a fundamental way, it’s critical that anyone who uses the account gets a proper introduction as to what is going on when they’re viewing the reports.
And that’s it! By adjusting the transaction configuration ever so slightly between our chunks, we can send in transactions with greater than 8192 bytes of data and still see them represented in the interface as a single, cohesive unit. Don’t forget – this solution should only be used if every other option is exhausted.
Any questions? Sound off below.