Four Tips For Advertising Pixels In Google Tag Manager
Google Tag Manager makes it quick and easy to add all sorts of tagging solutions to your website. We have blogged extensively about using GTM to implement Google Analytics, but the tool is also designed to handle tracking pixels provided by media vendors in the same fashion. Using GTM to implement your media pixels provides many advantages (many of which are similar to the advantages it provides for GA!)
- Ease of implementation: a user-friendly interface instead of dealing directly with HTML and JavaScript
- Quick feedback: Pixels can be implemented directly by the analytics or marketing teams, without having to go through the normal development release cycle
- Built-in tags: Helps prevent common errors, and keeps your tags up-to-date with the latest versions
- Consistency: Re-usable Trigger and Variable assets ensure that you tag the same thing the same way for different tools
This blog post outlines some tips and techniques that you can use to make sure you’re getting the most benefit from Google Tag Manager.
Prefer Built-In Tags
Google Tag Manager has built-in tag templates for several common media vendors. This includes most Google products like AdWords and DoubleClick, but also a few third-party tools like CrazyEgg, ClickTale, Twitter, and LinkedIn.
Many media platforms will give you their pixels in the form of HTML tags, and while it’s possible to implement any tag using a Custom HTML tag in Tag Manager, it’s almost always better to use the built-in tag template when it’s available. Several common media platforms, such as Facebook, do not have tag templates available, but it’s always worth the five seconds it takes to scroll through the list of tags to check. Oh, and we’ve got you covered with a Facebook post.
Published: November 7, 2017
Using the template tags provides several benefits. The interface is more user-friendly, making it easier to customize tags with additional information (such as Ecommerce data). It protects against common implementation errors, such as typos in variable names. Google also keeps their code templates up to date, in case the vendor releases a new tag version.
Re-Use Existing Triggers and Variables
It’s very common to have multiple tracking tools on a single site, such as media pixels from two vendors, or media pixels and Google Analytics. If you’re using Google Tag Manager, you can use a single Trigger to fire multiple Tags, and use a single Variable to pass the same data to all of them. This helps guarantee consistent tracking, especially with custom events.
For example, if you have a lead form on your site, you will probably want to know who submits that form in both Google Analytics and your media tool. It’s possible to track this form in at least three different ways in Tag Manager: with a Pageview Trigger on the confirmation page, a Click Trigger on the form submit button, or a Form Submitted Trigger. A user may fire some of these Triggers but not others, depending on how they interact with the form (e.g. hitting Return on the form instead of clicking, failing client-side form validation, or hitting the Back button on their browser). You may end up sending conversion data to GA but not your media pixel, making your data look confusing and inconsistent.
This can be avoided simply by taking a Trigger you created for one tool and re-using it with the other. Then you will always send the same data to both tools.
The same is true for Variables. For example, if you are using GTM to implement Ecommerce with Google Analytics, then you already have access to values for Revenue and Transaction ID. You can send these same values to your media partners.
Consolidate Tags with Regex Tables
One common set-up for advertising tags is to have different remarketing pixels on different pages so that you can remarket different messages to users depending on what content they have already viewed. It’s possible to have a dozen or more remarketing pixels, each to be placed on a different page or set of pages.
It’s possible to implement this by creating a new Tag in GTM for each pixel and each page. However, this makes your Container large, slow, bloated, and difficult to manage. However, it’s possible to consolidate multiple pixels into a single tag, which is easier to manage. This makes your container less bloated, and after the initial set-up, it becomes much easier to add new tags.
If you have a set of a dozen remarketing pixels to be placed on different pages, they usually are nearly identical, differing by only a single parameter. You can use a single Tag in GTM to implement all of these variables, by using a GTM Variable to provide the value of the one parameter. A Regex Table Variable will let you list out the URLs that have pixels, and what value the parameter should take on each URL. (A Regex Table can accept minor variations in the URL that a regular Lookup Table cannot, such as bounteos.com/blog vs bounteous.com/blog/ vs bounteous.com/Blog.)
When you publish new content on your website and want more remarketing pixels for those new pages, adding them is as simple as adding new rows to your Regex Table. This is much simpler and less error-prone than creating a whole new Tag, copying out all of the relevant values, and
defining a new trigger.
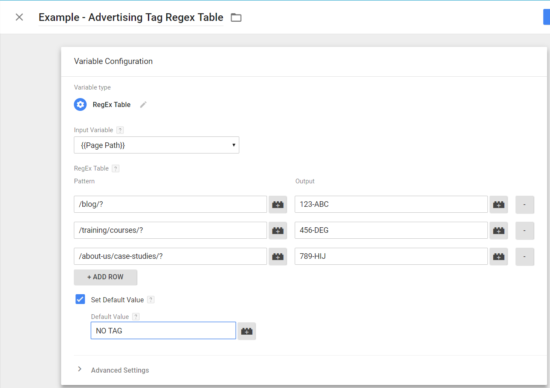
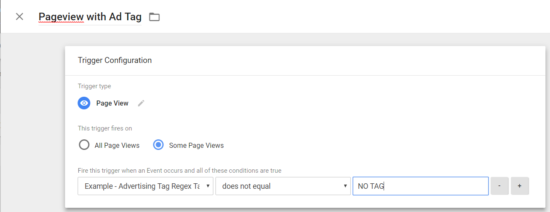
As an optional extra trick, you can create a trigger that only fires this tag on pages with a pixel configured for them by using the Default Value setting. This is optional because even without this setting trick, the pixel wouldn’t fire on other pages because it’s missing a required parameter. But if you want to make sure not to send junk data, you can configure your Regex Table to have a default value of “NO TAG” if the page URL does not match any of your tags. Then, you can create a Trigger for your pixels that fires only if the Regex Table does not have a value of “NO TAG.” Pay attention to the double-negative, and see below for an example.
Time-Limited Campaigns
Many media campaigns are intended to run only for a limited duration. The tracking pixels for these campaigns do not need to stay on your site forever. However, removing unused pixels is often not a priority. As a result, your GTM Container can accumulate legacy pixels that aren’t being used. Worst of all, there often isn’t anybody who knows for sure which pixels are still active and which aren’t, making it impossible to clean up!
A simple solution to this is to use a Custom Tag Firing schedule on a specific tag to determine when it should start and end.

We have a post that talks about a number of different ways to control when and how long a Tag should fire, including the scheduling feature (already included in Google Tag Manager) and more custom options, like scheduling tags by day of week and using Trigger exceptions.
Published: September 20, 2016
Be careful that everyone who plans on using the pixels knows that they will be self-stopping after a certain date. It’s helpful to have a little bit of padding in case plans change, and because a few conversions tend to trickle end even after the campaign has finally ended. Make sure that any changes to the campaign plan are communicated to you so you can update the schedule settings.
Also, another helpful tip is to name the Tag carefully to convey that it will be ending after a specific date (like “2017”) or campaign (like “Holiday Promotions”).
Conclusion
The tips above will help your data stay consistent, and will make your life easier maintaining and updating your container over time. If you have a GTM container that’s already overgrown with ad-hoc advertising pixels, the above tips can also help you bring it back under control.
News & Insights
Related Perspectives