Your First Google AdWords Account ‑ Concept, Build, and Launch
So, you want to build out an AdWords account for your business, but you don’t know where to get started, and you just keep putting it off.
I don’t blame you.
With such an abundance of resources online, sometimes it’s tough to wade through a sea of blog posts, YouTube videos and forum discussion threads; trying to cut through the fluff and drill down to the information that is relevant to you. There are changes all the time, heck – even the name of Google AdWords is changing to Google Ads later this month!
That ends today. I’m going to walk you through the steps to get your first AdWords account launched in no time!
Bonus Prerequisite
Before you can get started building an AdWords account, you need to have a website. If you don’t already have a website, get that taken care of first. But remember, an AdWords account is only as good as the landing page that it sends traffic to, so don’t waste your money sending traffic to a poorly designed site.
1. Sign up for AdWords
If your website is good-to-go, you can go ahead and sign up for an AdWords account. Depending on your level of familiarity with AdWords and how it works, you might want to look through this overview first. Or, you can jump right to it and create an account here.
If you’re completely unfamiliar with AdWords and PPC, this is a great article that will help you understand how PPC advertising works in general.
After you create your account, you’ll be sent to a page to build your first campaign. It will look something like this:

We’ll worry about the details here later. For now, just enter a budget of $1. You won’t be able to continue until you add at least one keyword and one ad, as well. Again, we’ll worry about the details here later. For now, just enter “test” (or something similar) as your keyword and fill your ad in with “test test test”, or similar, on each line.
Next, you need to enter your billing information. Do this for real, with a real working card. Don’t worry, they’re not going to charge anything to your card yet.
2. Brainstorm Some Keywords
Now that you have your account set up, it’s time to start thinking about what keywords you want to fill your account with (or build your account around).
**For the total n00bs—when someone searches for something on google, their search query (literally what they type into the search box) will match to a ‘keyword’ in your account and trigger an ad to serve.
This part should be relatively easy. Think about your business and think about your website. What are you trying to sell? Now start thinking about words and phrases that people would search on google to find your product or service.
I’ll use an online coffee & tea shop as an example throughout this post. Let’s say the shop sells whole coffee beans, pre-ground beans, tea leaves, tea bags, and accessories. In the case of my fictitious online shop, some keywords that immediately pop into my mind are “buy coffee beans”, “decaf coffee”, “french roast coffee”, “green tea bags”, “loose leaf tea”, “french press machine”, “espresso cups”, etc.
Start listing all these ideas out in a spreadsheet. On the fence about whether to include a keyword? Go ahead and include it, you’re going to narrow down this list later anyway.
3. Expand on Your Brainstormed Keyword List
Brainstorming a list of keywords is a great start, but it’s likely that there are going to be keyword ideas that you overlook or fail to think of during your initial brainstorm.
Lucky for us, AdWords provides a great tool for coming up with new keyword ideas. The Keyword Planner Tool allows you to enter a list of keywords that you already brainstormed (or a URL), and it will spit out an expanded list of related words and phrases.

Entering 3 of my originally brainstormed keywords into the keyword planner returned an additional 717 related keywords, along with search volume estimates. Some are highly relevant, some not-so-much.
Download this list into a spreadsheet and grab a cup of coffee. The next step is probably the most tedious part of this whole process.
Published: May 24, 2018
4. Organize Your Keyword List into Campaigns and Ad Groups
At this point, you should have a long list of potential keywords for your account. Now it’s time to organize this list, grouping it into strategic campaigns and ad groups. There are many ways to consider how to organize your Campaigns, Ad Groups, and Keywords, my suggestion above is a nice blend of ease and logic, perfect for someone just getting started.
When organizing keywords into a neatly structured account comprised of campaigns and ad groups the main takeaways are:
- Campaigns (for a basic account) are generally organized by sections of your site, product category or lines of service (depending on what kind of business you run). Using my coffee & tea shop example, I’d probably have campaigns for: Coffee, Tea, Coffee Makers, Accessories.
- Ad groups live within campaigns. While campaigns represent your different product categories or themes, each of the ad groups within that campaign will segment that campaign even further and will be filled with even more tightly themed groups of keywords. Ads are written and assigned per ad group, so it’s extremely important that all the keywords within an ad group are closely enough related that one ad can speak for all keywords within an ad group. See below for a very basic account structure example:

Notice how all keywords within an ad group are closely enough related that one ad could speak for all of the keywords in that ad group. This concept is extremely important. You don’t want someone that is searching for “green tea” to be served an ad talking about a 12 cup coffee maker—strategic account organization is how you prevent that.
As you begin to group your list of keywords into campaigns and ad groups, you’ll probably come up with a few more keyword ideas. Keep adding these in too.
Ad groups generally have anywhere between 1-15 keywords. Don’t feel like you need to limit yourself to 3 keywords per ad group as seen in the example above. Again, the important thing is that all keywords (whether 2 or 15) within an ad group are highly related—I can’t stress this enough.
Published: February 24, 2016
5. Start Creating Your First Campaign!
Pick a campaign that you’re excited about and get to work creating your first campaign. Navigate to your “Campaigns” tab on the left rail and click the blue “+” button:

On the next page select “search” as your campaign type:
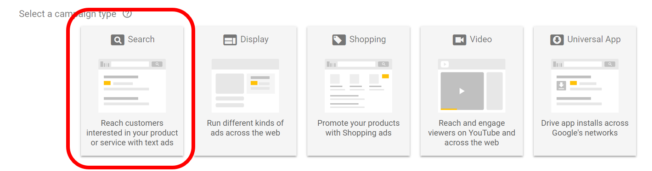
You’ll be prompted to select a campaign goal—are you trying to drive sales, leads or web traffic? Selecting a campaign goal will help AdWords recommend settings and features specific to your goal type. You can also choose to create your campaign without a goal.
6. Select Campaign Settings, Finalize and Save
The next step is to go through selecting your campaign settings. Check out Megan’s post to learn more about campaign settings and other helpful tidbits for a new campaign.
One decision you’ll have to make is if you want to set your keyword bids manually or let AdWords automatically do it for you. AdWords allows you chose certain criteria to optimize towards and will automatically adjust bids to try to meet your criteria. You can read more about AdWords automated bidding here.
You don’t need to worry about adding audiences, sitelinks, callouts and other extensions at this point. (you probably will want to at some point in the future, though).
Click “Save and Continue”.
7. Create Your First Ad Group
You’ll be brought to a screen that looks like this:
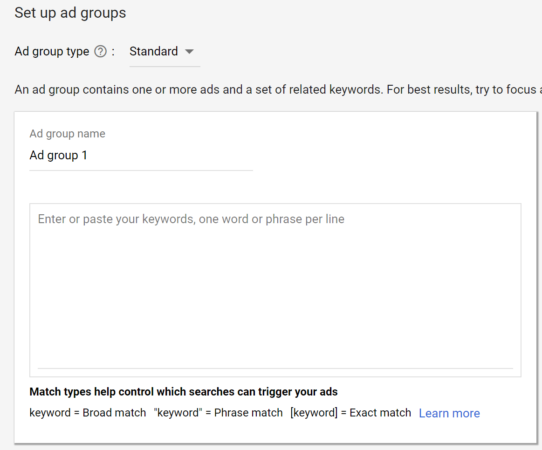
Enter a simple and descriptive name for your ad group and paste all the keywords for that ad group into the box.
Don’t click “save” just yet!
8. Refine Your Keyword Match Types
Before we save keywords to our ad group, we must define our keyword match types. Keyword match types control how precisely a searcher’s search query must match a keyword in our account in order to trigger an ad.
Think about it this way—say you have the keyword “green tea bags” in your account. Do you want an ad to serve when someone searches “green tea bags”?
Yes.
What about if someone searches “buy green tea bags”?
Yes.
Well those are both obvious and we probably already have them as keywords in our account. But what about when someone searches something like “what are the best green tea bags you can order online” or “green tea that is good that comes in bags”?
You probably won’t have a long phrase/question like this as a keyword in your account (referred to as a ‘longtail keyword’), and this is where the concept of match type comes in.
We have 4 match types to chose from—broad, broad modified, phrase, exact. Match types are indicated by adding different symbols to markup your keywords: broad, +broad +modified, “phrase”, [exact]. You can read all about match types here. Pay attention, it’s important!
After you markup your keywords with match types, click “save”.
9. Create an Ad
Now that we’ve built a campaign, an ad group, added keywords and defined match types, it’s time to write our ad. This is a fun part. You get the opportunity to flex your creative and persuasive muscles.
Click the box to create a new ad and get started writing a compelling, relevant and persuasive ad.
Text ads in AdWords are written in the following format: Two 30-character headlines, one 80-character description line, a vanity URL that is displayed in the ad (your domain + two 15-charater file paths), and a final URL where you want to send your traffic:

You want to write an ad that is specific and highly relevant to the keywords within the ad group, and then send that traffic to a landing page that is relevant to the keyword. A search for “green tea” should trigger a green tea-based ad, which links to a green tea landing page. Try to include one of your keywords within the ad when possible.
Check out our posts on strategic ad copy and effective calls-to-action for more tips on writing the best ad copy possible. And, as time goes on don’t forget to start testing your ads!
You should also review AdWords’ editorial policy to see what you can and can’t include in your ads.
Click “done” and then “save and continue”
10. Review and Go!
Congrats! You just launched your first AdWords campaign! Navigate back through your campaign settings, keywords, and ad to make sure everything is set up properly. Your ad might take a few hours to get approved, but at this point, your campaign is live and will start serving ads.
Also, doublecheck to make sure your original “test” campaign is paused or deleted.
Next Steps
Rinse and repeat steps 5 – 10 to continue building out additional campaigns and ad groups. As data starts to build in your account you’ll want to start analyzing it and making changes to optimize performance. Check out my post for some ways that you can start optimizing account performance. Zach’s post on maximizing your AdWords budget also provides some great extra flavor. And let’s not forget the AdWords Setup Checklist to make campaign setup a breeze.
Let us know how your first build goes! Running into pain points? Ask me a question in the comments.