Duplicate Transactions in Google Analytics and Google Analytics 4 Properties: The Check and Fix

Editor's Notes: Google has announced that all Universal Analytics properties must migrate to Google Analytics 4 by July 2023. Companies using Universal Analytics 360 properties have until July 2024, but encouraged to start immediately due to complexity.
For commerce sites, duplicate transactions in Google Analytics are among the most common and most dangerous problems we encounter.
Repeat transactions inflate revenue, skew attribution reports, and create discrepancies with sales records in enterprise resource platforms. In every property type, they compromise the integrity of your data, threaten the effectiveness of your decisions, and undermine your efforts to foster a data culture. In Google Analytics 4 properties, they inflate user lifetime value.
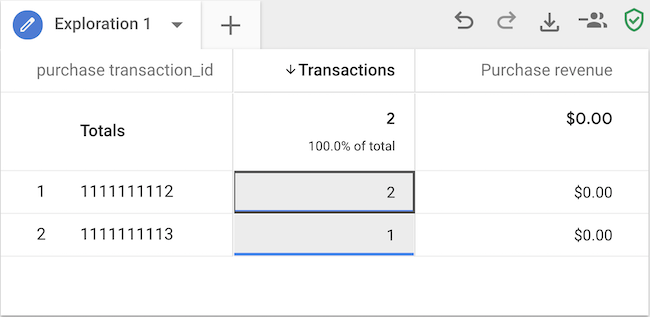
Repeat transactions look like this:
In the screenshot above, you will notice that the count of transactions is greater than one for each Transaction ID. This is a telltale sign that Google Analytics is registering the same transaction multiple times.
When Do Repeat Transactions Occur?
The primary reason why a repeat transaction gets sent is that the hit carrying the transaction, whether it’s a pageview or event hit, is sent two or more times. Often the hit carrying the transaction is triggered on page load. If the page is reloaded, the hit is sent to Google Analytics more than once, registering repeat transactions with the same Transaction ID.
The following scenarios are the most likely culprits:
- Returning to the page via an emailed link or bookmark
- Refreshing the page
- Navigating to a different page and returning via the back button
- Restoring the page from a closed browser session or on a phone
As you implement enhanced eCommerce, test each scenario to make sure you’re taking steps to prevent repeat transactions. (Need a test plan? Use ours.)
How to Check for Repeat Transactions in Google Analytics
Run a Custom Report in Google Analytics
Import Bounteous’ Duplicate Transactions Custom Report or search the Solutions Gallery for Duplicate Transactions. If you cannot import the Custom Report for some reason, create the report with this setup:
| Title | Duplicate Transactions |
|---|---|
| Type | Explorer |
| Metrics | Transactions |
| Dimension Drilldowns | Transaction ID |
| Filters | None |
| Views | (wherever you have eCommerce enabled) |
Adjust your date range to at least a month.
If you have Transaction IDs that register multiple transactions, then you’re either (A) sending duplicate transactions or (B) reusing Transaction IDs. Both issues should be fixed.
Google Analytics 4 Properties Callout: Duplicate Transactions
If you are sending purchase events to a Google Analytics 4 property with a transaction_id event parameter, until eCommerce reports are available, you can use BigQuery to see whether you’re sending repeat transactions.
Here’s a sample query:
SELECT
  COUNT(event_timestamp) AS transactions,
  event_name,
  event_date,
  params.key AS event_parameter_key,
  params.value.string_value AS event_parameter_value --if you’re passing Transaction ID as an integer rather than a string, use params.value.int_value instead
FROM
  `dataset.analytics_123456789.events_*`, --use your table
  UNNEST(event_params) AS params
  WHERE event_name = 'purchase'
  AND params.key = 'transaction_id'
  AND _TABLE_SUFFIX = '20200811'
GROUP BY
  2,
  3,
  4,
  5
ORDER BY
  1 DESC,
  2,
  3
LIMIT 5
The query will output a table. If it includes any duplicate transactions, the “transactions” column will reflect the inflated count:
If you register the transaction_id parameter in the interface, you can also create a repeat transactions Explorer report in the Analysis Hub:
How to Fix Repeat Transactions in Google Analytics
To prevent repeat transactions, put logic in place to make sure the transaction is sent only once.
For example, we often see the receipt page emailed to the customer as confirmation of their order with the ability for the customer to return as frequently as they please, each time sending a repeat transaction. Many people incorrectly assume this is something that is handled through Google Analytics processing, or that if it does occur, it’s a bug. In reality, it’s simply an implementation issue and one that is often overlooked.
Within a session, Google Analytics will filter out repeat transactions provided they have the same information. But if a visitor comes back later that day, or two weeks later, and another transaction is sent, then these transactions will appear in your reports.
We have several options to put logic in place to make sure the transaction is sent only once:
- Server-side logic
customTaskfield- Browser cookie and blocking trigger
- Browser cookie and server-side timestamp pushed to the data layer
As we explain each option, we will assume that you have Google Tag Manager on your site, that you have a receipt page triggering either the pageview or the event carrying the transaction, that you’re using Enhanced Ecommerce, and that the data layer is properly formatted.
A Note About Picking the Right Solution
Choosing the right solution is often a balancing act of time, resources, and urgency. The best solution may not be the easiest or quickest solution, and sometimes it’s necessary to make a change immediately.
As you consider the options below, keep in mind that duplicate transactions don’t only affect Google Analytics. When a thank you page or receipt page is loaded more than once, that often means that all of the tags fire on that particular page. That could mean that transactions are sent to Google Analytics. It could also mean that conversions are sent to Google Ads, social media platforms, and any other conversion tracking that you may have set up. The best solution is extensible to cover multiple tools, analytics, and otherwise.
1. Server-Side Logic
If you have the resources and time to spend, we recommend handling repeat transactions server-side.
Without getting into the details of Intelligent Tracking Prevention (ITP), first-party cookies stored in browsers such as Safari and Firefox expire after just one day. ITP has signaled its intention to limit other client-side storage mechanisms such as local storage, meaning that a server-side approach is the best solution to prevent repeat transactions being sent to Google Analytics and elsewhere.
With this approach, you would add server-side logic to ensure that the eCommerce analytics code is only delivered once to the page. For example, you could use a database to record the transaction and check to see if the eCommerce information has already been sent before sending the hit to Google Analytics.
You could also use a server-side variable that is similarly checked. Another option is to redirect the user away from the receipt page after the eCommerce information has been sent to Google Analytics, thus preventing the user from returning to the page that sends the transaction.
Sometimes a page refresh doesn’t require fully reloading the page from the server. Make sure to test all of the above scenarios.
Google Analytics 4 Properties Callout: Automatically Collected Purchase Events
Google Analytics 4 properties are built on Google Analytics for Firebase. The Firebase SDK collects in-app purchases automatically. A server-side approach is the best way to prevent unexpected transactions from appearing anywhere, including automatically collected purchases in Google Analytics 4 properties.
2. customTask Field
If you’re unable to deploy a server-side option, you can use customTask, a feature of Universal Analytics that lets you do some preprocessing before a hit is sent. We have Simo Ahava to thank for this approach.
In the case of using customTask to prevent duplicate transactions, you would add the customTask to the tag that sends the transaction to Google Analytics. Before the hit is sent, the customTask looks to see if there is a Transaction ID in the request, and if so, it will check the user’s browser storage to see if that Transaction ID has already been sent.
If the Transaction ID hasn’t been sent already, the hit will be sent to Google Analytics and the Transaction ID will be recorded in browser storage to block future repeat transactions. If the Transaction ID has been sent, customTask will prevent the hit.
We won’t go into specifics about how to configure customTask because Simo’s post walks you through it all.
We like this approach because you don’t need to worry about the additional trigger logic associated with the cookie-based option.
Google Analytics 4 Properties Callout: customTask is Not Available Yet
You’ll need to deploy either a server-side solution or a cookie-based solution for Google Analytics 4 properties. If you’re migrating to a Google Analytics 4 property, we recommend future-proofing your implementation now by using the cookie solution (next item).
3. Browser Cookie and Blocking Trigger
Another client-side approach is to use a cookie-based solution to prevent duplicate transactions.
This is a good option if you have access to Google Tag Manager and you don’t have access to a developer.
To implement this solution, when the transaction takes place, you will need to set a cookie that records the Transaction ID. If the Transaction ID already exists, we block the tag from firing. If it doesn’t already exist, we record the Transaction ID in a cookie and prevent future repeat transactions.
This approach is simple, easy, and effective across both Universal Analytics properties and Google Analytics 4 properties. It allows you to reuse this logic for other conversion tags that may be affected by multiple transactions, too.
Step-by-Step Instructions
First, download the Bounteous Duplicate Transaction Blocker Recipe for Google Tag Manager. We’ve done the heavy lifting for you.
This recipe contains everything you need to block repeat transactions in your existing web property. With a few tweaks, you can make it work in your Google Tag Manager container.
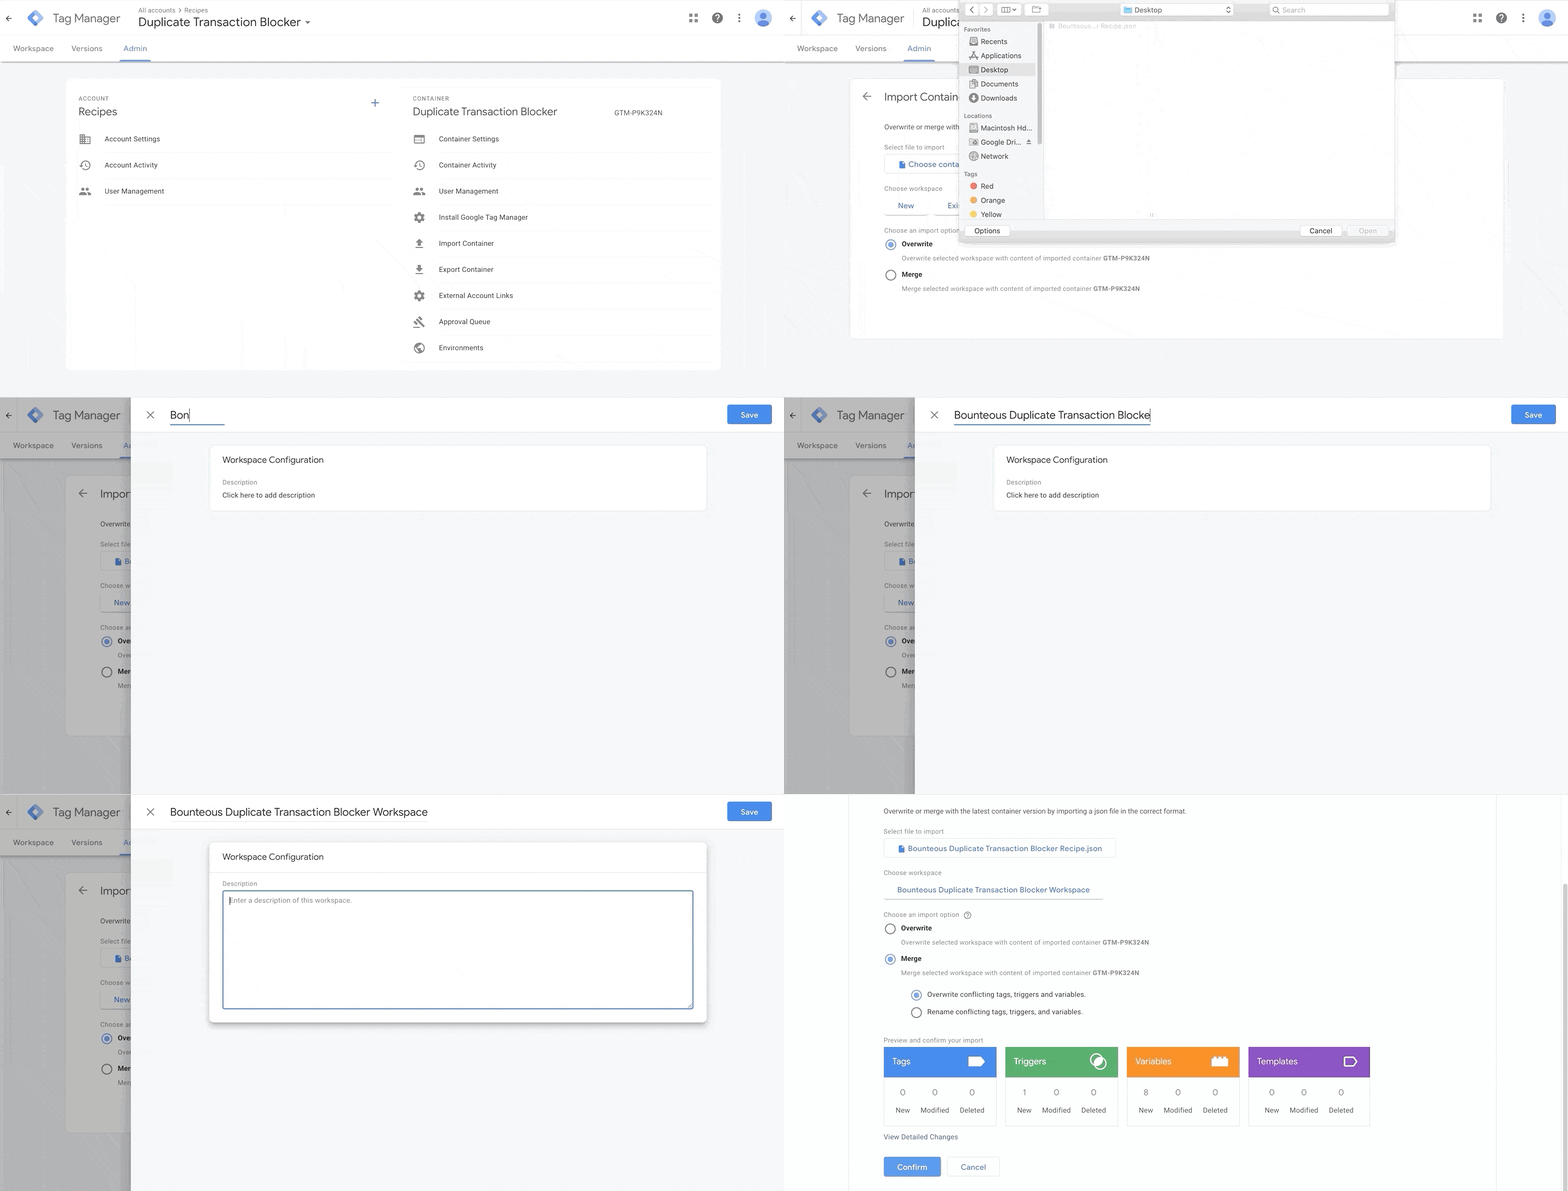
Next, import the recipe:
- In Google Tag Manager, open the container with your existing eCommerce tags
- In the top navigation ribbon, select Admin.
- Select Import Container. Click “Choose Container File” and find the JSON file you downloaded earlier.
- Choose a new workspace. Give it a name and description. Click Save.
- Select Merge. Rename conflicting tags, triggers, and variables.
We recommend opening this blog post in a separate window and looking at the new workspace side-by-side so you understand how all of the pieces work. Let’s review the ingredients in alphabetical order:
Blocking - Transaction Already Fired (Trigger)
This trigger will be used as a blocking trigger on our purchase event (or pageview) tag. You probably already have a trigger for it. For example, if you’re using our Enhanced eCommerce Variable Pack, that trigger is called Pageview - Purchase.
To prevent repeat transactions, you need to add an exception (aka blocking trigger) when the transaction has already been fired. This trigger will do that job for you.
What you need to do: Find your purchase tag and add this trigger as an exception.
Const - Google Analytics Transaction IDs Cookie Name (Variable)
As discussed above, with the cookie-based approach, you’re storing the transactions that have already been fired in a cookie. This variable names that cookie. If, by some chance, you already have a cookie with this name, just rename this variable. Otherwise do nothing.
What you need to do: Nothing.
Const - Transaction ID Separator (Variable)
Because a single user can make multiple separate legitimate transactions, you want to capture all of those Transaction IDs in a cookie and avoid duplicating any of them. The cookie stores them in a single field, and you need a way to separate them. This variable defines the character that delimits the Transaction IDs.
What you need to do: Nothing.
DLV - transactionId (Variable)
You probably already have a variable for Transaction ID. It might be called something else. You need the Transaction ID here for two reasons: first, to save it in the cookie when the transaction initially takes place; second, when future transactions take place, you need to check whether it already exists so you know to block the purchase tag from firing.
Here you have two options. The first and most elegant option would be to edit the Custom Javascript Variables that reference this variable so that they reference your existing variable instead.
Here’s an example of what that would look like for the variable {{JS - checkIfTransactionStored Function}}:
You would need to do the same for the variable for both {{JS - checkIfTransactionStored Function}} and {{JS - Ecommerce Hit hitCallback}}.
If you go this route, delete the recipe’s {{DLV - transactionId}} variable to avoid confusion.
The second option, which is less work but also less elegant, is to use the recipe’s variable and set it to grab the same value as your existing variable. The benefit here is that you don’t have to edit any of the recipe’s custom javascript. The downside is you have redundant variables.
Here’s an example of what that would look like for the {{order id}} variable in the above screenshot.
If you go this route, you’ll want to keep both your existing variable and the recipe’s {{DLV - transactionId}}
What you need to do: Decide on one of the two options. If you choose the elegant route, update {{JS - checkIfTransactionStored Function}} and {{JS - Ecommerce Hit hitCallback}} and delete the recipe’s {{DLV - transactionId}}. If you choose the second but easier option, update {{DLV - transactionId}.
JS - checkIfTransactionStored Function (Variable)
Here you check to see if the Transaction ID is stored in the cookie. Your blocking trigger, described above, uses this variable. If the Transaction ID is stored, then our blocking trigger will be activated, preventing the repeat transaction. If the Transaction ID is not stored, then our blocking trigger will not be activated, allowing the purchase event to be sent.
What you need to do: Nothing.
JS - Ecommerce Hit hitCallback (Variable)
Once the initial transaction happens, you need to provide that feedback to the cookie storing the Transaction ID. This is set as the Field to Set hitCallback on your purchase event tag. Once the hit is sent to Google Analytics, this Custom Javascript Variable function will store the latest Transaction ID in the Google Analytics Transaction IDs cookie.
What you need to do: On your purchase event tag, enable override settings in the tag. Under Fields to Set, add a field name hitCallback with a value {{JS - Ecommerce Hit hitCallback}}.
Google Analytics 4 Properties Callout: Fields to Set in your Configuration Tag
If you’re preventing repeat transactions in your Google Analytics 4 property, you need to update that purchase event tag too.
Unlike Universal Analytics tags, Google Analytics 4 properties event tags do not allow for overriding settings. Instead, you need to create a new Google Analytics 4 properties config tag, change your purchase event tag to reference that tag, and then set the field. Trigger the new config tag when your order confirmation page loads.
One more note: because Google Analytics 4 properties uses gtag.js instead of analytics.js, you need to use the field event_callback instead of hitCallback.
Once you’ve created the config tag, reference it in your purchase event tag:
JS - Google Analytics Transaction IDs Cookie Getter (Variable)
This variable works in tandem with the next one, {{JS - Stored Transaction IDs}}. It fetches the current value of the Transaction ID cookie.
What you need to do: Nothing.
JS - Stored Transaction IDs (Variable)
This variable returns a prefix-separated string of Transaction IDs.
What you need to do: Nothing.
JS - Transaction Was Never Fired Before (Variable)
This variable uses {{JS - checkIfTransactionStored Function}}. It returns the inverse of that variable. It gets referenced by the blocking trigger.
What you need to do: Nothing.
That’s everything in the recipe! To summarize your next steps:
- Download and import the recipe
- Add the blocking trigger to your purchase tag
- Update
{{DLV - transactionId}}to grab your actual Transaction ID - Update your purchase tag and set the field
hitCallback
You’re ready to publish your new workspace.
4. Browser Cookie and Server-Side Timestamp in the Data Layer
ur final and recommended client-side approach is an upgrade of #3, introducing a fallback to our solution. Here, we use a cookie plus a server-side timestamp pushed to the data layer. Like #3, this solution works for both web properties and Google Analytics 4 properties.
A Two-Pronged Approach
Cookies by themselves can filter out most duplicate transactions but can be less than 100 percent effective due to privacy settings and user preferences. Someone can clear their cookies, browse in incognito mode, or pull up the same receipt on two different browsers/devices.
Thus, when a completely server-side solution isn’t available, we recommend using a timestamp pushed to the data layer in addition to the cookie to help determine the age of the transaction. This timestamp should come from the page immediately before the receipt page, so very little time should pass. You can set it to 15 or 30 minutes to be safe, just in case, there’s some kind of validation check or third-party system before they hit the receipt.
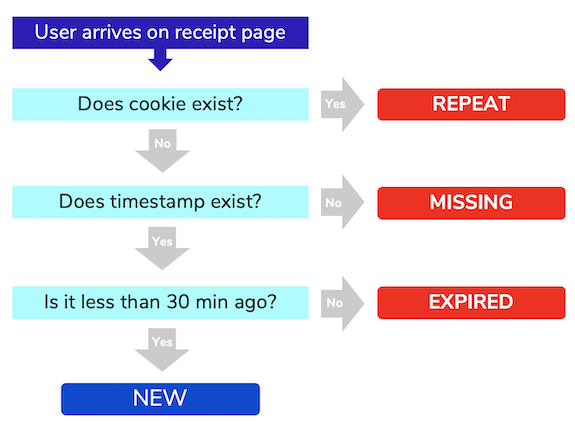
Here is the general user flow that it follows: check to see if a cookie with this Transaction ID exists. If it does, then it’s a repeat transaction, and it won’t send the eCommerce information to Google Analytics.
If there is no cookie, check the timestamp. If there is no timestamp, then it’s days or weeks old, from before the date you put our new process went into place, so the transaction will be labeled missing
If there is a timestamp, how old is it? If it’s more than 30 minutes old, it’s an old transaction and it will be labeled expired.
Lastly, if there’s no cookie and it’s been less than 30 minutes, call this a new transaction. Set a new cookie on this browser/device and then proceed with the checkout as normal.
Data Layer Push: Add timeStamp to the Data Layer Upon Page Load
First, you need the transaction timestamp available on the order confirmation page. The solution checks the age of the transaction to see if it’s labeled repeat, missing, expired, or new. It depends on the timestamp to do so.
<script>
  dataLayer.push({
    'timeStamp': '12345' // replace with the timestamp of the transaction (not of the page load!)
  });
</script>
What you need to do: Copy the code sample above and give it to your developer to push the timestamp of the transaction to the data layer.
DLV - timeStamp (Variable)
You need to be able to access the timestamp in Google Tag Manager.
| Variable Name | DLV - timeStamp |
|---|---|
| Type | Data Layer Variable |
| Data Layer Variable Name | timeStamp |
| Data Layer Version | Version 2 |
| Set Default Value | Leave unchecked |
| Format Value | Leave unchanged |
What you need to do: Create the variable as per the above specifications.
CHTML - Duplicate Transaction Checking (Tag)
Here is where the magic happens. This Custom HTML will take care of all of the work, checking for cookies, setting cookies, and checking the timestamp. The result is then pushed to the data layer with a custom event.
<script type="text/javascript">
function checkCookies() {
    var cookievalue = "test";
    var cname = "";
    cname =  "TID_{{DLV - transactionId}}=";
    var ca = document.cookie.split(';');
    //Checks for existing Cookie
    for(var i=0; i<ca.length; i++){
      var ck = ca[i].trim().toString();
      if (ck.indexOf(cname)==0) {
          cookievalue = ck.substring(cname.length).toString();
          break;
      };
    };
    // Cookie is found, so repeat transaction
    if (cookievalue>0){
        dataLayer.push({'transactionType':'repeat'});
        dataLayer.push({'event':'transactionChecked'});
    } else {
        //Check time as a backup
        var validateDate = {{timeStamp}};
        var currentTime = new Date().getTime();
        if (validateDate > 0) {
            var minutes = Math.round((currentTime-validateDate)/1000/60)
            //Set expiration time for new cookie
            var d = new Date();
            d.setTime(d.getTime()+(365*24*60*60*1000));
            var expires = "expires="+d.toGMTString();
                if(minutes < 30) {
                    //less than 30 minutes, so good transaction!
                    document.cookie = "TID_{{DLV - transactionId}}=" + validateDate + "; " + expires;
                    dataLayer.push({'transactionType':'new'});
                    dataLayer.push({'event':'transactionChecked'});
                } else {
                    //older than 30 minutes, so expired transaction
                    document.cookie = "TID_{{DLV - transactionId}}=" + validateDate + "; " + expires;
                    dataLayer.push({'transactionType':'expired'});
                    dataLayer.push({'event':'transactionChecked'});
                };
        } else {
            //no timestamp found, so must be old
        	document.cookie = "TID_{{DLV - transactionId}}=" + currentTime + "; " + expires;
        	dataLayer.push({'transactionType':'missing'});
        	dataLayer.push({'event':'transactionChecked'});
        };
    };
};
checkCookies()
</script>
What you need to do: Create a Custom HTML tag. Copy the above code snippet and paste it into the tag. Set the tag to trigger on your order confirmation page.
Note that the script references the variable {{DLV - transactionId}}. Recall from earlier that you had the option of retaining this variable or replacing it with your existing variable for Transaction ID. If you replaced it earlier (for example, our {{order id}}), you need to update this snippet to likewise reference your existing variable.
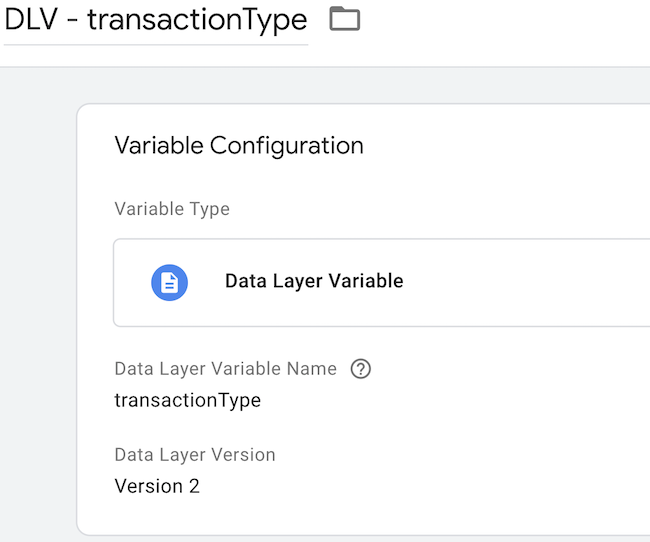
DLV - transactionType (Variable)
The Custom HTML tag pushes values to the data layer, including transactionType. We need to be able to grab that value and add it as a condition on your existing trigger.
| Variable Name | DLV - transactionType |
|---|---|
| Type | Data Layer Variable |
| Data Layer Variable Name | transactionType |
| Data Layer Version | Version 2 |
| Set Default Value | Leave unchecked |
| Format Value | Leave unchanged |
Once you’ve created the variable, find the trigger that currently fires your purchase event tag. You need to add a condition so that it fires only when transactionType is new.
For example, here we have a Custom Event trigger that previously fired on All Custom Events. Now we’re editing this trigger so that it only fires when {{DLV - transactionType}} equals "new."
| Trigger Name | (Whatever is currently firing your purchase event) |
|---|---|
| Trigger Type | (Whatever is currently firing your purchase event) |
| This trigger fires on | Some conditions |
| Fire this trigger when all of these conditions are true | DLV - transactionType equals new |
What you need to do: Create the variable as per the specifications above. Edit your purchase event trigger to look for {{DLV - transactionType}} equals new.
Which Approach Should I Use?
Our viewpoint is that server-side is the best approach for the reasons noted in the introduction of this article.
If you are choosing between the client-side options presented here, with the advent of Google Analytics 4 properties, we see the cookie-based approach with a transaction timestamp as the natural choice because it makes it easiest to run concurrent implementations of existing web properties and Google Analytics 4 properties, and we want the transition to be as seamless as possible. Plus the blocking trigger logic can be applied to other conversion pixels.
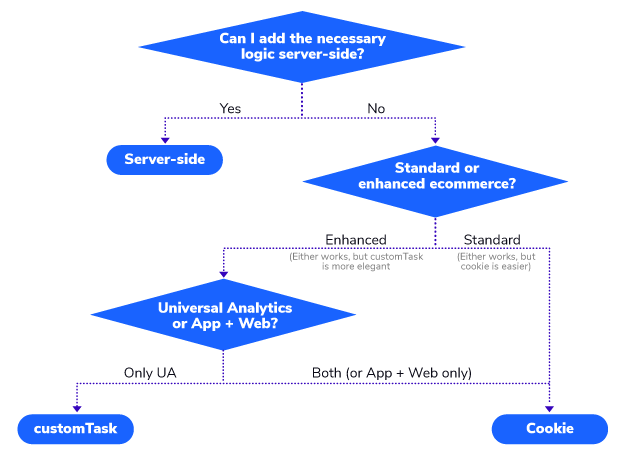
Here’s a flowchart that summarizes how we would make a recommendation:
Start with asking whether you can add the necessary logic server-side.
If "yes," use that approach.
If "no," your approach will depend on whether you're using standard eCommerce or enhanced eCommerce.
If you're using standard eCommerce, the browser cookie approach is probably the easier of the two remaining choices because you don't need to worry about the logic for your blocking trigger in customTask.
If you're using enhanced eCommerce, your approach depends on whether you're sending transactions to a Google Analytics 4 property. If so, the cookie-based solution is best.
If you're using only a web property with no plans to set up a Google Analytics 4 property, customTask is the way to go.
But, we’re advocating that everybody set up a Google Analytics 4 property in parallel with their existing web property, so consider the longevity of any decision to forego the cookie-based solution.
Parting Thoughts
We recommend setting up a test property to receive these eCommerce transactions until you're sure that this is working properly, then make the switch at a time when few people are using the site.


