How To Build AEM Projects With Maven
Maven is the tool of choice for talking between your codebase and your AEM instance. It allows automation of packaging both content and code. It is a very helpful tool, but it is also a very expansive tool, which leads to complexities. Maven allows us to push code to our AEM instances with little effort through the use of build profiles. AEM is configured already with services that allow users to hook Maven up to their instance to build code. There are certain URLs inside of AEM that Maven uses to push content during the build process, and AEM receives the content and ingests it properly. It is an everyday tool for developers, and should be looked at closely and studied to some degree. This article goes over the basics of Maven and how it interacts with AEM.
Bonus: At the end is a collection of troubleshooting tips.
Note: All of this material assumes the usage of IntelliJ, but there are other options and integrations with AEM, such as the AEM Dev Tools for Eclipse.
Creating a new maven project
The AEM Maven Archetype lets you easily start a new project that’s ready to build to your local AEM instance. It does essentially all the heavy lifting for you. For those of you who have worked with already established AEM projects, you may recognize the structure that is automatically created by the archetype.
If you have to create a new project meant to be built to an AEM instance, it is easiest and most consistent to start with the Adobe Maven Archetype. From personal experience, I recommend creating the project via command line using the instance of Maven you have installed locally. The only reason behind this is that when you create the project using this archetype inside of IntelliJ it creates the modules for the separate areas of code, but it doesn’t treat them as modules or recognize them as such because they were added after the project was created. I would create the project via command line then ‘Import Project from Existing Sources’ inside of IntelliJ.
Something to keep in mind is that starting the project does require properties to be added that are used in the creation process.
| Property Name | Sample Property Value | What the property value means |
|---|---|---|
| groupId | com.bounteous | The Maven group ID – generally the parent package |
| artifactId | bounteous | The Maven artifact ID – generally the generic name of the project (usually the customer name) |
| version | 1.0-SNAPSHOT | The Maven version number – used in referencing this project as a dependency & keeps track of the current version of the project |
| package | com.bounteous.example | The location of all the Java code stored in the ‘core’ module |
| appsFolderName | bounteous | The name of the folder under the ‘/apps’ directory that will house all the components/templates/configs |
| artifactName | Bounteous | The actual name of the project |
| componentGroupName | BOU | The AEM component group that will be assigned to the sample component created by the Maven Archetype |
| contentFolderName | example | The name of the folder beneath ‘/content’ inside of AEM (this is generally unused in projects – content is managed inside of AEM itself, not the codebase) |
| cssId | bou-css | The project specific prefix used in the Archetype generated CSS |
| packageGroup | bounteous-pages | The group name of the content package (generally unused because we don’t keep content in the repo) |
| siteName | Bounteous | The name of the AEM site (again generally unused for the reason above) |
Build profiles – How they work and where they are stored
Something we’re all very familiar with is building code to our local AEM instances using predefined build profiles. Some of us may not know exactly what’s happening when we build the code, i.e. how it knows where to build the code and what to build. All of the information about a project – specifically how it relates to Maven – is stored inside what’s called a POM file. A POM file is just an XML file storing information that Maven ingests and uses to run its processes (such as building code). These POM files house the build profiles that we reference in the Run Configurations we create inside IntelliJ, see screenshot below:
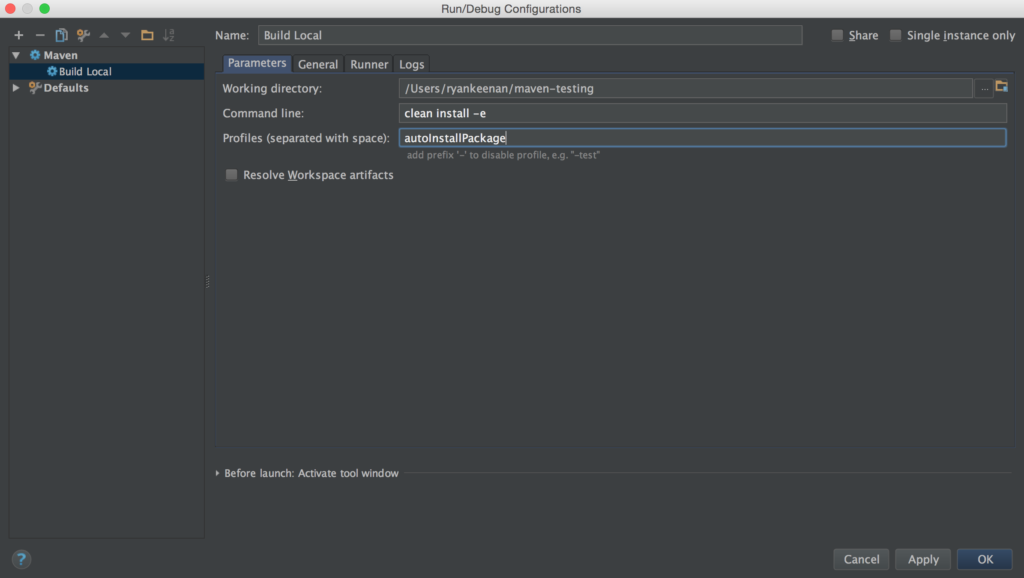
Common additions to run configurations are ‘-e’ to display error messaging if an error occurs and ‘-U’ which forces an update of all the dependencies associated with the project. When setting up run configurations it should be noted that most established projects will have their own setup for how the project should be run. Generally, if there are any special instructions on how to build the project, you can find them in the ‘README.md’ located the root folder of the project. One example of this is if the project has custom Maven settings that need to be applied, the ‘settings.xml’ file needs to be referenced in the ‘Command Line’ section of the run configuration. Generally any extra settings in the ‘settings.xml’ file will be locations of other external Maven “Nexus”s. These are just URLs that house the repository (location of all the Maven dependencies).
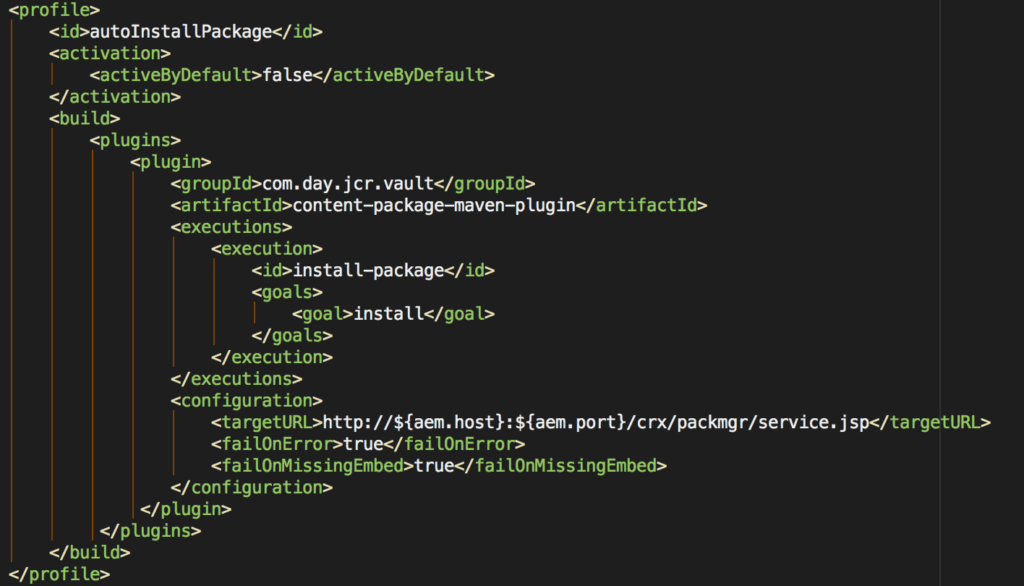
The run configuration defined above uses a profile of ‘autoInstallPackage’. Below is how that build profile is defined inside the POM file for the ui.apps module. The variables used in the <targetURL> tag are defined above as variables inside the POM. In this instance they are just pointing to ‘localhost’ for the host name, and ‘4502’ for the port. These are used for the readability of the POM for other users. For example, some customers do not have descriptive server names and instead use IPs. In the build profile you’ll see ‘${staging.publish.host}’ instead of ‘10.1.18.12’.
Typically the structure of the project can be simplified to the two most integral Maven Modules – ui.apps and core. These two modules contain everything that makes your components act and look the way they do inside of AEM. The ‘core’ module houses the Java code that drives the server-side functionality while the ‘ui.apps’ module houses the actual visible/client-side functionality of the components. Each of these modules have their own distinct POM files that define what should happen when their respective modules build.
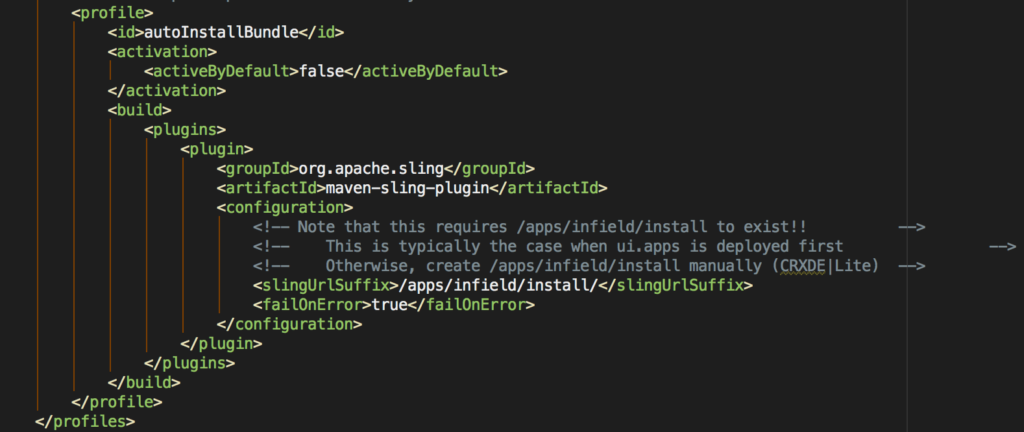
The way the POM file in the ‘core’ module works is that it creates an OSGi bundle that’s uploaded to AEM as a jar file (typically located at ‘/apps/<project>/install’). Below is a screenshot of the build profile created by default by the AEM Maven Archetype. In it you can see the profile ID defined which is you use when creating the run configurations in IntelliJ.
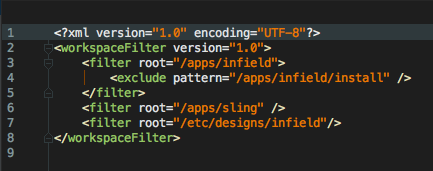
The difference between the ‘core’ module and the ‘ui.apps’ module, when it comes to building the code, is that the ‘core’ module builds a jar file to upload as an OSGi bundle. The ‘ui.apps’ module compiles the module into a zip file that is then uploaded to the Package Manager inside of AEM. The way the package defines what is built and uploaded in the package is in the ‘filter.xml’ file inside the ‘ui.apps’ module. Below is a sample configuration created by default with the AEM Maven Archetype. You can see the filters define what directories get built into the package uploaded to AEM. If you have created a new directory and it is not included in your filters, the changes won’t reflect inside of AEM.
Maven Modules
Thus far we have talked vaguely about Maven modules, but these are very important pieces to the Maven puzzle. Typically a project is segmented out into separate Maven modules representing different areas of code or even different applications within AEM. Each module has its own POM file, and generally can house their own build profiles. A very convenient feature of multi-modular Maven projects is that you can build only the code you want when you perform a build. You can have a build profile that builds just one module, or you can have build profiles in different modules with the same name so they get triggered at the same time. It’s generally best practice to modularize your project as much as necessary, but not excessively. If there are applications that are distinct from each other (such as a separate application that will reside within AEM but be hosted on a different domain) then it would be a good thing to keep your code bases distinct.
As with many things in programming, sometimes the easiest route to take is Copy/Paste. This is the case in this instance as well. If creating another module to build a separate application (via AEM package) is needed, the best course of action may just be to copy the existing apps module and rename it.
Maven Dependencies
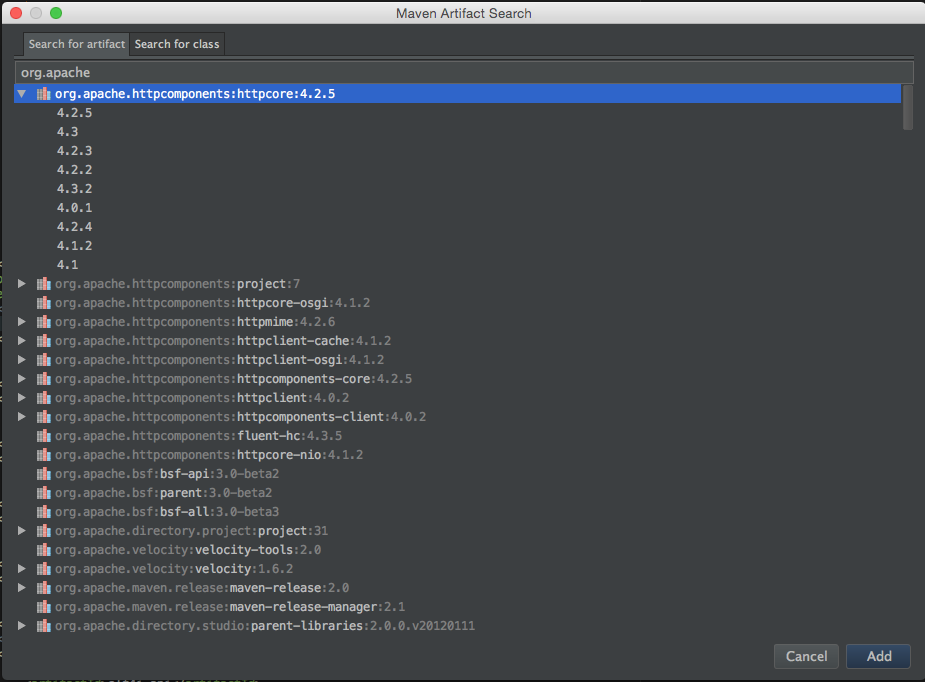
Maven is an extensible tool. It has some important tools built in, but there are many other tools that you may want for your project. We include these in the project via Maven dependencies. Dependencies can be quite tricky sometimes, especially in the context of AEM. AEM obviously has AEM specific libraries loaded into the instance already. In that case the ‘scope’ of the dependency is ‘provided’ by AEM. Generally speaking, if you have an extra library you want to include in your project, you’ll inject a new Maven dependency. This can be done in various ways, such as Copy/Pasting another dependency and grabbing the specific info from the project you’re trying to import. However, the easiest way to do it is inside of IntelliJ. It has a tool built in so you can generate a dependency from just the artifact ID. It shows all the available versions of the Maven artifact, and you just select the one most relevant to your situation (generally the newest) and it includes it in the POM file for you automatically:
Helpful Maven/AEM Troubleshooting Tips
- A POM file generally defines the Snapshot version of the code (for OSGi bundles) and AEM prioritizes the highest version number, so even if you build newer code to your AEM instance, your code may not act the way it should because AEM is using a different version of your code. The best way to combat this is to A) increment the version of your build to have it hold priority OR B) delete the newer versions of the OSGi jar (stored at ‘/apps/<project>/install’) – Note: sometimes after deleted old jar files in the install folder, a restarting of the instance is required.
- Unfortunately Maven doesn’t always know if the package successfully installed inside of AEM, it just looks to see if the package was uploaded successfully. If you think changes that you made should be showing up in your instance but aren’t, something you can do is go to the package manager inside of AEM (/crx/packmgr/index.jsp) and manually reinstall the package your Maven build uploaded. There’s a more verbose logging inside of AEM, so you can know better if something is wrong inside the package Maven installed for you.
- If you’ve created a new directory, for instance a new configuration directory, and you build your package to AEM via Maven build, but you aren’t seeing your config file uploaded, something you should do is go to the package manager (/crx/packmgr/index.jsp) and check the filters on your package. If you don’t see your filter including that directory, the next step is to check the filter.xml of your project to ensure that your package actually has that directory as a filter, otherwise it will not be uploaded to the package and you won’t see your changes reflected in AEM.
- If you’re getting an error on page load saying a certain Java class you’ve created ‘cannot be found’, then somewhere to check if your bundle installed on your instance correctly is in the Felix Console (/system/console/bundles). In this console you can check the status of your bundle (Installed/Active). If your bundle is not active you can try to manually activate it from this console. If that doesn’t work you can open up the definition of the bundle to see if some imports are not resolving that would not allow the bundle from activating.
- If you’re having dependency issues, you can always add new imports into your POM files with ‘Cmd + N’ when inside the POM file itself in IntelliJ. If that doesn’t resolve your issue, Maven has a dependency plugin that can come in handy when you need to force a purge of your local repository and re-download dependencies.
- Something else available to debug your dependencies is the ‘depfinder’ inside of AEM. It’s located at ‘/system/console/depfinder’. The way it works is if you know there’s a certain path you have to include as a maven dependency, you can go into this tool, paste the path to the file (i.e. ‘com.example.File’) and it gives you the full markup needed to add the dependency to your POM file.
- If you’re having build issues, something to check is the README.md file of the project to see if there are project specific requirements that aren’t being met in your current run configuration.
News & Insights
Related Perspectives