The Way To Personalized Content With Adobe CQ5 ‑ Part 1
Here at Infield Digital, we’ve been working a lot with content personalization, especially using Adobe CQ5 (a.k.a. AEM).
Personalized content is a growing trend, and lately, we’ve put a lot of effort in leveraging CQ5’s built-in tools, as well as developing custom components that can consume rich marketing data from third parties. These components — out-of-the box or custom—are a real complement to an enterprise CMS when they are well used and well-integrated. In addition, they can be especially useful to content authors and marketers when used to visualize and simulate different segmented experiences.
To kick off a 3-part series on content personalization in CQ5, I’ll start by answering a simple question: How can I personalize my content depending on search engine keywords?
Let’s say I have an online outdoor clothing store built on CQ5 and I want to highlight the sunglasses section of my catalog. I have great sunglasses but I suspect this product section is too deep in the navigation, so visitors almost never find it. My plan is to create a personalized content that links to the sunglasses section on my homepage that will display if the visitor comes to the site via a specific search for sunglasses in a search engine.
Are you still there? Great! Let’s keep going. I will assume you are familiar with most of the Adobe CQ5 concepts and if not, feel free to click on the links mentioned in the “resources” at the end of this post:
Step 1: Add the “keyword” property to the client context
Client Context is great and you will hear it a lot about it during this journey. It is basically a set of different data collections from different sources that will be used to test segments and personalize content. I now edit the default client context of my website, adding a “Generic Store Properties” component from the sidekick. I then edit it and select the “Surferinfo” store and then add the “keywords” property item. At this point, it looks like this:
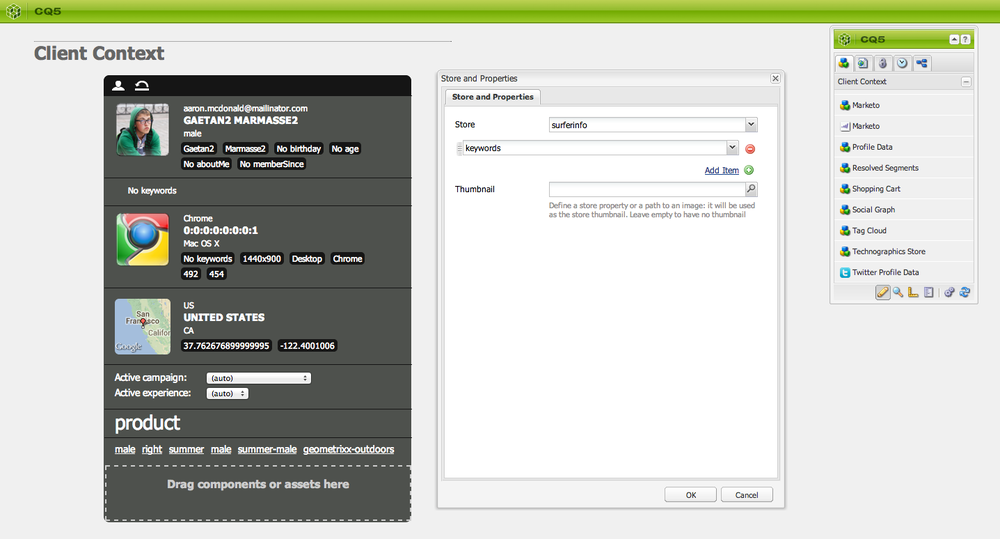
I can now validate and close the page. The referral keyword property is now available for me so I can test personalizing content in CQ5.
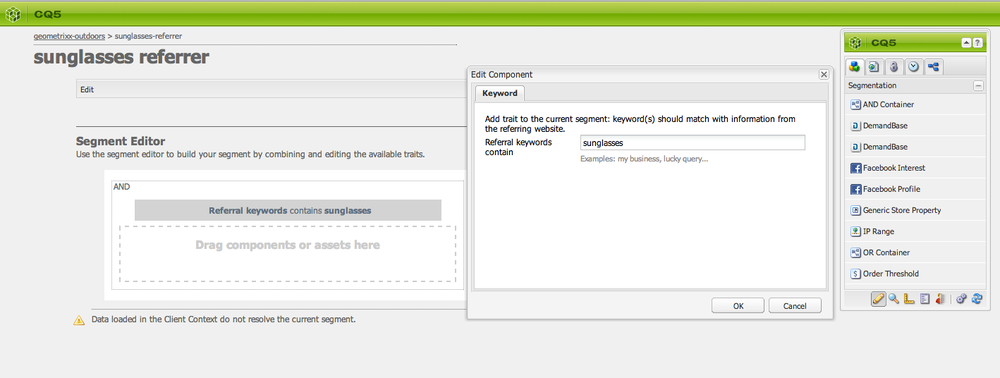
Step 2: Build a segmentation rule
Now I’m going to build a segmentation rule that will test if the keywords matches a value. I create a segment page in /etc/segmentation/geometrixx-outdoors/ and open it. I start with an empty rule in the segment editor, then drag and drop the out-of-the-box “Referral Keywords” component from the sidekick to type “sunglasses” in the input field.
It should now look like this:
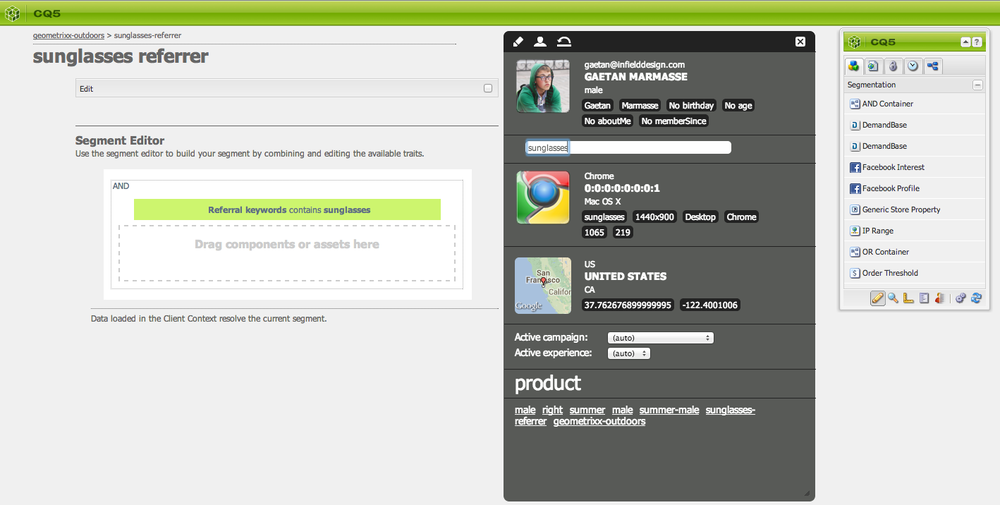
Notice the grey box on the left and the text below saying “Data loaded in the Client Context do not resolve the current segment.” Well now, if you open the client context from the sidekick, you are able to play with the keyword value and see if it matches your segmentation rule. The box will turn bright green if I type in “sunglasses” in the client context property like this:
Sweet, right? And that is just the beginning.
Step 3: Getting it all together
In this final step, I’ll explain how to create a personalized experience and interact with it as an author or marketer.
On the homepage of the website, I will now:
- create an out-of-the-box “teaser” component (“Segmentation” component group) and link it to an existing campaign
- create an experience element inside what is now called, “sunglasses referrer campaign” in the Campaign manager
- assign the sunglasses segment previously built (remember Step 2?) to this experience in the page properties
- tailor the experience directly in the CMS, for instance, adding a pretty image that links to the sunglasses section
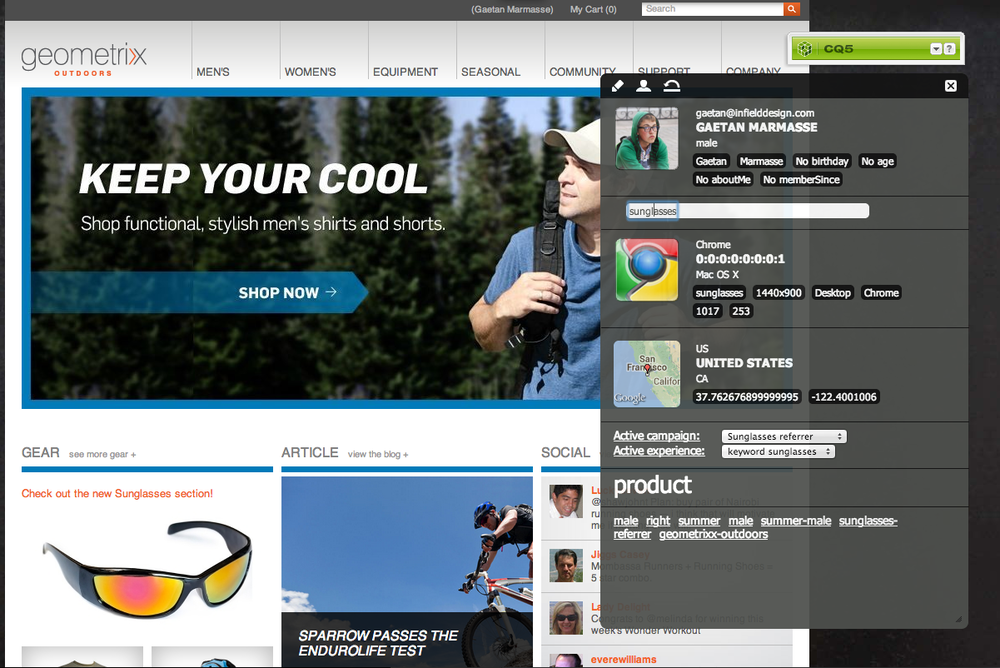
Now, when this is all saved and hooked up together, you can actually render the homepage as any regular visitor. But, now, you also can open the client context from the sidekick and change the keyword value as the property is available here (remember? step 1?). If you play with it and enter “sunglasses”, you are simulating a visitor coming from a search engine and having that word as part of the searched keywords and…

Magic! the personalized experience fades in:
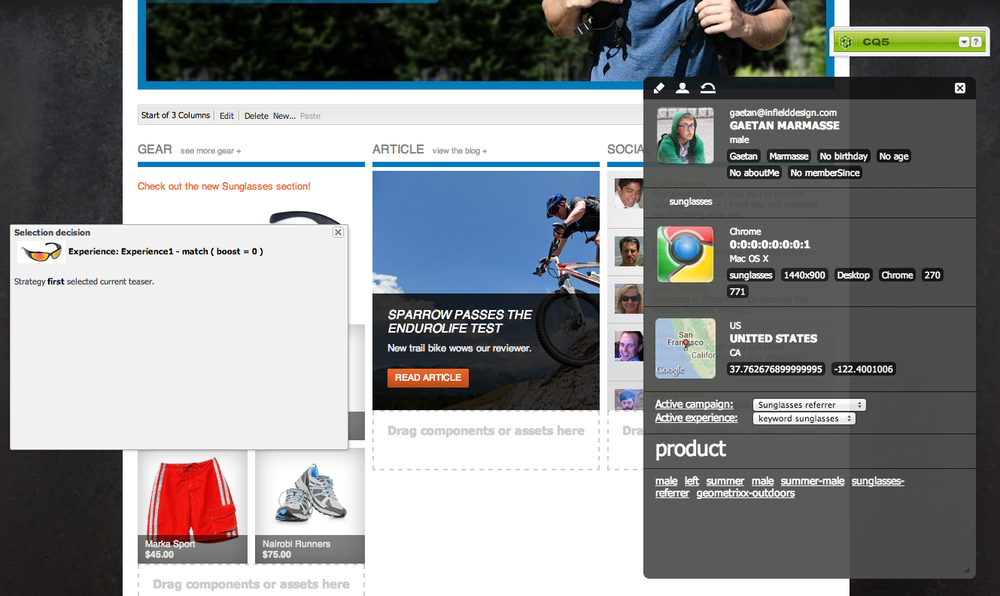
And CQ even explains the decision logic:
I’ve omitted a lot of details here since there is so much to say about the campaign manager in CQ5, far more than could fit into one blog post! Stay tuned for more detail, and in the meantime, check out the documentation via the links listed at the end.
That is it for this first chapter and I hope it just got you excited for the next two. But hey, because you made it to the end of this post, here is a quick sneak peek of the following parts:
Chapter 2: B2B personalized content using Demandbase data in CQ5
Chapter 3: Content personalized to the person using Marketo lead data in CQ5 (i.e pre-populated forms, client’s own sales contact person)
And if you tried your hand at personalizing content, tell me how it went? Any questions or new discoveries?
If you want to know the concepts:
CQ5 Campaign Management: dev.day.com/docs/en/cq/current/wcm/campaigns.html
CQ5 Client Context: dev.day.com/docs/en/cq/current/administering/client_context.html
News & Insights
Related Perspectives