Single Sign‑On (SSO) Integration With Okta In AEM 6.3

Why use single sign-on?
Single sign-on (SSO) plays a very important role in larger organizations which have multiple applications and require authentication to access them. So instead of having the user remember a username and password for each application, SSO helps the user by only needing one set of login credentials to access multiple applications. Not only does it help the user to use one set of credentials for multiple applications, it also eliminates the authentication when the user switches between the applications during the same session.
There are multiple identity providers that help in achieving single sign-on. In this post we will use Okta as our identity provider. SAML bridges the gap between Identity provider (Okta) and Service Provider (AEM). SAML (Security Assertion Markup Language) acts as mediator between IdP and SP to exchange authentication information in the form of a SAML response. AEM by default provides a SAML authentication handler. This handler provides support for the SAML 2.0 Authentication Request Protocol (Web-SSO profile).
To achieve Single Sign-On with AEM we need to follow a series of steps outlined below…
1) Setting up the Identity Provider
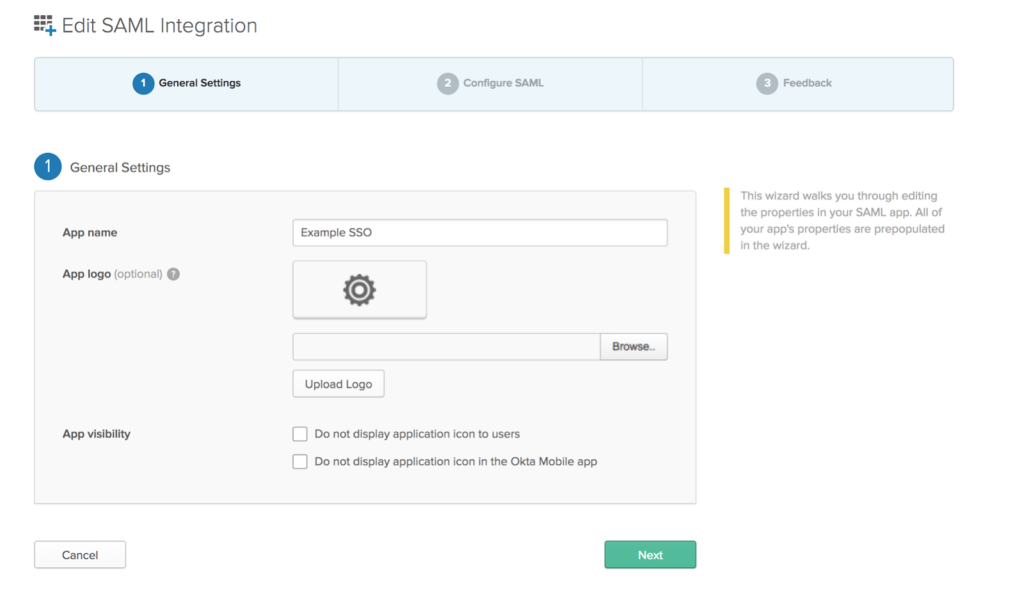
a) Create a new application in Okta or any other identity provider accordingly (steps might differ for a different IdP)
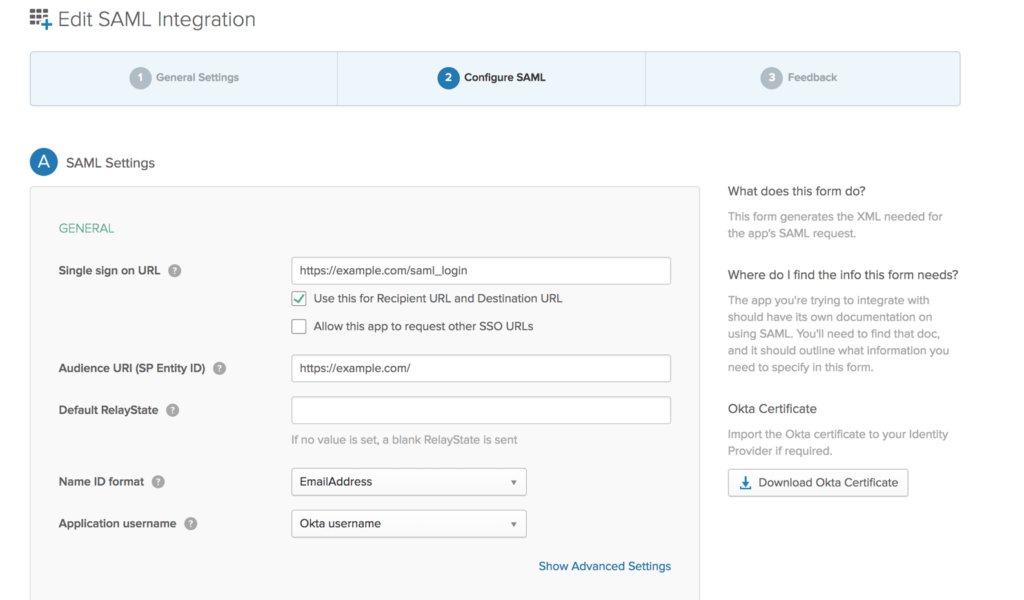
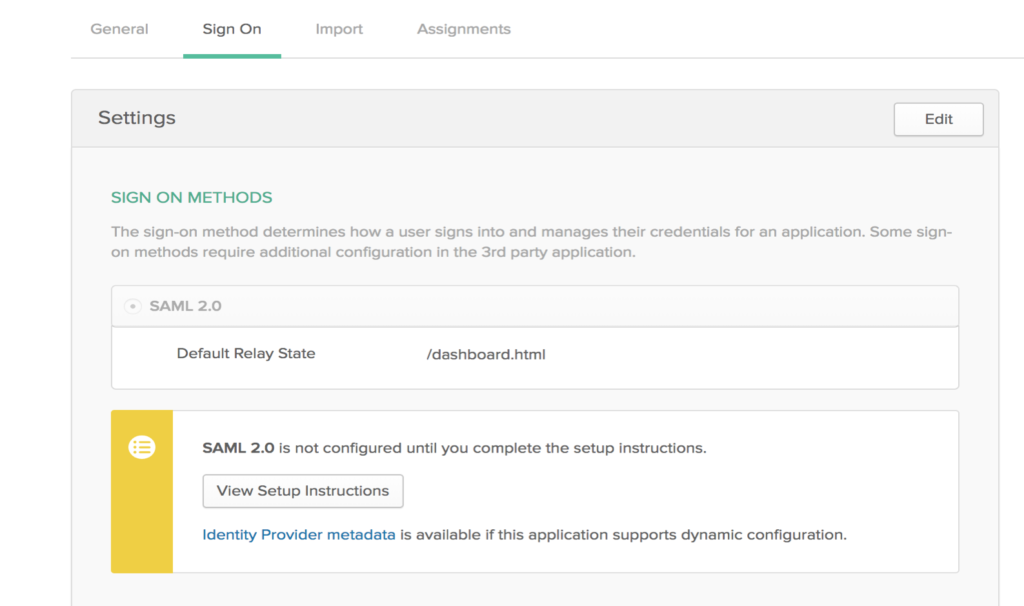
b) Configure SAML settings in Okta app, the single sign on url should always end with saml_login
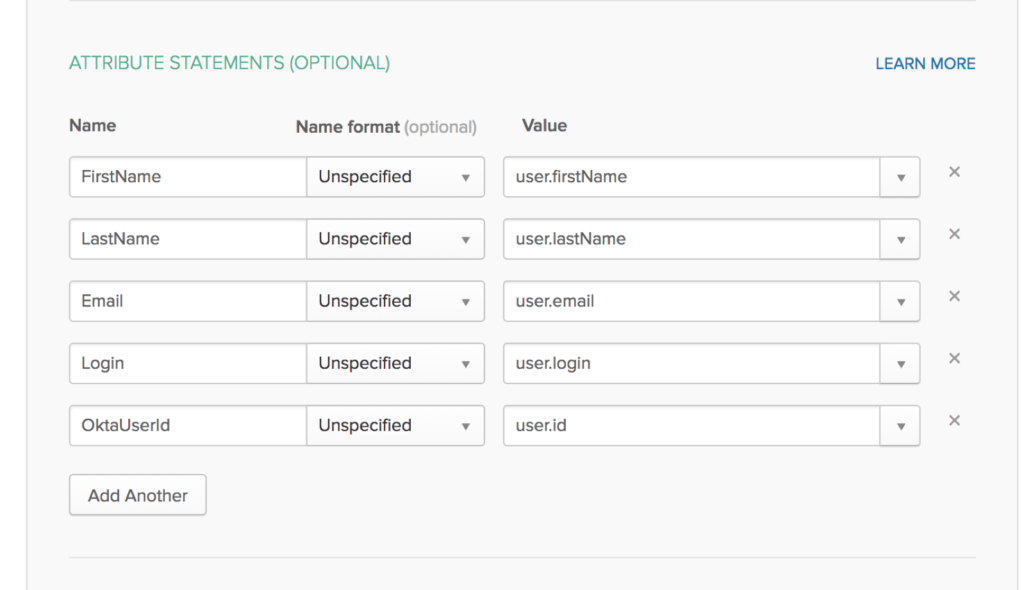
c) As per the requirement, configure this section. The attributes will be part of the SAML assertion.
d) Once the application is setup, click on the setup instructions to fetch the IdP url and download the IdP certificate.
2) Setting up keystore and truststore in AEM
The SAML assertions are encrypted and we need to add the IdP certificate that was downloaded from the Okta app in the previous step. The instructions has been provided in Adobe’s official document. https://helpx.adobe.com/experience-manager/6-3/sites/administering/using/saml-2-0-authenticationhandler.html
As instructed in the document, go over the below two steps to set up the truststore and keystore:
a) Add the IdP Certificate to the AEM TrustStore
b) Add the Service Provider key and certificate chain to the AEM keystore
To avoid having different cert aliases for each of the publish instances, perform step ‘a’ in the author instance and replicate the trust store node (/etc/truststore/truststore.p12) to all the publish instances. Before replicating the truststore.p12 file, be sure to create the truststore on the publish instances first, and be sure to use the same password as the author instance.

But make sure to create the keystore in all the publish instances individually as shown in step ‘b’
3) Configuring the SAML authentication handler
As we know, AEM by default ships with a SAML authentication handler which provides support for the SAML 2.0 Authentication Request Protocol, configuring it is very simple. It can be either configured via run mode specific folder ex:config.author or through the Felix console (/system/console/configMgr)
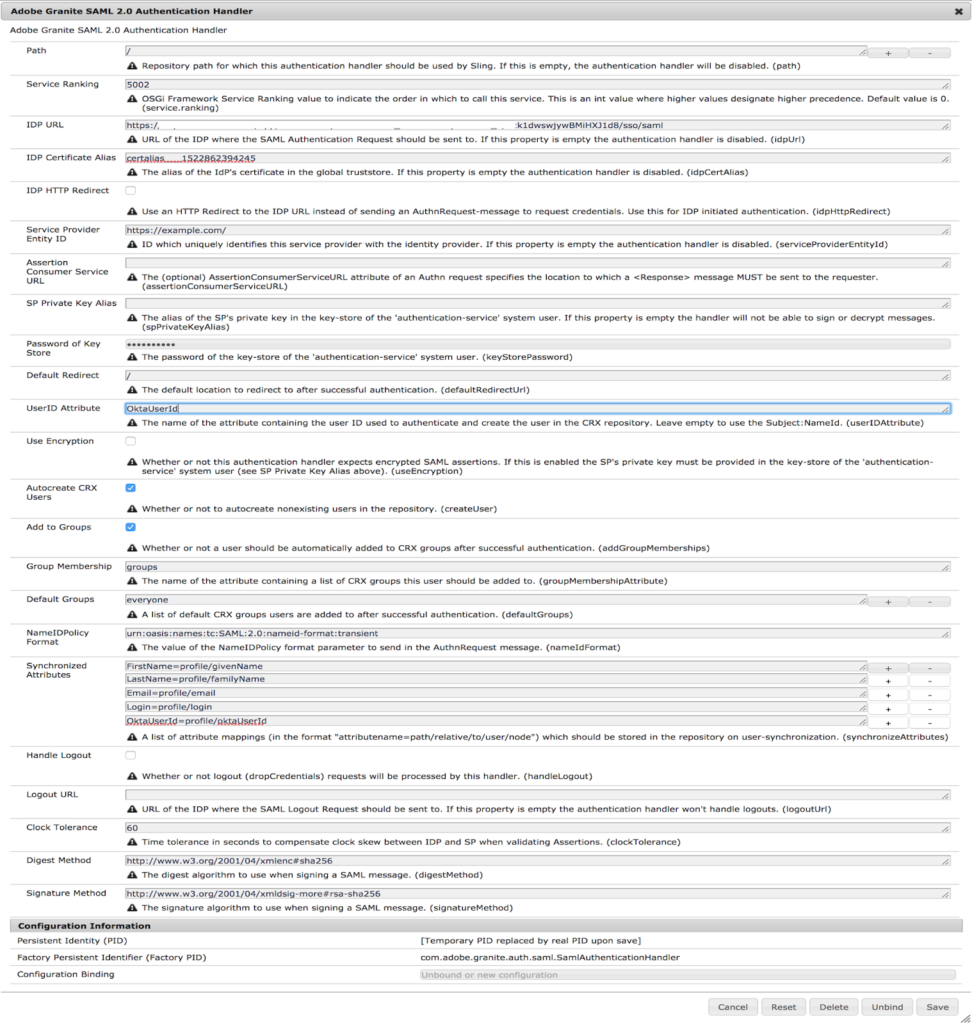
Below are some of the fields which if not configured or left empty will disable the authentication handler.
Path: This is the repository path for which this authentication handler should be used.
Note: During the Okta app configuration in step 1, the single sign on url path should match with this field
Path: /
Single Sign On Url: https://example.com/saml_login
Path: /content/testpage
Single Sign On Url: https://example.com/content/testpage/saml_login
IdP Url : URL where the SAML Authentication Request will be sent. This can be obtained from Okta app in step 1
IdP Certificate Alias: This is the alias of the IdP’s certificate in the AEM truststore as configured in step 2
Service Provider entity ID: This is a unique ID which should match with the SP entity Id as configured in the Okta app in step 1 (Audience URI)
Password of Keystore: authentication-service system user’s key store password configured in Step 2
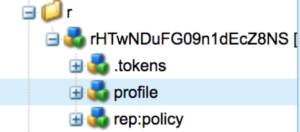
Synchronized Attributes: These are the attribute mappings configured in the Okta app in step 1. The attribute values will be passed through SAML response to AEM during the SAML assertion.
Ex: FirstName = profile/giveName
Value present in FirstName will be saved under the user’s profile node as a property

As mentioned earlier, the SAML authentication handler can be configured specific to run modes like other services. Below is an example configuration:
<?xml version=”1.0″ encoding=”UTF-8″?>
<jcr:root xmlns:sling=”http://sling.apache.org/jcr/sling/1.0″ xmlns:cq=”http://www.day.com/jcr/cq/1.0″
xmlns:jcr=”http://www.jcp.org/jcr/1.0″
jcr:primaryType=”sling:OsgiConfig”
addGroupMemberships=”true”
assertionConsumerServiceURL=””
createUser=”true”
defaultGroups=”[everyone]”
defaultRedirectUrl=”/”
groupMembershipAttribute=”[groups]”
handleLogout=”false”
idpCertAlias=”idpCertAlias”
idpHttpRedirect=”false”
idpUrl=”myIdpUrl”
keyStorePassword=”myPassword”
logoutUrl=””
nameIdFormat=”urn:oasis:names:tc:SAML:1.1:nameid-format:emailAddress”
path=”/”
service.ranking=”5002″
serviceProviderEntityId=”https://example.com/”
synchronizeAttributes=” [FirstName=profile/givenName,LastName=profile/familyName,Email=profile/email,Login=profile/login,OktaUserId=profile/oktaUserId]”
useEncryption=”false”
userIDAttribute=”OktaUserId”/>
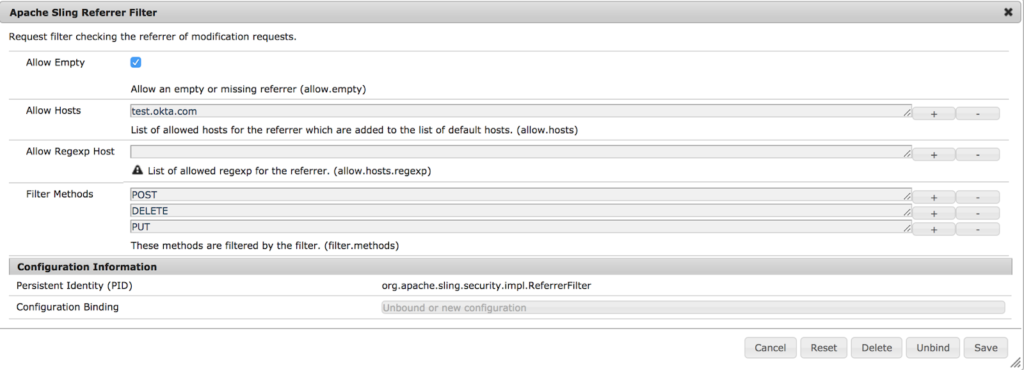
4) Add the Identity Provider hostname in referrer filter
IdP hostname needs to be added to the list of trusted servers in the referrer filter and this can be configured for specific run mode or through Felix console
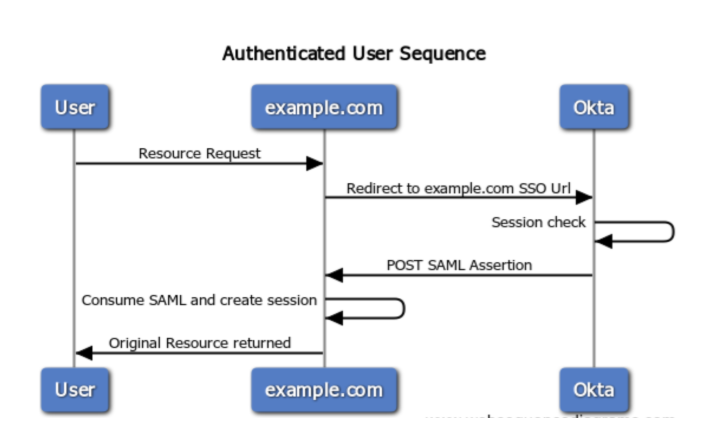
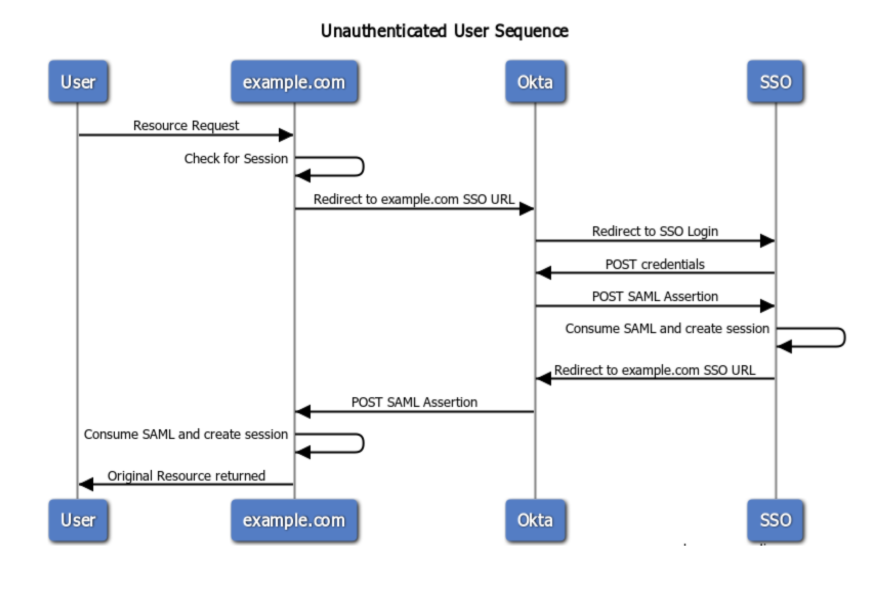
The SSO integration with AEM is complete. Now hit the url for which the authentication was configured. As soon as AEM sees a request for this path it redirects to the IdP URL for authentication. If the authentication is successful the requested resource is returned.
Troubleshooting:
When SSO is setup in the publish instance and the user/dispatcher hits the url for which the authentication was configured, the resource is directly returned without redirecting to the IdP url. This is because of the publish instance’s default behavior. So the path also needs to be added to the SlingAuthenticator configuration (org.apache.sling.engine.impl.auth.SlingAuthenticator.xml)
It can also be avoided by using Permission sensitive caching
https://helpx.adobe.com/experience-manager/kb/PSCachingDelivery.html