Google Spreadsheets For Social Media Tracking And Sharing ‑ Part 2
This is the second of a 2-part series on using Google Spreadsheets to make social media measurement easier, quicker and almost completely automated. For a refresher, read part 1 – Tracking Social Media with Google Spreadsheets.
In the previous post, you learned how to create a Google Spreadsheet that automated the task of tagging URLs with campaign parameters and shortening the links. Now, I’m going to show you how to take it two steps further.
Step 1: Send an email from within the Google Spreadsheet
At the end of the last post, you end up with a spreadsheet that takes a URL that you enter and spits out four shortened links (each going to versions of the URL with utm campaign parameters specific to that social network). That’s certainly a time saver (it saved me 10-15 minutes each time), but it still left me copying and pasting those links into an email every time I wanted to share with coworkers (so they could share the content with their social networks using the same campaign parameters).

I wanted to be even lazier more efficient. So I added in some email functionality to the spreadsheet (you can get a copy of that spreadsheet here). Once it’s open, go to File > Make a copy so you can edit the spreadsheet (you may need to sign in to your Google account – even if you were already signed in).
You should notice at the top a new menu item named EMAIL (see below).

This is made possible by using a little-known feature of Google Spreadsheets – the Script Editor. (If you’re looking for a complete user guide on the Script Editor, start here, otherwise keep reading.) Go to Tools > Script Editor in the menu and you’ll see how the magic happens. The first thing you’ll need to do is edit the list of email addresses you want to send to. Go to line 38 and modify the line that looks like this:
GmailApp.sendEmail("jim@example.com, betty@example.com, george@example.com",Include the email addresses in a comma-separated list, making sure to enclose the addresses in quotes. Also be sure to leave the comma at the end of the last address, then save your changes.

Now when you go back into your spreadsheet and select EMAIL > Send Email from the menu, you’ll be presented with some initial authorization messages. The first one looks like this (click to enlarge):

Since you are using a script to access your Gmail account (to send the emails), Google requires authorization. That’s a good thing, albeit slightly cumbersome. Click on the OK button and it will pop open another window (see below) asking you to grant access to your Gmail account. Click on the Grant Access button and you’re good to go.

Now when you go back into your spreadsheet and select EMAIL > Send Email, a simple dialogue box will pop up asking “Would you like to send an email with these links to share?” Click the Send Email button to confirm and send the email to your list, or click cancel if you’ve changed your mind.
Step 2: Detect when a new post is published (and automatically send the email)
As efficient as the above process is, I still wasn’t happy. After all, every time a new blog post is published, someone still had to manually go to Google Docs, open the spreadsheet, copy/paste in the URL, then click email. My goal was to make this completely automated – no humans allowed. So I added in some additional functionality to check for new posts, and automatically send the email when a new post is published.
Of course, I’m happy to share this spreadsheet with you, our loyal readers.
In addition to adding your Bit.ly credentials on the Technical Details tab, and modifying the email addresses as mentioned above, there is one more change you need to make to get this up and running.
Go to the Behind the Scenes tab and enter your blog homepage in the cell below where it says “URL of blog homepage.” Then, in the cell next to that, below the heading “Most recent blog posts” you need to edit the formula in that cell. Before you edit it, it will look like:
=importXML(J2, "//h2[@class='post-headline']/a/@href")
That formula uses the importXML function to pull in data from a particular location, in this case your blog homepage (as indicated by the first parameter – J2). The second parameter uses Xpath to drill down to just the bits of the page we need – the URLs of the blog posts. If I’m speaking a second language to you right now, go read this more complete (and awesome) guide to importXML and Xpath.
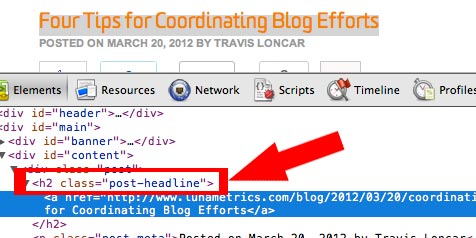
Basically, you’ll need to specify how your blog headlines are styled – are they headings (h1, h2, h3…) and do they have a class associated with them (like ‘post-headline’ or ‘entry-title’, etc.)? To get this information, you can right click on the blog headline (in Google Chrome) and click on Inspect Element. Taking our blog homepage, for example, we can see that it is an H2 heading with a class of ‘post-headline’.
Once you’ve updated that formula, there is one last step. Go to Tools > Script Editor from the main navigation. Now click on Resource > All your triggers. Click Add a new trigger and choose “sendEmail” from the first dropdown menu, “Time-driven” from the second dropdown, “Minutes timer” from the third drop down and “Every 5 minutes” from the last dropdown. It should look like this (click to enlarge):
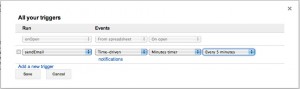
This sets up a time-based trigger that executes the function sendEmail every 5 minutes. (That function only sends the email if the URL of the most recent blog post has changed).
That’s it! You did it – you stuck around to the very end, and now you have a tool that saves you time and makes it easier to track your social media efforts. Now you can enjoy the fruits of you labor and spend time doing what matters (watching the dollar shave video again).
Let me know in the comments if this tool is helpful (or if you want to see more of these kinds of posts here). And don’t forget to like it, share it, tweet it, +1 it or Pin it if you really enjoyed it!