Customize Your Ad Placement With Facebook's Power Editor
With recent additions to the Facebook Ads Power Editor, smaller brands suddenly have a large amount of firepower at their disposal. Premium units, once the playground of larger brands with deeper pockets, have been made available (or will soon be) to the public. On Tuesday, we published a rundown of some of these ads – now we’re going to go over some power features that you can access in the Editor.
Getting The Power Editor
First and foremost, you’ll need to install the Power Editor onto your Chrome browse. Currently, Chrome is the only supported browser; Facebook has made promises to roll out a version for Firefox in the past, but there hasn’t been much word on it in the past year.
Once you have it installed, you need to open a new tab to access the interface.
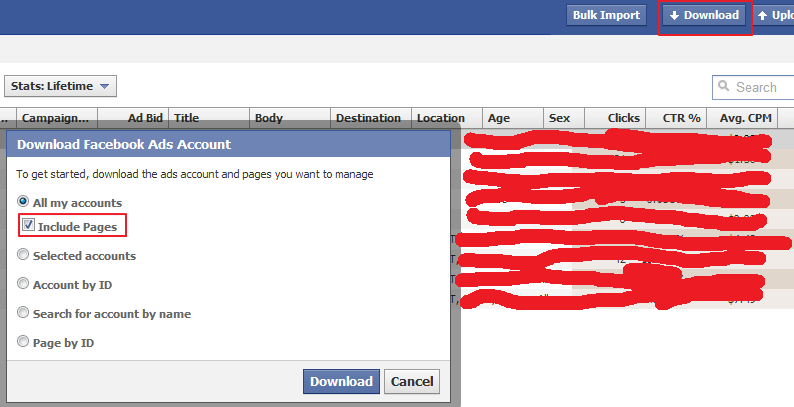
Click the Facebook Power Editor icon and you’re on your way. You’ll be greeted by the Power Editor interface, where you’ll need to download in your relevant page data and campaigns. To do this, select ‘Download’ in the top right corner, and then choose whichever option best fits your needs. I personally simply downloaded all my accounts and checked the ‘Include Pages’ box.

From there, you can manage current campaigns or add campaigns as you wish. Once you’ve created a campaign and set your parameters, there’s a handy Upload button at the top right that will import them into your Facebook account, to be managed from the Ads Manager dashboard there.
So let’s get into the new features, shall we? Select ‘Create Ad’ (you might have to add a Campaign for this), and check out the interface at the bottom of the screen that opens up.

This region will be where you set up all the nitty-gritty details about your Ads campaign. That includes naming it, targeting your demographics, adding your images and copy, setting your bid, and determining what kind of ad you want to run. Although slightly different than the simpler Ads Manager interface, these functions are pretty intuitive and have been covered very thoroughly by AllFacebook.
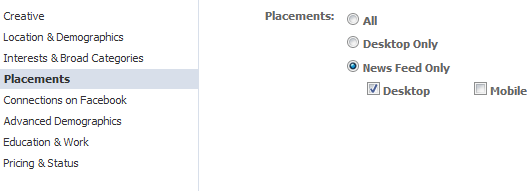
The features we’re interested in are the new premium selections, namely, selecting your placements and selecting your platform. Those features are under the Placements tab, where you’ll see this screen:

Here you can select where you want your ads to show up. This includes targeting only desktop users, only mobile users, and only newsfeed placements – pretty cool, right? Especially because certain ad types have higher success rates than the standard right-column ads we’re all used to. AdAge has a great piece about a study breaking down the effectiveness of each type that you can check out here.
And that’s pretty much all there is to it! Determine your campaign parameters, upload your campaign (and please, please, always be testing) and you’re on your way.
Have you tried the new ad units yet? What do you think of them? Let us know in the comments!


