Measuring AdWords Product Listing Ads In Google Analytics
As you may know, Google Shopping search (aka Froogle, aka Google Product Search) recently ceased being a free service and was rolled into AdWords. It still works essentially the same way: it starts with you uploading information about your products into Google Merchant Center. But now, instead of those just showing up in organic product results, they only appear as sponsored listings if you connect your Merchant Center to your AdWords account and choose to display them.
Data about products shows in paid listings in a couple of ways…

1. In what’s called a “product extension” to an existing AdWords ad (which has been around since even before the change to an all-paid model).
2. In what’s called a “product listing ad”, which can appear at the top or side of a regular web search (much like regular AdWords ads, but with snazzy pictures!), or if someone clicks over to the Shopping tab of results.
If you’re a retail ecommerce brand, you can see how appealing this kind of advertising is — it’s prominently placed, and it’s visual. And naturally, like any data-driven advertiser, you want to understand how well these perform and what kind of ROI you’re getting, so you turn to Google Analytics.
How Google Analytics displays PLA data
Assuming you have your Google Analytics and AdWords accounts linked together, for product extensions, data in Google Analytics appears just like it would normally for an ad — you can think of the product extension links as additional URLs that are displayed with your ad, just like sitelinks.
For product listing ads (PLAs), it’s a little different.
Just like usual in Google Analytics, the Medium is “cpc” and the Source is “google”, indicating traffic from AdWords. And the Campaign and Ad Group of course correspond to the campaign and ad group from AdWords.
For the Keyword field, however, you’ll see some cryptic phrases, like “*” (an asterisk) or “product_type==fryers”. In Product Listing Ads, you don’t pick the keywords — Google matches your ad to search queries for you based on the product information. Instead, what you choose are the products you are targeting in a given campaign and ad group.
In AdWords, your options look like this:

These are based on options you specify in your product data in Merchant Center. For In Analytics, the data you see in the Keyword field corresponds to what you choose for this product targeting. You’ll see things like this:
*(asterisk) <— If you’ve chosen the “Add all products” optionid==1234567890<— If you’ve chosen to add a particular product idproduct_type==turkey fryers<— If you’ve chosen a product typebrand==brandname<— If you’ve chosen a brandcondition==New<— If you’ve chosen a condition (new or used)labels==Thanksgiving<— If you’ve chosen an AdWords label (or grouping)
Again, these are all fields you can specify in your product data in Merchant Center. In some cases, the existing fields like ID, Product Type, and Brand may be enough options for you to break up and categorize your products, but there are also the AdWords Labels and Grouping fields to be more specific if you need to. (They’re basically additional categories: labels are like tags and you can specify more than one per product, while groupings allow only one per product.)
Finally, the Ad Content field in Google Analytics is blank — i.e., (not set) — for all Product Listing Ads.
Pro Tip: Sort out Product Extensions and Product Listing Ads in your data
The above is what AdWords & Analytics do by default, and it’s enough to sort out Product Extensions and Product Listing Ads in most cases. The best practice here is to have entirely separate campaigns for product listing ads, which helps, but even if you don’t, you can figure it out. The important fields to look at are:
- Destination URL: Look for the URL of an individual product page that appears in your Merchant Center data to find ads about that product.
- Ad Content: Look for an ad headline (for a Product Extension) or “(not set)” (for a Product Listing Ad)
However, that requires a little detective work matching up data in GA. So another option is to use the dynamic AdWords Value Track parameters in your destination URLs in your product feed in Merchant Center. Normally, say your product information uses the following URL:
http://shop.example.com/category/product/turkey-fryer/
Instead, you could use the following:
http://shop.example.com/category/product/turkey-fryer/?adtype={adtype}
AdWords automatically replaces {adtype} in this URL with either pe for Product Extensions or pla for Product Listing Ads. Voila! Now just look at the Destination URLs report (or Landing Pages) to tell them apart.
Super Pro Tip: Clean up the fields in Google Analytics
OK, super, you now know everything you need to know to see data about your Product Listing Ads in Google Analytics, so if you’re tired of reading this, you can stop now.
But, maybe you’re looking at the above and saying, “Gee, that’s great, but now I have a bunch of stuff gunking up the URLs in my Content reports in Google Analytics, and who wants that?” Who, indeed, my friend, so I have a solution for you.
Notice that GA leaves the Ad Content field for Product Listing Ads blank. Not very helpful. So why don’t we leverage that to store this adtype field? We can do that with a filter on your profile in Google Analytics. (To implement this, you have to be an administrator, and test it out on a test profile first to be careful you don’t screw up any data.)
You want a Custom Advanced filter that does the following:
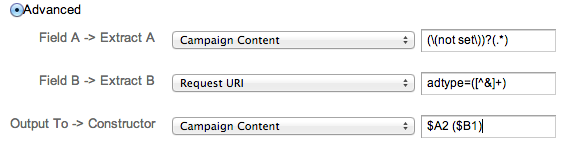
What this does: It looks for that adtype parameter in a URL (either pe or pla) and sticks in in the Ad Content field. If Ad Content is currently (not set), (pla) simply replaces that. If Ad Content currently has an ad headline in it, it appends (pe) to the end of the headline, so the full field is Whatever the Ad Headline Is (pe). So now it’s easy to tell them apart in the field where it makes sense (Ad Content), with no sleuthing involved. (Note: Test this out and tweak it based on what you want to see. No guarantees on the regular expressions here, and this depends on you adding that “adtype” parameter above to your Merchant Center data.)
Second, add another filter that removes the adtype parameter from URLs:
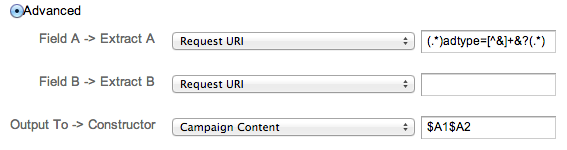
Now your URLs are gunk-free. And now, you’re really done.
(Super EXTRA Pro Tip: You can use the same type of filter to put information about Sitelinks from the URL into the Ad Content field. We’ve written previously about adding parameters to track sitelinks. This is left as an exercise to the reader, although I can post a follow-up with the solution if needed.)
News & Insights
Related Perspectives