Building The Ultimate XML Sitemap

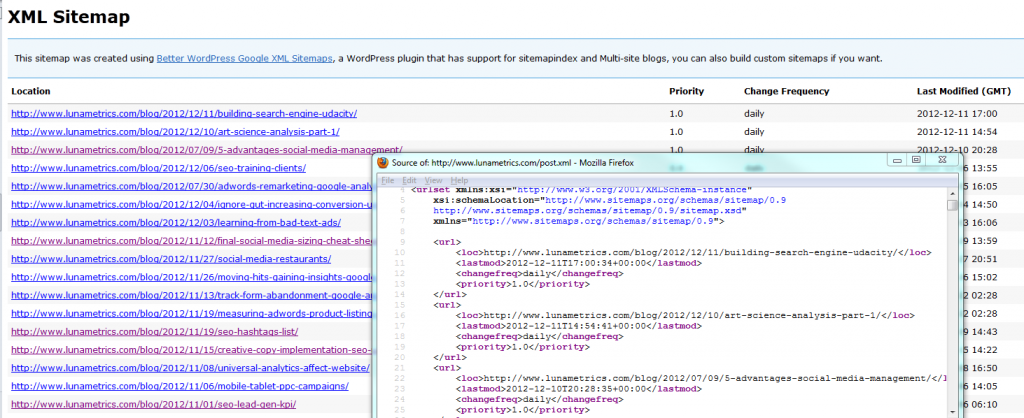
An XML Sitemap is a sitemap created for search engines. The XML Sitemap is a listing of all the URLs on your site that you want search engines to crawl and index. The Sitemap also provides information on when pages get updated and how important they are. Search engines do not guarantee they will fully abide by the sitemap, but search engines do use XML Sitemaps for assistance in crawling the web.
Many webmasters and SEOs have reported improved traffic simply from submitting the Sitemap. In addition, the Sitemap can greatly assist in diagnosing indexation shortcomings. Submitting a proper, up-to-date XML sitemap, therefore, is an SEO best practice.
Building a Sitemap can be very easy or quite complex. The return on investment with Sitemaps varies tremendously from case to case; indeed many people can waste time getting bogged down in Sitemap technicalities if it is unwarranted. The amount time you put into Sitemaps should depend on your needs. This guide focuses on thinking critically about how utilize Sitemaps as an SEO tool to address your specific needs of your website and SEO campaigns.
There are 10 steps to building the Ultimate XML Sitemap:
1. Understand XML Sitemaps
2. Identify what types of Sitemaps you need
3. Pick Sitemap Generation Method
4. Figure out Sitemap content and structure
5. Build Sitemap
6. Check and validate Sitemap
7. Submit Sitemap
8. Check & Monitor Sitemap
9. Learn and Act
10. Rinse and Repeat Steps 8 and 9
Step 1: Understand XML Sitemaps
While you won’t need to hand-code XMl Sitemaps, I really recommend you get a basic understanding of how search engines use them, the protocol for Sitemaps, size limits, and the tags used in Sitemaps. Get it straight from the horse’s mouth by checking out Google’s section on Sitemaps.
Step 2: Identify what types of Sitemaps you need
In addition to the standard XML Sitemap, there is a Sitemap index and four more specialized sitemaps (the code search sitemap is now basically useless since Google Code Search has been deprecated this year.) If you want to improve traffic to videos, images, your mobile site, or news articles, use specialized Sitemaps (Sitemap extensions).
The 6 Types of Sitemaps:
Step 3: Pick Sitemap generation method
There’s a few ways to build Sitemaps and tons of tools to help do so.
Needs analysis:
First, perform some needs analysis to figure out the best way for you to go about building the Sitemap by asking the following questions:
- What CMS do you have? (There are many generators specifically made for certain CMSs, like WordPress.)
- Approximately how many pages will you be submitting? (Unless your Site is really tiny, you’ll want a Sitemap generator. Also, most free generators will only crawl up to a certain number of pages)
- Do you suspect you are having notable issues with the search engines properly crawling and indexing your site?
- Do you want a simple solution so you can set and forget? OR…,
- Do you want to really dig in and optimize indexation?
At this point, you should have a good idea how much effort you should put into your Sitemaps.
Find a Sitemap generator:
Unless you have a very small site and/or a desire to hand code the Sitemap, you’re probably going to use a Sitemap generator tool to build the Sitemap file. The generator will look out the pages in your site and list them on the Sitemap, according to XML Sitemap protocol and how you configure the generator.
There are basically two types of generators — those that crawl your site (like Googlebot does), and those that look at your site from the back-end. I find that CMS-specific back-end based generators usually make life easier. (That said, I do highly recommend running a crawler on your site from time to time to see all existing URLs, broken links, http status codes, and such.)
Here is a list of Sitemap generators. You may also want to perform a separate search for generators specifically for your CMS.
Sitemap generator selection criteria: Pick a generator that:
- will generate the types of Sitemaps you need.
- fits your needs identified in needs analysis.
- updates dynamically. Updating static Sitemaps is usually an unnecessary and undesirable chore.
- set the sitemap tags for individual pages and groups of pages
- break up sitemaps into pieces however you want
- *Bonus: find orphan pages (pages that do not have any pages linking to them)
Step 4: Figure out the Sitemap content and structure
Next, we need to figure out which URLs are going into the Sitemap, and, if your site is large, which URLs go into which Sitemaps.
Sitemap content:
To decide which URLs to include in your Sitemap, you need to figure which pages you want the search engines to crawl and index. Remember, we’re only going to list one URL for each page. We also will leave out pages that should be private.
Sitemap structure:
You may need multiple Sitemaps files if:
- You want special sitemaps for specialized content (images, videos, etc…)
- You suspect certain sections of your site are at risk for indexation shortcomings and you’ll want to analyze those sections
- You have a large site (each Sitemap file can only be up to 50,000 URLs or 50MB)
When deciding how to structure Sitemap files of the same type, section the Sitemaps in terms of what is most helpful in diagnosing indexation issues. Ask yourself 2 questions:
- What parts of your site are not getting indexed that should be?
- What pages are not getting indexed frequently enough?
Here is a great article on structuring Sitemaps to assist in diagnosing indexation issues.
Step 5: Build Sitemap
You can either let the generator go and do its thing or you can tweak settings to generate the Sitemap that shows the engines exactly how you want your site crawled.
Things to tweak in your Sitemap:
- Sitemap tags
- Sitemaps segmentation — divvy up individual Sitemaps by type and by a structure that will best help you diagnose indexation shortcomings. Give them descriptive names as well.
- Exclude URLs that should NOT be indexed
- Exclude URLS disallowed in robots.txt (good time to make sure you’re disallowing the right urls)
- Exclude URLs disallowed via meta noindex tags
- Exclude duplicate URLS
- Exclude private pages
Uploading Sitemap:
After you run the sitemap, you will upload it to your site, ideally at the root directory like so: www.example.com/sitemap.xml. Technically, you don’t have to place it at the root, but there will be some limitations.

**Congratulations! If you’ve completed Step 5, you’ve now built your XML Sitemap. However, the next steps will ensure you get the most out of your Sitemap. Let’s proceed…
Step 6: Check and validate Sitemap
Now, it’s time to make sure the Sitemap follows protocol and says what you want it to say.
Validation:
There are a few tools to validate that your Sitemap follows protocol and will be fully useable by search engines. Since we should be submitting the Sitemaps to Google Webmaster Tools anyways, I like to use this. If you don’t use Google Webmaster Tools, now is the time to start; GWT may be second only to Google Analytics in terms of being the best free tool for webmasters. To test your sitemap, simply go into Google Webmaster Tools, and click the “Sitemaps” link under “Optimization” in the left navigation section of your

site’s dashboard. Then click the big red button and test away. If you’re feeling warm and fuzzy inside, then I presume Google can read your Sitemap.
Manual check:
But wait! Just because your Sitemap follows protocol doesn’t mean it looks the way you want it to. Best to check the following…
- Does it list the pages you want indexed?
- Does it exclude pages you don’t want indexed? (like duplicate urls or private pages)
- Do the tags describe the URLs like they should?
Step 7: Submit Sitemap

Once the Sitemap is all checked out, it’s time to make sure the engines know about it. I recommend submitting the Sitemap directly to Google and to Bing (which powers Yahoo). I recommend doing this through Google and Bing Webmaster Tools, because you should use those tools to analyze your Sitemaps anyways. (In Bing Webmaster Tools, go to your website dashboard and click the “Sitemaps” link in the “Configure My Site” dropdown in the left nav.)
Also, be sure to list your Sitemap in your robots.txt file to ensure it gets found by all search engines.
Step 8: Check & Monitor Sitemap
I highly dissuade you from setting and forgetting when it comes to your Sitemaps. There’s a lot of information you can get in Bing and Google Webmaster Tools (especially the latter). In fact, in many cases it is the diagnostic assistance which is the biggest benefit of Sitemaps.
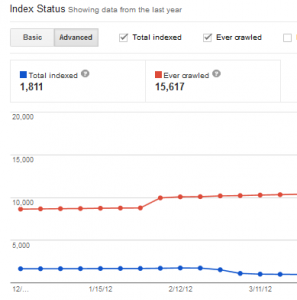
Be sure to check on pages indexed versus URLs submitted. It’s rare that the number of pages indexed matches what you submitted, but something is amiss if there is a big difference in the numbers.
Also pay attention to Sitemap errors and warnings. The less errors and warnings you have, the more likely the search engines will listen well to your Sitemap. Sitemap errors and warnings may reveal problems with robots.txt, Meta robots tags, duplicate content , or other issues.
If you have a Sitemap that 100% accurately represents how you want your site crawled, then you can gain a ton of insight by comparing Sitemap stats to other data points. Consider cross referencing the following:
-

‘site:’ search: Enter in Bing and Google site:www.yourwebsite/subdirectory to find what is indexed. This may not be 100% accurate but it can help the investigative process.
- Analytics: See which pages received search engine visits in Google Analytics.
- GWT Index Status: Compare the stats on crawling and indexation, and pay attention to spikes in number of pages crawled and indexed.
- BWT Site Activity: Compare the stats on crawling and indexation, and pay attention to spikes in number of pages crawled and indexed.
Step 9: Learn and Act
A perfect Sitemap can be your best tool in diagnosing indexation shortcomings. If you’re having problems diagnosing indexation issues, consider tweaking your Sitemap to perfection.
The goal is to get the right pages indexed, and new content on those pages indexed as soon as possible. Use the information from your Sitemap analysis to diagnosis issues with site structure, duplicate content, and internal linking to help you reach this goal.
Step 10: Rinse and Repeat Steps 8 and 9
Definitely keep checking in on those Sitemaps every once in a while to see if you’re having any addressable indexation issues. Be sure to check in after major updates to your site or any major traffic pattern changes. Remember, your XML Sitemap is a great tool, so use it.


