If That SEO Tool Didn't Exist . . .
As SEOs, there are times at which we take for granted the tremendous tools and resources that help us perform our jobs efficiently. In this post, we’ll look at three tasks that we perform regularly, the tools that help us perform these tasks, and how we might replicate these tools’ functionality and results if they didn’t exist. Hold on for the ride; it’s time to get hypothetical.
1. Crafting Page Titles
In a recent post on misconceptions within the SEO industry, I talked about the mythological character cut-off for page titles, highlighting SEOmofo’s width-based snippet testing tool as a viable alternative to JavaScript character counts. This tool is useful in that it demonstrates that title cut-off in Google SERPs is not a function of character count, but rather the pixel width of the text. Pretty great, right?

We can fit 128 ‘i’s into a page title
I got to thinking – if this tool didn’t exist, how could I verify that a title fits within the allotted space? Beyond building my own tool, there has to be some hacky, inefficient way to get this done. Alas, we turn to Chrome’s Developer Tools and/or Firebug for Firefox. To avoid dealing with the <em> tags that Google uses to markup query terms that appear in result titles (bolded keywords, in other words), we start with a simple site search. You can use any domain you please. For this example, we’ll be using Google.com.
Once we’ve executed our site search, we can right click on any of the result titles and choose ‘Inspect Element.’ From here, we can edit the text within the result anchor tags, testing to see whether or not our title will overflow the allotted width. We’ll be testing the title, ‘Monkey Bar Conundrum | Donkey Kong Libation or Playground Equipment?‘ – a title that’s 68 characters in length.
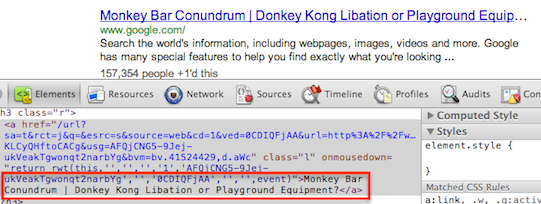
Editing the result title
Notice that, although our title is under 70 characters in length, the width of its characters has caused it to overflow the surrounding <h3> element. When the anchor text overflows the <h3>, the CSS rule, text-overflow: ellipsis, takes effect, cutting our title short. In the screenshot above, we see the word ‘Equipment’ left short. In a real SERP, however, it’s likely that the word ‘Equipment’ would be cut out entirely, as Google doesn’t show partial words in page titles (that I’ve seen).
Let’s see if we can rework this title to make it fit. We’ll remove ‘Conundrum’ and pluralize ‘Monkey Bar’ – ending up with ‘Monkey Bars | Donkey Kong Libation or Playground Equipment?‘.
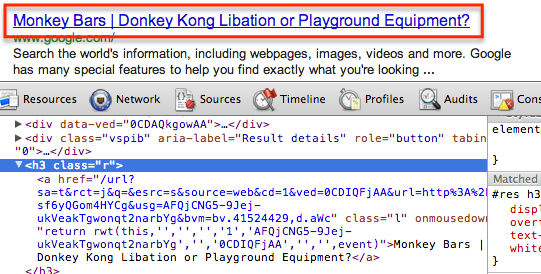
Very fitting, isn’t it?
Sure enough, our shortened page title fits the result width nicely. At these 59 specific characters, we’re in the clear. I encourage you to see how many capital ‘W’s you can squeeze into the same <h3>. My “guess” is that you won’t get to Lyndon B. Johnson.
Note: While it is likely that both Google and Bing precompute title pixel width and deliver results that have been adjusted accordingly, only Google makes use of the text-overflow: ellipsis CSS property-value pairing. In doing the same type of test with Bing, you might look for the text to overflow to the next line, rather than the ellipsis.
2. Checking Server Response Headers
Checking the HTTP headers returned when web pages are requested is an integral part of our duties as SEOs. Tools like Live HTTP Headers for Firefox help us identify server types, response codes, canonical URLs, and much else. As far as tools go, my personal favorite is SEO Book’s HTTP Status Code Checker. With this tool, one can see not just the initial header returned, but all headers returned until the server responds with 2XX, 4XX, or 5XX code. In the case of chained redirects, this is especially helpful, in that it allows us to identify all of the URLs in the redirect path.
Interestingly enough, we can accomplish the same task with a little command line magic. Let’s open our command line (Terminal for Mac), and use the cURL command to request the initial HTTP header for www.bounteous.com. The syntax we’ll use is: curl -I example.com

Using cURL to request HTTP header
Let’s look at the header that our server responds with, paying special attention to the status code and location. Remember, in this example, we’re just requesting the initial response.

HTTP header in Terminal
So, what can we garner from this HTTP header? We see a response code of 301, meaning that a 301 redirect has been implemented for www.bounteous.com. As you might suspect, www.bounteous.com is being redirected to www.bounteous.com. This is evidenced by the Location: http://www.bounteous.com line. This is all well and good, but we can’t be certain that www.bounteous.com is returning a 200 status code (without checking it directly). What we need is for cURL to not stop showing us HTTP headers until the server responds with a 2XX, 4XX, or 5XX.
To do this, we simply add -L to our syntax: curl -I -L example.com. Let’s take a look at the headers we get back now.
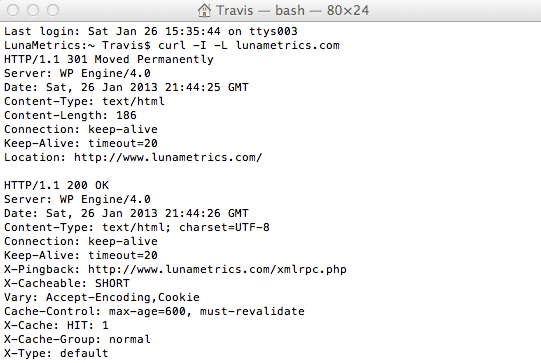
Multiple HTTP headers
This time, we get the reassurance that www.bounteous.com does indeed return a 200 response code. Again, this use of cURL can be incredibly useful when it comes to identifying and remediating chained redirects. It’s not so labor-intensive a technique, either.
You can read more about cURL here.
3. Setting Page-Specific Titles and Meta Descriptions in WordPress
Most of us have become accustomed to using great plugins like All in One SEO and Yoast’s WordPress SEO for setting page-specific titles and meta descriptions in WordPress. And why not? These plugins give WordPress users the ability to set custom titles and meta descriptions for each page, making on-page SEO a more feasible endeavor.
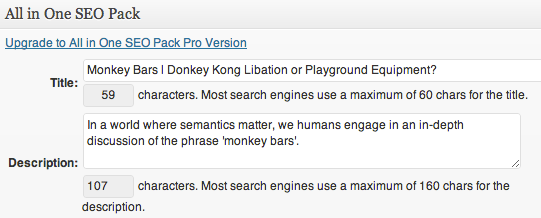
Having some fun with All in One
Should the day come when all of the WordPress plugins we so love vanish into thin cyberspace, how would we replicate this functionality? Well, actually, we can make use of WordPress’s Custom Fields and a couple lines of PHP to get the job done. If you’re unfamiliar with Custom Fields in WordPress, you can read the documentation here. To view Custom Fields for a given post or page, you’ll need to click the ‘Screen Options’ button in the upper right-hand corner and make sure that the Custom Fields checkbox is checked.

View Custom Fields in WordPress
Now, you should see the ‘Custom Fields’ box beneath the WordPress text editor. To add a new Custom Field, click ‘Enter new’ beneath the Name select. We’ll set the field’s Name to ‘title‘ and its value to our desired page title: ‘Monkey Bars | Donkey Kong Libation or Playground Equipment?‘.

Add New Custom Field
Next, we’ll set up the meta description Custom Field, giving it a Name of ‘description‘ and a value of our desired meta description. Once both Custom Fields have been entered, we end up with something like this:
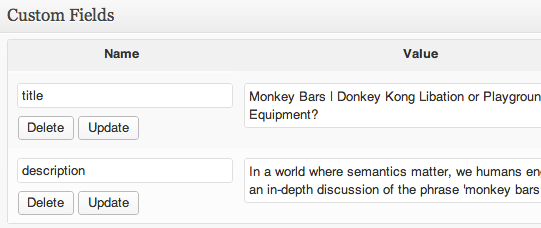
Title and Meta Description Custom Fields
Okay, so we’ve set Custom Fields for both our title and meta description; now we need to integrate these CF’s with our WordPress theme. To do so, you’ll need permission to edit the theme’s template files — specifically header.php. To access the header.php file, hover over the ‘Appearance‘ navigation item in your dashboard’s left-hand nav and click ‘Editor‘. This will bring you to WordPress’s internal theme file editor (likely loading with style.css by default). Find and click ‘header.php‘ in the list of theme files at the right.
Note: From here on out, I’m only demonstrating. While this is in fact an effective method by which titles and meta descriptions can be implemented on a page-by-page basis, the plugins you’re using do this much and more. In looking at the header.php file for the current theme, I actually encountered this exact implementation commented out and remarked upon. Thanks, Sayf.
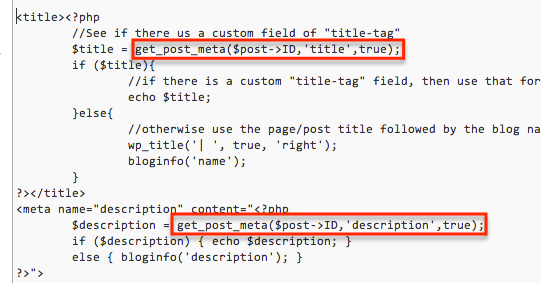
Title and Meta Description in header.php
The PHP in the screenshot above accomplishes our goal of setting titles and meta descriptions with Custom Fields (if they are set). The code outlined in red is responsible for actually fetching the fields that we’ve set for each post or page, where the second input accepted by the get_post_meta() function is the Name (or key) of the Custom Field.
– –
That’s enough of that, though. If nothing else, I hope you have a new perspective on the way things work. Leave comments and questions below.