How To Track Hover Events With Google Tag Manager
When visitors hover on your website, are they more likely to convert? Pick a hover target and add event tracking to find out.
If you want to listen for clicks or form submissions, Google Tag Manager has some seriously awesome automatic event tracking. It doesn’t cover hover events yet, though. So if you want to track a visitor hovering over a menu or pop-up window or other such thing-a-ma-jig, read on for a nifty bit of jQuery that will do the trick.
Step 1. Include the jQuery library.
If your page doesn’t have jQuery, or the jQuery library is only included in the page source after your Tag Manager container code, then the code I’m going to give you won’t work.
First things first: make sure your page source includes the jQuery library before Tag Manager.
<script src="//ajax.googleapis.com/ajax/libs/jquery/1.10.2/jquery.min.js"></script>

<!--– Google Tag Manager –-->
<script>(function(w,d,s,l,i){w[l]=w[l]||[];w[l].push({'gtm.start':
new Date().getTime(),event:'gtm.js'});var f=d.getElementsByTagName(s)[0],
j=d.createElement(s),dl=l!='dataLayer'?'&l='+l:";j.async=true;j.src=
'//www.googletagmanager.com/gtm.js?id='+i+dl;f.parentNode.insertBefore(j,f);
})(window,document,'script','dataLayer','GTM-XXXXXX');</script>
<!--– End Google Tag Manager –-->
Typically, jQuery and other scripts are included in the head element, while Tag Manager appears in the body element. Your page source won’t look exactly like the above. It’s the order that counts. The jQuery library has to come first.
Step 2. Identify the hover element.
Tag Manager needs some information like a unique element name, class, or id (or unique combination of attributes) so it doesn’t try to track everywhere the visitor hovers on the page. Right-click on the page where you want to track the hover event, and choose inspect element.

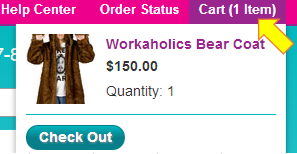
In this example, I’m going to track when a visitor hovers over some text that says “Cart (1 Item)”. That action produces a pop-up window showing the contents of the shopping cart.
I inspect the element by right-clicking on it, and see the text is contained in a div element with the class “wl-cart-summary”.

Because the class “wl-cart-summary” is unique to this element, I can use it to write a jQuery selector. The selector will focus the hover tracking on the cart summary pop-up.
Step 3. Create a Custom HTML tag and enter jQuery.
Open Tag Manager and create a new tag of the Custom HTML tag type. Enter the script shown below, and customize the jQuery selector $(“div.wl-cart-summary”) to match your hover target.
jQuery(document).ready(function ($) {

  // Hover over Cart Summary
  var startHover = $.now();

  $("div.wl-cart-summary").hover(
    function () {
      startHover = $.now();
    },
    function () {
      var endHover = $.now();
      var msHovered = endHover - startHover;
      var seconds = msHovered / 1000;
      if (seconds >= 1) {
        dataLayer.push({'
          event: "cart - hover",
          eventAction: {{cartText}},
          eventLabel: {{Page Path}},
          eventValue: seconds
        });
      }
    }
  );

});
This code targets the div element with the class “wl-cart-summary” and listens for when a visitor starts hovering and also for when she stops hovering. It doesn’t send an event to the data layer until the visitor stops hovering.
The code also calculates the amount of time a visitor hovered, so you can decide whether or not she hovered long enough to make it worth tracking an event. Here I push the event to the data layer if the visitor hovers for at least 1 second.
I send all of this info to the data layer because I’ll need it in the next step, when I write my GA event tag:
event: cart-hover
eventAction: {{cartText}} = a custom JavaScript macro (how many items in cart?)
eventLabel: {{url path}} = a default macro (what page was the visitor on?)
eventValue: seconds = a variable from my code (how long did she hover?)
And then I fire this tag on every page since it’s part of the top navigation. You could use a more selective rule if you don’t need to fire it everywhere.
Bonus tip: The eventAction doesn’t have to be a macro; it could just be a word or phrase. But I wanted to get fancy, since the text of this element can change. So I created a Custom JavaScript macro in Tag Manager called {{cartText}} to reflect the number of items in the cart when the visitor hovered.
function() {
var cartText = $(".wl-cart-summary a.cart-summary-trigger").text();
return cartText;
}
The above macro cartText looks for an anchor with the class “cart-summary-trigger” inside an element with the class “wl-cart-summary” and returns the text of that anchor. (See the screen shot earlier from when I right-clicked to inspect the element.)
Step 4. Create a GA Event tag.
Finally, write a tag that will send an event to Google Analytics every time your cart-hover event gets pushed to the data layer.
Create a new tag in Tag Manager: tag type = Google Analytics and track type = Event.
Enter the information you pushed to the data layer in the Event Tracking Parameters, as shown below.
Then fire this tag with a new rule that says {{event}} equals cart-hover, or whatever event you pushed to the data layer.
If you haven’t already created the macros for eventAction, eventLabel, and eventValue, you’ll need to do that, too. Simply choose macro type Data Layer Variable and enter the same variable name that you pushed to the data layer, e.g. eventAction, etc. You’ll be able to re-use those macros with other events you might decide to track later.
Step 5. Update, Preview, Debug. Create New Version and Publish!
Test your tag to make sure it’s firing at the right times and capturing the right info. Then create a new version of your Tag Manager container and publish, and start collecting all that beautiful data!
How are you harnessing the power of Google Tag Manager? What events have you been able to track that aren’t covered yet by auto event tracking? Please share in the comments.


