One Goal, Many Values With Lookup Tables In Google Tag Manager
Google Analytics Events + GTM Lookup Tables = Super Groovy Goal Values!
Here’s a familiar refrain: Need KPIs? Assign goal values to your non-ecommerce goals in Google Analytics – for example, calculate the average value of a lead and enter that as the goal value.
And a less-familiar verse: Should you settle for the average value? Not if the actual values vary widely. Distributions matter!
Suppose you have one lead form for many types of leads. The user might request info about option A, a potential sale worth nearly twice as much as option B, and five times as much as option C. And what about options D, E, F, and so on?
New verse: You don’t have to give them all the same goal value. And you don’t have to create multiple goals to give them each a different value.
Send different event values to Google Analytics for each type of lead with a lookup table in Google Tag Manager. And then set the event value as the goal value in the Google Analytics interface.
You say your goal is based on the thank-you page URL and not an event? No problem. Fire an event when the user reaches the thank-you page and use that event to define the goal instead.
Follow these four steps to add more meaningful values and make your goal data rock.
Step 1: Create the lookup table in Google Tag Manager
Start making a list of lead types and their corresponding values. Calculate the values by the usual method, but do it for each lead type individually, instead of for all leads combined.
The usual method: What percentage of each type of lead turns into a sale? For example, what’s the conversion rate for leads who request info about getting an MBA? Use this to calculate the lead value for MBA prospects.
Conversion rate X value of sale = Lead value
If MBA prospects convert 10% of the time, and enrollment is worth $50K, then the lead value is $5,000. Make a similar calculation for all types of prospects.
Tip: Keep a long list of lead types and values in a simple two-column spreadsheet while you work on it. Then upload all your data in a jiffy with the automated Lookup Table tool from Jon Meck. You can have up to 252 rows in a Google Tag Manager lookup table.
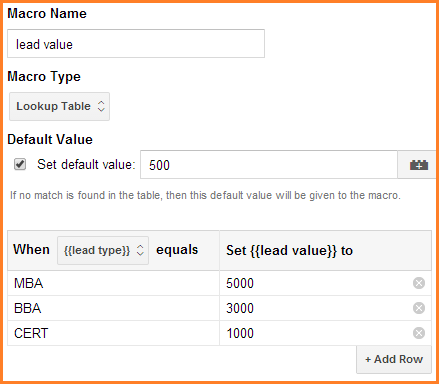
Here’s a much shorter example.

The key feature here is what I’ve selected as the data for the left column. When {{lead type}} equals one of the items in my list, then Tag Manager will set {{lead value}} to the corresponding dollar amount.
Where does {{lead type}} come from?
Step 2: Tell Tag Manager where to find the lead type
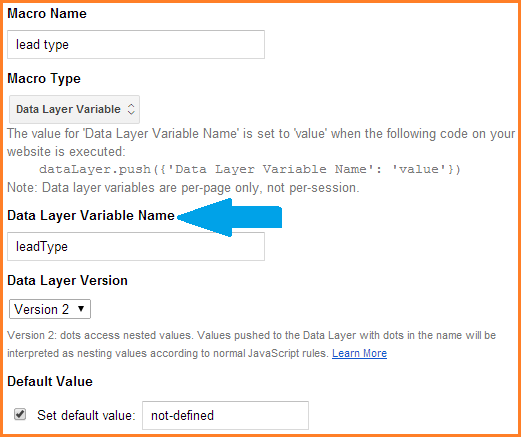
Create a new macro in Google Tag Manager. Name it “lead type” and then determine what type of macro it will be, based on where the information about the lead type can be found on the thank-you page.
Good Macro Type: DOM Element or Custom JavaScript
The lead type may be present in an element on the thank-you page as in the example below. In such a case, you would create a new macro with Macro Type: DOM element, Element ID: lead-type, and Attribute Name: data-lead-type.
If the lead type is present elsewhere on the thank-you page, you might be able to use a Custom JavaScript macro to retrieve it. Or you might rather leave the coding to the developers. In any case, for the most robust implementation I recommend the following…

Better Macro Type: Data Layer Variable
When the thank-you page loads, your developers push ‘leadType’:’MBA’ (or whatever your lead type is) to the page’s data layer. It should appear like this above the GTM code snippet on the page:
Read more about preparing the data layer for this and many other tracking opportunities.
Step 3: Create the Event tag in GTM and insert the event value
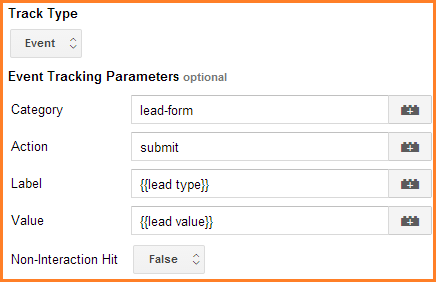
Now create the Event tag in Google Tag Manager. Select Universal Analytics or Classic Google Analytics as the tag type according to your implementation, and select Event as the track type.

Insert the category, action, label, and value as shown above. The {{lead type}} macro will read information from the page (element or data layer). For that specific lead type, the {{lead value}} macro will look in the table and return the corresponding dollar amount.
Add a rule to fire this event tag on your thank-you page.
Preview, Debug, Test, and Publish!
Step 4: Configure the Event goal in Google Analytics
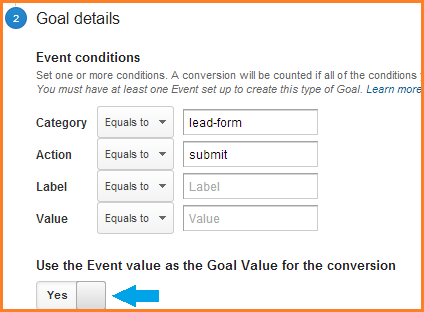
With event data flowing into Google Analytics, don’t wait too long to configure the new goal. You can even do this step first if you decide ahead of time what your event category and action will be. That way the goal can be “on standby” and ready to start counting conversions immediately when you publish your additions to Tag Manager.

Set your event conditions to match any lead-form submission by using only the category and action. Don’t specify the label.
(Key change, big finish…) Use the Event value as the Goal Value for the conversion: Yes!
TL;DR
This is where it all comes together. Many values for one goal, based on the values you calculated for each different type of lead. More valuable leads transmit more value to the data, for more valuable KPIs.
Even when a page goal would be the usual choice, combining event goals and lookup tables is the key.
How are you adding value to non-ecommerce goals and KPIs? Have you combined event goals and lookup tables for this or any other purpose? Please share in the comments.


