Cross Domain Tracking With Google Tag Manager
If you want to track multiple domains within the same Google Analytics account, you’ll have to make some modifications to your tracking code. Out of the box, Google Analytics will not properly track a user between these two domains. Initially, cross domain tracking was a huge pain – you’d have to manually tag links with special attributes in order to get the job done. Universal Analytics made things significantly easier with the linker.js plugin, which allows for cross domain settings to be configured when the tracker is being created.
Google Tag Manager has made things even simpler; I regularly help attendees of our Google Tag Manager trainings get their cross-domain needs sorted out in just a few minutes. It’s that good. Here’s how you can configure cross domain tracking with Google Tag Manager.
IMPORTANT: Before You Get Started
If you are trying to track users across many different subsections of a single domain, e.g.:
- shopping.bounteous.com
- www.bounteous.com
- admin.bounteous.com
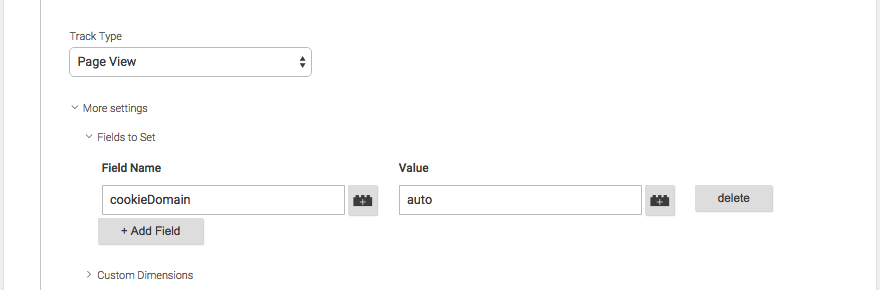
You are not interested in cross domain tracking, you are interested in subdomain tracking. The best way to accomplish this is to add the ‘cookieDomain’ Field To Set and set it’s value to auto, or to use the a Google Analytics settings variable which has this set my default.
That will instruct the tracker to make the cookie available to all of the subdomains that it can. IMPORTANT: Verify that your domain is configured in your Referral Exclusion list – (bounteous.com in our example above). For more information, check out our guide about cross-subdomain tracking.
Published: August 11, 2016
Step #1: Create an Auto Link Domains Variable
Create a new Constant Variable and set it to a comma-separated list of all of the domains you’d like to track in your property. It should look something like this:
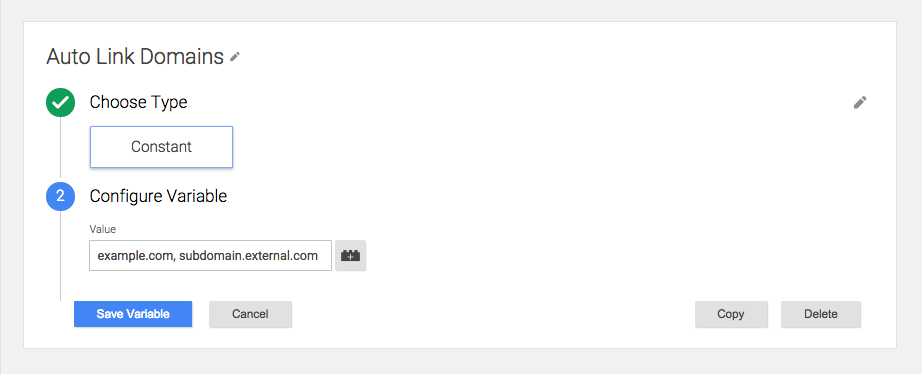
- If you want to track links to all subdomains of domain, enter just the hostname without any subdomain, e.g. for admin.example.com and www.example.com, enter example.com
- If you want to track links to just one specific subdomain of an external domain, enter in the full hostname, e.g. for shopping.external.com but not www.external.com, enter in shopping.external.com
Step #2: Add the Auto Link Domains to Your Pageview Tag
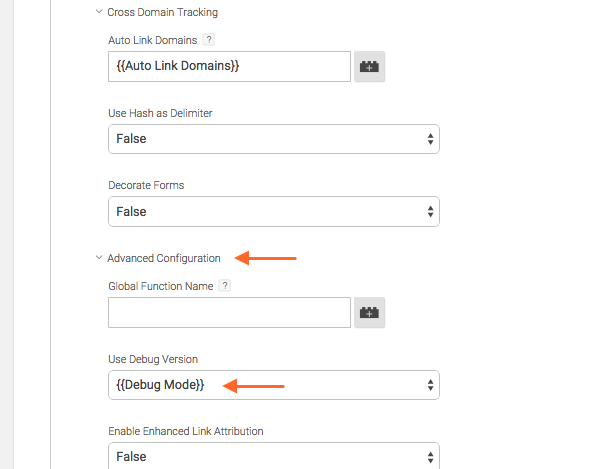
Next, you’ll need to enable Cross Domain Tracking in your Pageview tag. To do this, open your Universal Analytics Pageview Tag in Google Tag Manager. On the ‘Configure’ step in the tag creation wizard, click the More Settings dropdown, then the Cross Domain Tracking menu beneath that. In the Auto Link Domains field, enter {{Auto Link Domains}}. It should look like this at this point:
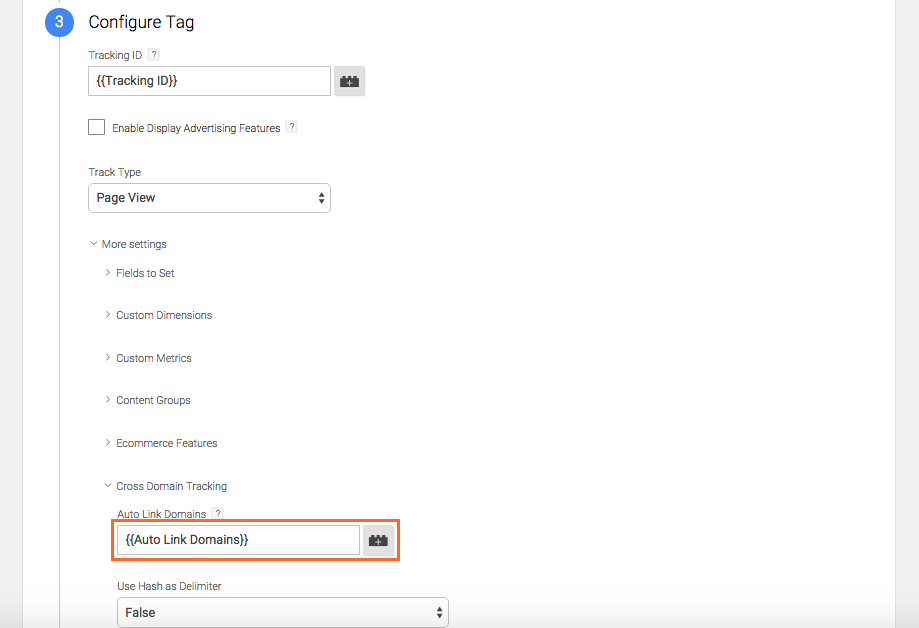
This tells Google Analytics to decorate any links it sees that point to those domains with special parameters for tracking users cross-domain.
Step #3: Add the allowLinker Field to Set
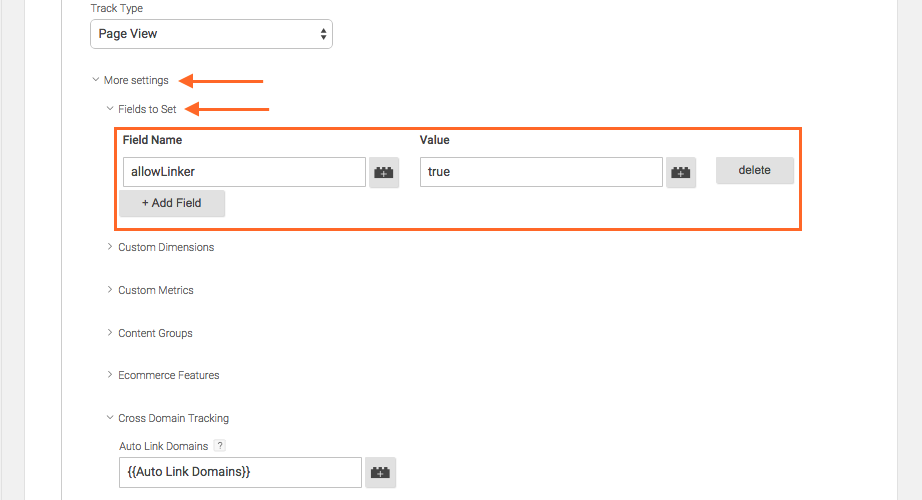
Now that Google Analytics knows which links to decorate, you have to tell it to use those special parameters when it sees them in a page path. To do this, you’ll want to scroll up to the Fields To Set dropdown and expand it. Click Add Field, and then enter allowLinker into the Field Name field that appears. In the accompanying Value field, enter true. It should look like this:
You’re 90% of the way done, but don’t publish just yet. You’ve got one more VERY important step to take.
Step #4: IMPORTANT: Update Your Referral Exclusion List
The Referral Exclusion List is a list of domain names that Google Analytics treats as Direct traffic instead of referrals. When a user visits your site from a domain on the exclusion list, Google Analytics rewrites their source/medium information to be (direct)/(none) instead of whatever it would have been. If the user already has a session that has not expired, Google Analytics will ignore the new referring information entirely and continue the session as is (Note: this applies to subdomain tracking, too).
This is important: if you do not add all of the domains you set in your Auto Link Domains variable to your referral exclusion list, your cross-domain tracking will not work as expected. Google Analytics will correctly attribute the session to the same user that it was tracking on Domain A when they arrive on Domain B, but it will start a new session with Domain A set as the source/medium information. This is commonly called a self-referral (and is probably why you’re here in the first place).
To update your Referral Exclusion List, open the Admin Panel in Google Analytics, then select the Tracking Info menu item from the Property configurations. Select the Referral Exclusion List menu item.

In the Referral Exclusion List interface, click Add Referral Exclusion and enter in each of the hostnames you’d like to exclude.

If you only want to exclude traffic from a particular hostname, or you’ve got thousands of domains you want to exclude, check out Dorcas’ post on advanced Referral Exclusion List techniques.
Step #5: Testing
We now need to test and ensure our Cross Domain Tracking is configured properly. In your Universal Analytics Pageview Tag, under the Advanced Options dropdown, set the Debug Mode Option to {{Debug Mode}}, then save it. Debug Mode is just a built-in variable that can be enabled.
Click the ‘Preview’ button, clear your cookies on your homepage, then reload your homepage with special source and medium campaign parameters attached, e.g.:
http://www.example.com/?utm_source=cd_test&utm_medium=cd_test
Click on a link to one of your other domains. When the page loads, look in the URL bar of your browser and look for a bunch of extra parameters attached to the link, like this:
http://subdomain.external.com/?_ga=1.210371479.3429707736.1432831029
Test #1 – Did clicking on a link to one of your auto-linked domains add extra parameters to the link? The example above is using Universal Analytics, Classic code will look a little different. If you don’t see extra parameters being attached to the link, then go back and check your Auto Link Domain settings.
This next part is a little more technical. We can use the Developer Tools in our browser to see extra Debug information that we just enabled. Open the Developer Tools Console on your browser (in Chrome, CMD+SHIFT+J on a Mac or F12 on a PC, in Firefox, CMD+ALT+K on a Mac and CTRL+SHIFT+K on a PC).
In the output, you should see the line Loaded Linker Parameter: 1242342241.144231251 (the numbers will be different in your output):

Test #2 – If you don’t see this line in your console, then doublecheck that you’ve set the allowLinker parameter to true.
That’s it! Clear your cookies and close the page.
Finally, check your Analytics the next day, and create an Advanced Segment to only show Users with Source cd_test. You should see a single User, with a single Session, and two pageviews.
Step #6: Add a Filter to Prepend Hostnames (OPTIONAL)
If you’re tracking multiple sites in a single property, hits for all domains will be grouped by page path. What that means is pageviews of example.com/about-us and external.com/about-us will both be counted in a single row in the All Pages reports, /about-us.
To fix this, follow these directions to prepend the hostname to all of your page paths. Annie Cushing has written a good guide on setting this up. Note that this will affect your data going forward, so you may want to do this in a separate view.
Editor’s note: Comments for this blog are now closed. There are many questions below that Dan graciously answered, check to see if any of them match your particular situation! There are several tools out there that make troubleshooting cross-domain tracking much easier. If you’re still having trouble, please contact us using the form below to learn more about our Google Analytics consulting services.
News & Insights
Related Perspectives