Improve Your Time On Site Metrics With Google Tag Manager
Engaged Minutes as a metric has increased in prominence particularly with content publishers of late. It’s not the be-all-end-all, but understanding not just how many pages people visit, but how long they spend on those pages is important. Luckily Google Tag Manager makes it really easy to get a clearer idea of the engaged minutes your users are spending on your website.
If you’re looking to improve how long users stay on your site, there are many ways to do that, mainly creating better content that engages your users or helping your users find more relevant content.
Rather, the tips below will help you more accurately measure how long someone is on your website. The metrics in Google Analytics inherently under-report the length of time that a user is on your website, so it can be helpful to work to get these numbers closer to reality.
By default, with just simple pageview tracking, Google Analytics will calculate the time between hits, to assign to a user for their Average Session Duration, and the Average Time on each page. Also by default, we don’t have any information on how long someone has spent on your website AFTER the last hit is sent. This means that if you are just doing basic pageview tracking, we never know how long someone spent on the LAST page they hit on your site.
A Note on Bounce Rate
What happens then if the LAST page is also their only page they visit? Typically, that user would count as a bounce, which is defined as a single-page session. More specifically, a bounce is a single-interaction session. If someone arrives and only visits one page, then we have no real information about whether they hit the site and immediately left, or spent a minute and a half reading your home page, or 3 minutes reading the blog post, before leaving.
This is a challenge especially when you’re spending money to drive traffic to your website but are unable to gauge if your audience is even vaguely interested in your content. This is also a problem for publishers who may have lengthy articles; your users may be reading all of your content and then exiting – but it can be extremely frustrating if you are seeing an extremely high percentage of bounces for your articles and are unable to measure engagement.
Typically, combating this problem involves configuring event tracking to send additional hits to Google Analytics. There are tons of articles out there that point out some useful configurations for improving upon these metrics – and we have some below for you too – but it is important to first recognize the impact these solutions can have on your bounce rate before jumping right in.
If we introduce event tracking, by default our events are going to impact bounce rate because they are counted as interactions (hits). So while our bounce rate will go down, we need to make sure we’re clear about the definition. Any of the solutions below will mean that we’re redefining what bounce rate means for our own website. Instead of, “A bounce is a single-interaction session,” we may instead decide to define bounce as “A bounce is a single-pageview session that stays on our site for less than 15 seconds.”
In some cases, that may make the most sense. If someone stays on our site for a certain amount of time, we can make the executive decision to move them from the bounce bucket to the engaged bucket. Now the question becomes an internal decision, does 15 seconds count as engaged, or does 30 seconds make more sense? We know that some users may open a browser and then immediately walk away or get distracted, but we can at least separate out the people that immediately realize this isn’t for them and close the page or hit the back button.
We need to be careful that we’re clear about what impacts our bounce rate. If we have an event that fires as soon as the page loads, like an auto-scroller on our homepage, by default that will also affect our bounce rate. This makes less sense, as the user didn’t stay on the site for a period of time or perform some action. (In this case, we’d use the non-interaction parameter to not impact our site metrics, but still, record data.)
As you evaluate the following tips, just be clear that any interaction on your site will affect your Bounce Rate and any time metrics like Average Session Duration and Average Time on Page.
The 5 and 15 Second Events
First we need to create a couple of timers. Go to “Triggers” in your Google Tag Manager and then click to create a new trigger. You’ll select an event of Timer, and make the Interval value 5000, with a limit of 1. That’s a trigger that will fire at 5 seconds. Do the same thing and make a 15 second timer with an Interval value of 15000.
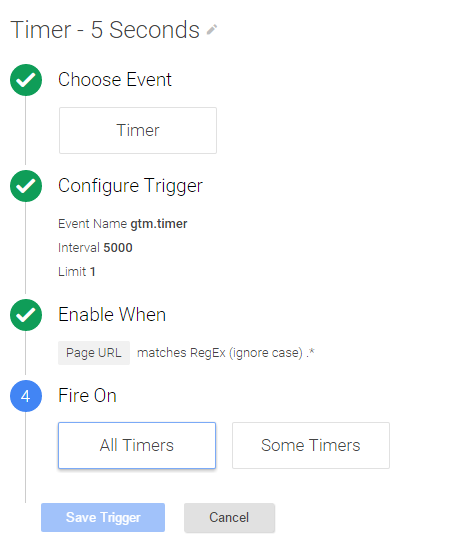
Now we can use those as Triggers to fire events at 5 and 15 seconds after a user has reached a page.
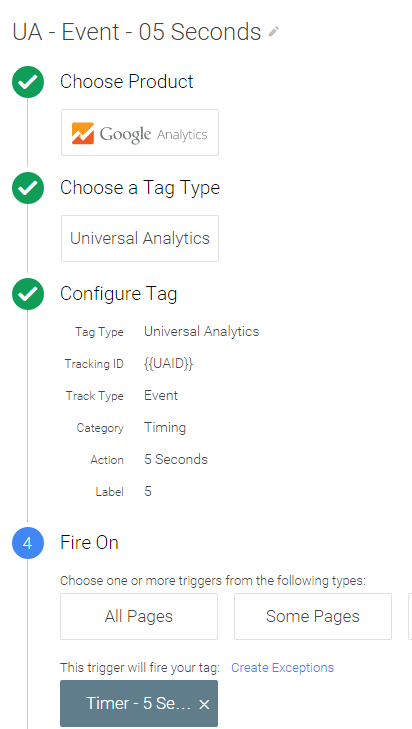
I’ve named the Category for the event “Timing” and the Action “5 Seconds”. The 15 second event would look just like this, but have 15 seconds instead of 5, obviously. The label is just the pure seconds indicator. This comes into play later. Each tag would fire on the Timer we created for each.
Now you have an event firing on every page after 5 seconds and 15 seconds. This is a really aggressive approach that will dramatically alter our bounce rate, but will help us see the drop off between 5 seconds and 15 seconds.
The 30 Second Interval
We can also set up a timer to fire on an interval. Set up a trigger that is a timer that fires on the interval 30000 (30 seconds) with a limit of 120. This would fire an event every 30 seconds for 2 hours.
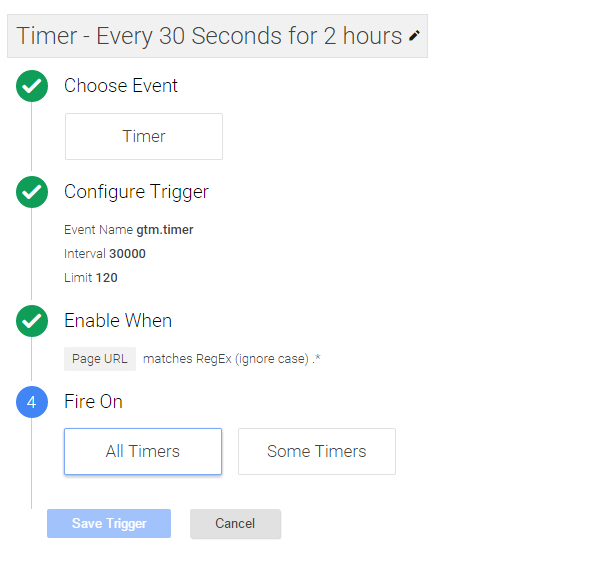
Then create an event to fire on that timer as the trigger similar to the 5 and 15 second events, except name the action something like “30 second intervals”.
Now if someone comes to your site and spends 5 minutes reading a page before exiting, you know they spent 5 minutes on that page. If they are on a particular page of your checkout process which is too long and difficult to people, you might start seeing why the exit from that funnel step is so bad… because the time on the page is so high. As long as the person is on your website, every 30 seconds for 2 hours an event will fire updating their time on site. Sure it’s not second by second accurate, but it’s a ton better than before.
Keep in mind that there is a 500 hit per session limit, so we don’t want to fire an event every second. The example above would take up 120 of those hits. For all these timing events, you need to keep that 500 hit limit in the back of your head, so you don’t spam too many timing events and lose some actual tracking you care about. Maybe only include this on the pages you specifically care about, or maybe you change it to be every minute but upping the interval to 60000. It’s up to you.
The Body Mouseout
Now here’s the one that triggered me to write this post (excuse the GTM pun). I was thinking about how when someone navigates away from your site… What is it that they do? Well, maybe they click on an external link on your site. You should also be tracking external/outbound links with other events, and that’ll help your timing as well, but what if they’re simply leaving your site. Maybe they’re closing the tab in the browser, or the browser entirely. Maybe they’re clicking on a bookmark. Whatever they’re doing they are leaving the window of your website. If we fire an event when the user’s mouse LEAVES the body, it’s a decent indication that the user is about to leave the site entirely, within seconds.
There is a number of usability tools that track where people are looking on your website via eye-tracking. We can do something similar by tracking mouse movement. So let’s track them leaving the site. You can do this entirely from within GTM, with some help from jQuery.
First, you should create a new Custom HTML Tag and include the following Javascript:
<script src="https://ajax.googleapis.com/ajax/libs/jquery/2.1.4/jquery.min.js"></script>
<script>
$("body").mouseout(function() {
dataLayer.push({'event': 'bodyOut'});
var d= new Date();
d.setTime(d.getTime()+5000);
var expires = "; expires="+d.toGMTString();
document.cookie = "bodyOut=1"+expires+"; path=/";
});
</script>
The first thing we’re doing is including jQuery. If you are already including this on your page, you don’t need that first line. Most sites have it already these days, and you’d probably be better off having your developers stick it right on the page correctly, but this is a jumpstart. If you already have jquery installed it shouldn’t hurt your page to have it in here as well.
Next, we are telling the page to do a data layer push of a ‘bodyOut’ event when a user’s mouse leaves the body element of the page (basically the entire page).
Finally we’re setting a cookie for 5 seconds. You could make it longer, maybe 10 seconds. We don’t want the event to fire on EVERY time the mouse leaves the body, particularly if the user is shaking their mouse around, but we want to capture it enough that it hopefully captures that LAST mouseout. So we set a cookie that expires in 5 seconds, and next I’ll show you why.
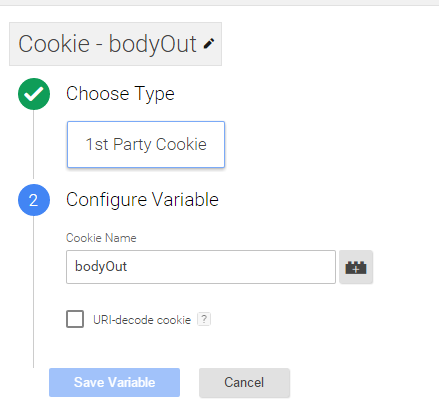
Next, we make a user-defined variable and choose 1st Party Cookie. Let’s call this bodyOut. This will automatically grab the value from that cookie we just set for 5 seconds.
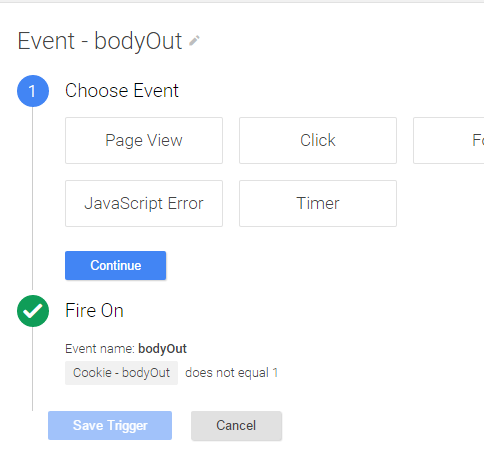
Next we make a new trigger that is a custom event, with the name bodyOut (from our datalayer.push in the code above), but also where the Cookie bodyOut value does NOT equal 1. That way it won’t fire every millisecond and every single time the user’s mouse leaves the body, but only once every 5 (or 10 if you increased it to that) seconds
Lastly we make an Event tag for the Timing Category called Body Mouseout that fires on that trigger.
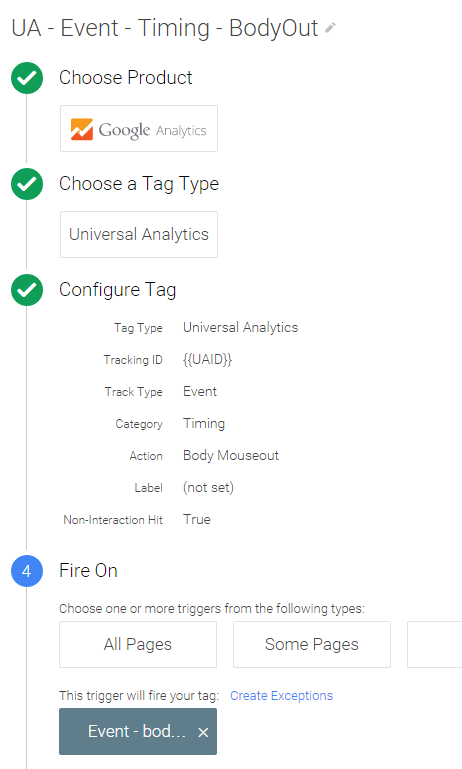
And now every time (well, once every 5 seconds) that a user’s mouse ‘leaves’ the window of your website, an event will fire, updating the timing within Google Analytics and updating the Session Duration and Average Time on Page metrics for the session and page.
Conclusion
By applying one or all of these in some way, you will inevitably improve your metrics for Average Session Duration, and Average Time on Page. These events will dramatically affect your bounce rate, so it’s useful to consider how you’d like to implement them. You could create a separate View for these types of events and filter them out of your main views if you’d still like to report on your bounce rate.
Any events that you add will help you get a clearer idea of the content that is engaging people, and that can help you get a better idea for what people on your site are doing, and how long they’re staying there.
Good luck and get tracking!


