Getting Started With Firebase Analytics For Apps
Firebase Analytics is an analytics tool specifically designed for apps. It is part of the larger Firebase SDK, a mobile development platform that helps you use Google services when building iOS and Android apps. There are a variety of other tools built into the Firebase SDK, but for our purposes we are only focused on utilizing Firebase Analytics.
This post aims to provide the stepping stones for getting up and running with Firebase Analytics for your mobile app, as well as sending the information to your Google Analytics mobile app property.
Background
Firebase Analytics
What does it cost to use Firebase? According to the documentation, there is no charge for using Firebase to collect events about user activity on your apps. There are no limits or tiers for the amount of data collected – there is only a limit to the number of types of events you collect (the names given to the events you are tracking). You can have up to 500 different event types or names, which should be plenty in most cases.
Note: Firebase data is oriented around events instead of screenviews – you will essentially be logging events into Firebase with optional parameters containing additional information about the action that occurred. This is different than the traditional form of app tracking with Google Analytics where data is screenview-oriented and your reports look very similar to a standard web Google Analytics property (which is pageview-oriented). However, you can use Firebase and GTM in tandem to get both – we’ll walk through how to do that in this post as well.
Google Tag Manager
Firebase hooks into the Google Tag Manager (GTM) dataLayer, making integration with Google Analytics very straightforward. When events are logged to Firebase (as instructed later in this post), GTM can be used to collect and send that data to Google Analytics as well, which will make it possible to provide roll-up reporting with website data for a bigger picture of how users are engaging with all of your digital properties.
Note – These instructions are geared towards fully native apps. If your app is a hybrid app (such as a PhoneGap app), you may need to customize your implementation.
Summary of Steps
Here we’ll focus on the basic steps to getting set up and logging Firebase events, as well as tracking those same events with Google Analytics screenview and event tracking. Firebase offers a variety of additional features and functionality that could not be fit into this one blog post, but there are many links to Google’s documentation throughout if you want to learn more as well.
The general steps we will walk through include:
- Set up Firebase Account
- Install Firebase SDK
- Install GTM SDK
- Log Firebase Events
- Bonus: Send Screenviews and Events to Google Analytics
Firebase Account Setup
Follow the steps below to set up a new Firebase account for your Android and/or iOS app.
If you have both an Android and an iOS version of your app, you can either set them up with separate Firebase accounts or set them up within the same Firebase account. If you want to set them up within the same Firebase account, you’ll need to set up one first and then add the second within the Project Settings. This will allow you to toggle back and forth between data for the Android and iOS apps, for example (the data will not be combined).
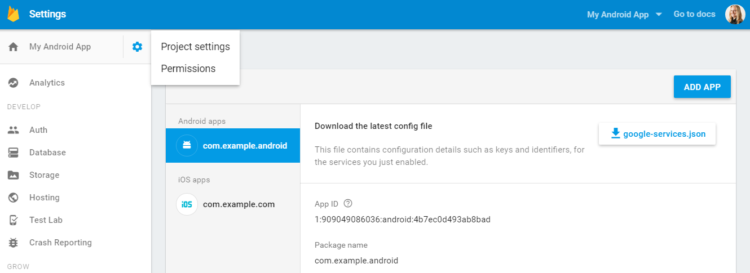
Getting Started
Have your package name ready for your Android app and/or your Bundle ID ready for your iOS app (ask your developers for this).
Go to console.firebase.google.com and create a new project.
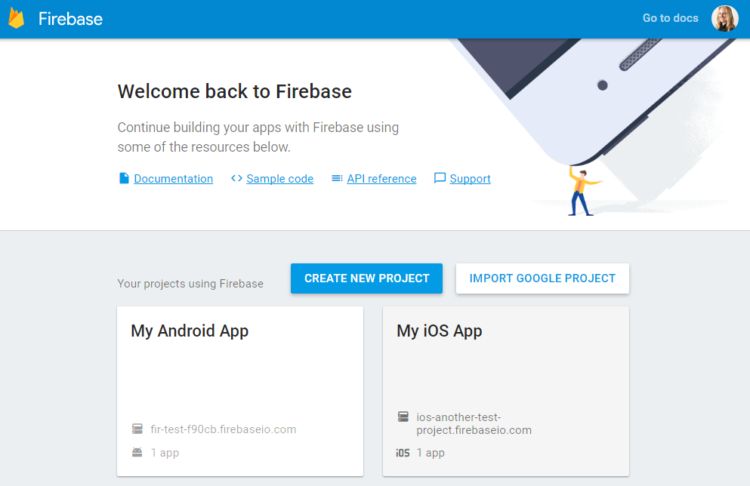
Once you’ve created a new project, you’ll see the overview screen. Down the left-hand side you will see many of the Firebase features, such as Crash Reporting and Analytics. We’re going to be working with Firebase Analytics.
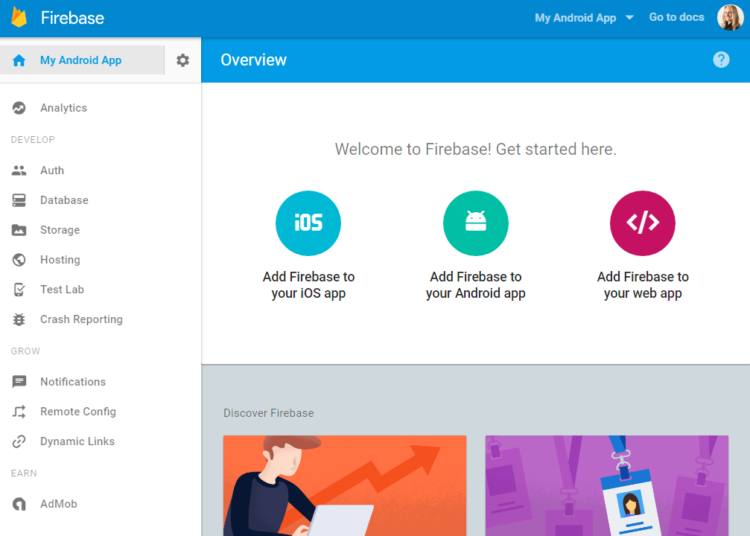
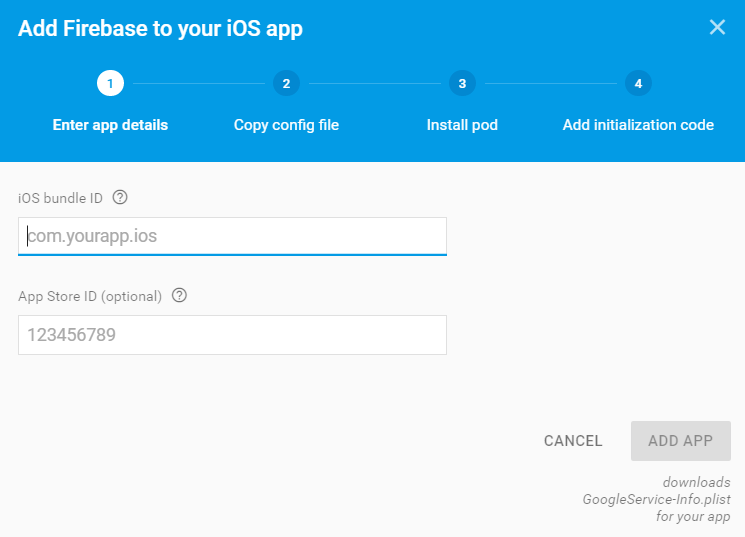
In the center of the screen you’ll see options to Add Firebase to your iOS app, Add Firebase to your Android app and Add Firebase to your web app. Click on the appropriate option for your app (disregard the web app option for now), you will be prompted to enter your app’s package name (Android) or Bundle ID (iOS).
Get the Config File(s)
Once you have provided your Bundle ID or Package Name you will be given a config file along with instructions on where to place it in your app. You will also be provided with steps to installing the config file and installing dependencies for your Android or iOS app. Follow each of the steps as instructed.
Examples for both Objective-C and Swift are provided for iOS.
Go to Analytics from the left-hand navigation and you will see a variety of reports are available, including a Dashboard, Events, Audiences, and more:
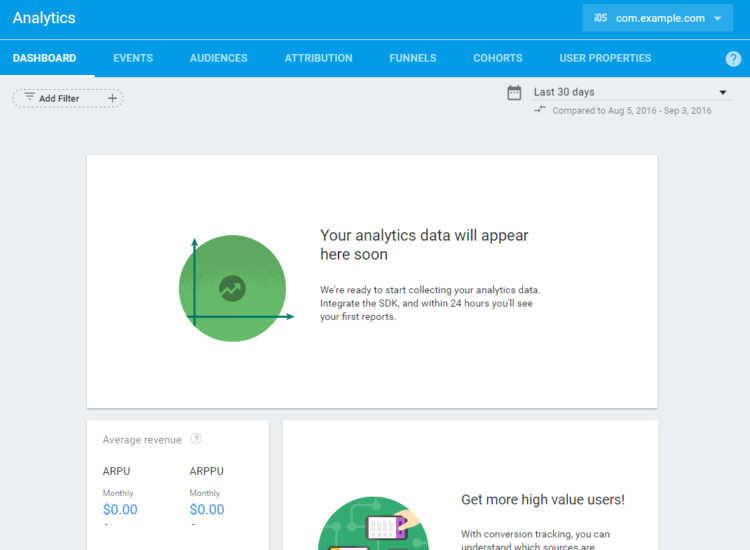
There are other data points that Firebase can collect (such as user properties), but we’ll save those for a later post. Today we’re only concerned with logging Firebase events and setting up basic screenview and event tracking for Google Analytics. Check out this handy resource to learn more about the Firebase Analytics reporting interface.
While You’re At It – Take It A Step Further
While we’re setting up Firebase, there are a few other tools that we can use in tandem. Consider the differences between the tools and how much effort is required to track into multiple tools. In some cases, it’s not much effort at all!
Google Analytics
This one we’ll cover in this post – set up a Mobile Google Analytics property and use GTM to piggyback off the Firebase events in order to send screenviews and events to Google Analytics as you would with analytics tracking on a website using GTM. This is a helpful approach if you’re just getting warmed up to the Firebase reporting style and you want to have your more familiar Google Analytics-style reports available to refer back to as you make the transition to Firebase.
Make sure you select the Google Analytics Services SDK option, not the Firebase option (more on the Firebase option at the very end of this post):
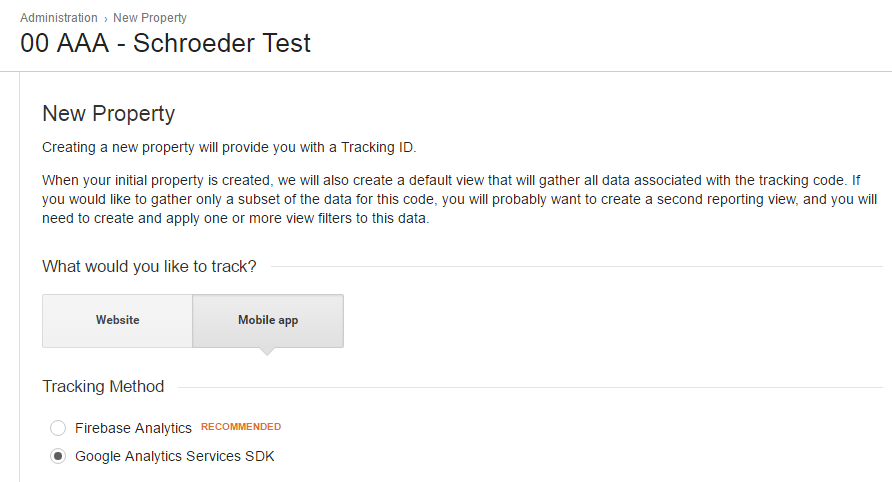
This is NOT mandatory, but often we will recommend doing this in addition to using Firebase Analytics because you reap the benefits of having more familiar reports in Google Analytics. It can be a very handy approach if you’re interested in using Firebase but are more comfortable with the reporting options in Google Analytics or need a feature in the Google Analytics interface that does not yet exist in Firebase. Ideally though, the goal is to rely solely on Firebase Analytics, not both, as the data will not always line up 1:1. See this post for more information about the reporting differences.
Google’s documentation actually lays out a few good points you can use to decide whether you want to use Firebase Analytics, Google Analytics or both. Some best practices are also provided for deciding how to segment the data into different properties in Google Analytics as well.
For the purposes of exploring the options and the reporting differences, we’re going to assume you are interested in configuring both Firebase Analytics and tracking screenviews and events in Google Analytics and that you have a mobile Google Analytics property ready.
BigQuery
For another day – BigQuery Integration! Enough said, right? Well, except a quick note on billing: you will have to enable a billing account for Firebase (since BQ is a paid tool) and choose the “Blaze” (pay-as-you-go) plan. If you’re not using the Firebase features other than Analytics (other features like Realtime Database, File Storage, etc.) you shouldn’t have any charges aside from BigQuery storage and query processing. In the Firebase project, select the gear icon in the left nav, Project Settings. Then go to the Account Linking tab and choose BigQuery.
Install Firebase SDK
You will need to refer to the documentation for installing the Firebase SDK on your app:
- Android: https://firebase.google.com/docs/android/setup
- iOS: https://firebase.google.com/docs/ios/setup
Note that at the bottom of both sets of instructions there are additional services you can enable, such as crash reporting. Enable that and any other service relevant to your app.
Install GTM SDK
As I mentioned earlier, we’re going to use GTM for collecting Firebase events and sending them to our mobile Google Analytics property in order to enable a new suite of reports that we otherwise would not get with Firebase alone.
First we need to make sure we have a GTM container to add to our app. Go to http://tagmanager.google.com and create a new container for your app(s). Select the appropriate operating system and choose a Firebase container:
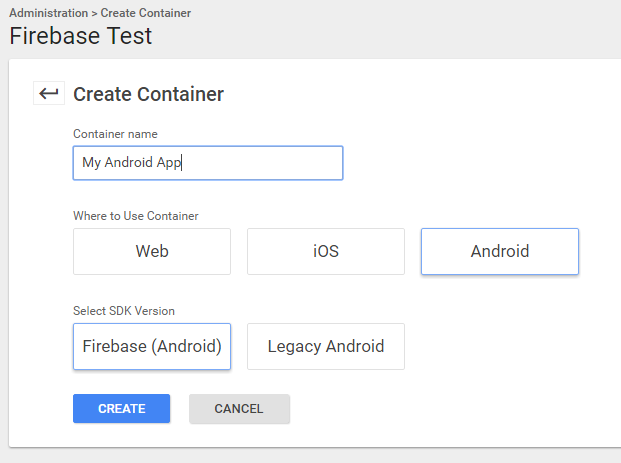
Once you do this, you will immediately be provided with a link to instructions on installing the GTM SDK for your app:
- Android: https://developers.google.com/tag-manager/android/v5/#add-gtm-to-project
- iOS: https://developers.google.com/tag-manager/ios/v5/#add-gtm-to-project
If you peek ahead in those instructions, you’ll see some examples for logging events. You’ll also see this important note:
Google Tag Manager uses Firebase Analytics’ events, parameters, and user properties to trigger and build tags you’ve configured in the Google Tag Manager web interface. In this sense, your Firebase Analytics implementation acts as your data layer.
This is a key point referring to how GTM and Firebase work together. In fact, you could completely ignore the Firebase Analytics reports altogether and simply use the platform to log events to the “data layer” for GTM, ultimately using GTM to send data to Google Analytics if you prefer the screenview-oriented reports.
Log Firebase Events
You should have a strategy in place for how the data is going to look before you request it from your developers. If you want to capture screenviews, you’re likely going to want to see the screen name of the screen that was viewed, for example. It may be helpful to create a spreadsheet to organize all of the actions you want to track and the details you want to collect about those actions.
The two documents I linked to last show some examples of how you would log events. For example, the Android documentation shows example code that looks like this:
Bundle params = new Bundle();
params.putString("image_name", name);
params.putString("full_text", text);
mFirebaseAnalytics.logEvent("share_image", params);
In this example, share_image is the name of the custom event, and the image_name and full_text are additional pieces of information that are provided as parameters.
If you’re not sure how to label your events, check out Google’s list of suggested events.
Better yet, there are certain events that are automatically logged to Firebase for you (but not to Google Analytics), such as first_open. We won’t go into detail on those, but if you’re interested you can check out the documentation for those.
For additional information on logging events, there is more thorough documentation for that:
- Android: https://firebase.google.com/docs/analytics/android/events
- iOS: https://firebase.google.com/docs/analytics/ios/events
Ok, so once those new custom events are logged to Firebase from within your app, you will begin to see them in your Firebase Analytics account (typically within a few hours, but it can take longer). They will appear in the Events tab along with the events that are automatically logged for you:
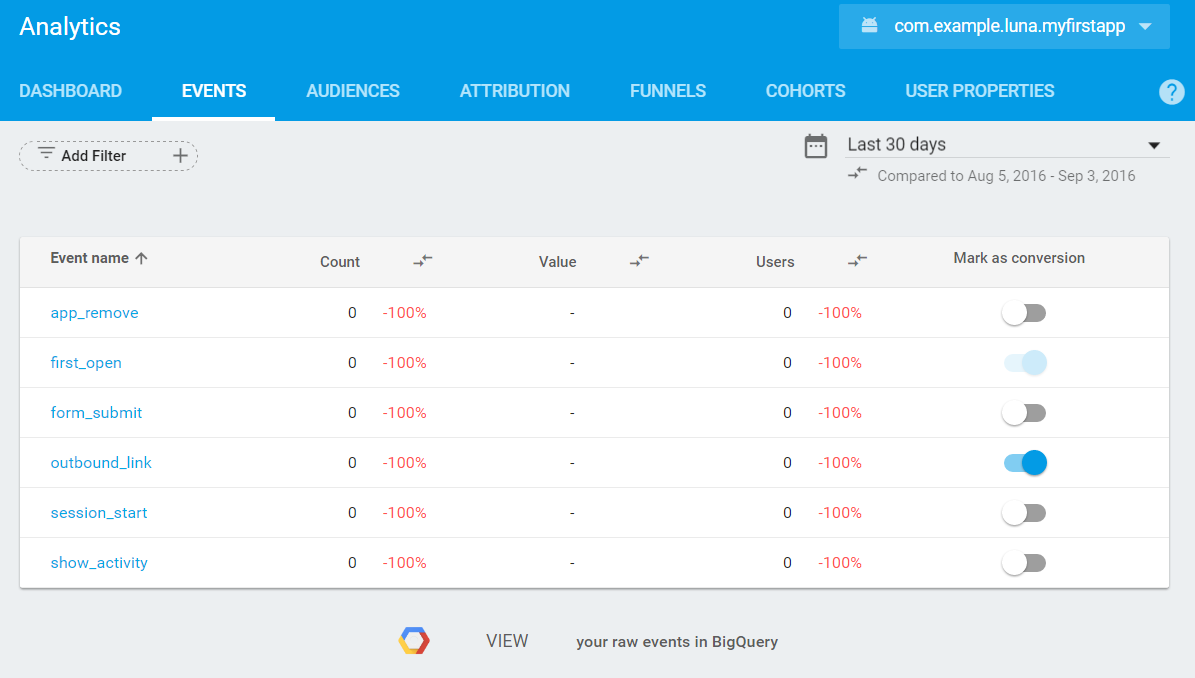
You will not need to configure tags in GTM in order to see the Firebase events that you are logging.
You will need to set up tags in GTM to pass this data along to Google Analytics as traditional screenview and event tracking, however.
Send Screenviews and Events to Google Analytics
As I said, events that are logged to Firebase will appear in Firebase Analytics reports – you will not need to configure tags in GTM to see them there. However, if you want to also send that data to Google Analytics, you will need to capture it with variables and set up Google Analytics tags.
Google Analytics Screenview Tracking
Here’s an example of how an event might be logged in an Android app for a screenview:
Bundle params = new Bundle();
params.putString("screen_name", name);
mFirebaseAnalytics.logEvent("screenview", params);
In GTM – we can take this information, break it apart into pieces, and then use that to send information to Google Analytics. Let’s start from the bottom up – Variable, Trigger, then Tag.
Use an event parameter variable to pull in the screen name from the Firebase event being logged from your app:
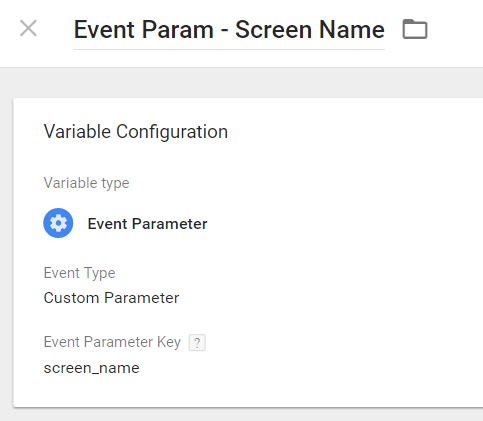
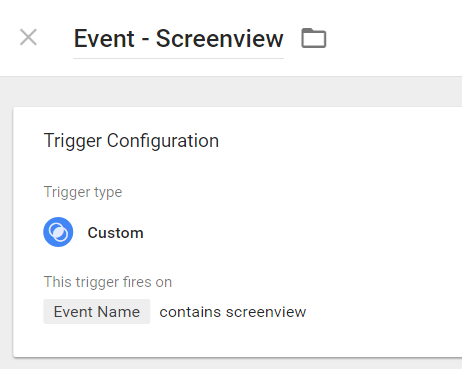
Then create a trigger that listens for Firebase events called “screenview:”
Lastly, you’ll need to create a Google Analytics tag for your screenview. We can set the tracking ID to your new Google Analytics mobile app property.
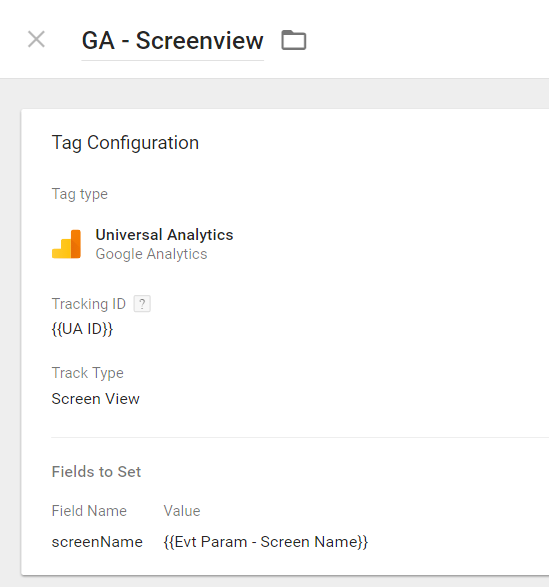
You’ve just created your first screenview tag using Firebase and GTM! Once the GTM container is published, screenview hits will be collected in the mobile app Google Analytics property:

Google Analytics Event Tracking
So now that we have our screenviews tracked, let’s set up some event tracking. Let’s use an iOS example this time, written in Swift, of an event that might be logged when a user performs a search on the app:
FIRAnalytics.logEventWithName("search", parameters: [
  "search_term": search_term,
  "screen_name": screen_name
  ])
This example comes from Google’s list of suggested events mentioned earlier.
To capture this with Google Analytics event tracking, we’ll again start from the bottom and work our way to a Tag.
We can reuse that same event parameter variable created earlier to pull in the screen name from the Firebase event being logged from within the app:

Create another event parameter variable to pull in the search term for the event action:
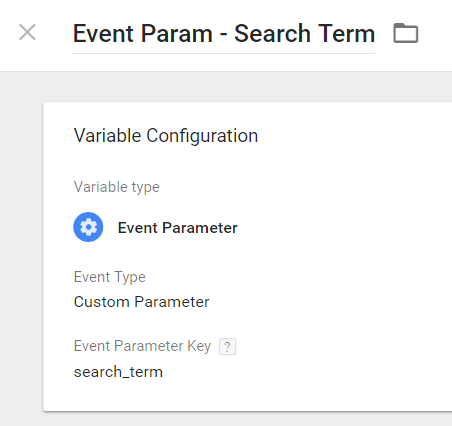
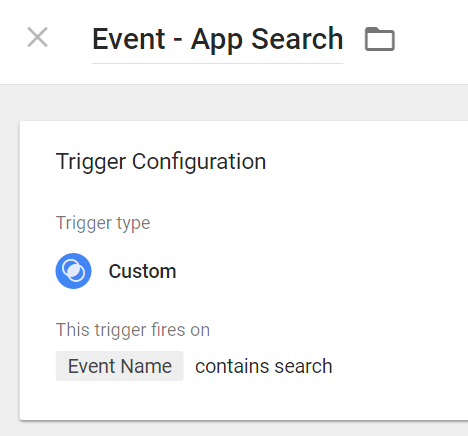
Then create a trigger that listens for Firebase events called “search:”
Finally, set up a new Google Analytics tag:
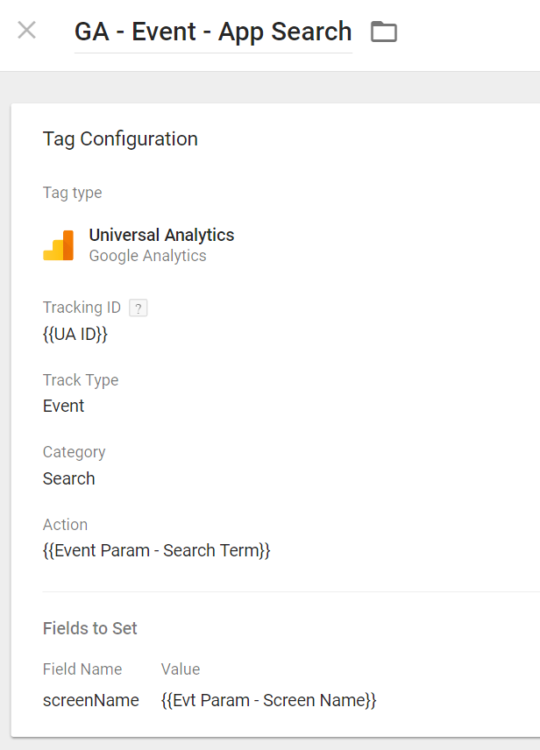
Again, set the tracking id to the Google Analytics mobile app property.
Once you publish GTM with these updates, event tracking data will appear in the mobile app Google Analytics Event reports:

Troubleshooting
Now that you’ve set up these tags, you’re probably wondering how to test them. Testing Firebase and Google Analytics on a mobile app can be especially challenging, and is certainly worthy of its own blog post. Some of the most common tools for debugging include:
- Charles Proxy, Fiddler, WireShark or similar network request sniffing tool – You can configure these to listen to the network requests sent out from your app, check the parameters that are provided for accuracy, etc.
- Android Studio console – Log console events in Android Studio while testing configurations with an Android emulator.
- Xcode debug console – Same idea as the Android Studio console, but for iOS.
- DebugView in Firebase – you have to do a little extra work to configure this, but it will allow you to send debug hits and see them in the same Firebase Console Project that you have set up for your app. In the Analytics section, hover over StreamView to get the DebugView drop down to appear and check it out.
- Google Analytics Real Time Reports – While app hits can take a few minutes little longer to appear in Real Time reports, they should appear there while you’re testing.
Summary
I hope this is a clear yet useful guide to getting up and running with Firebase Analytics. There are plenty of other Firebase features we could talk about in future posts. If you’re curious, check out Jimmy’s review of Noteworthy Features of Firebase Analytics.
Keep in mind that if you have a hybrid app (using web components and native components), you may need a MUCH more complex solution. If you’re not sure whether your app is fully native or a hybrid, talk with your developers before getting started with setting up Firebase.
Note that you can also set up a new Firebase Google Analytics property and link it to your new Firebase account in order to bring those same Firebase reports into Google Analytics:
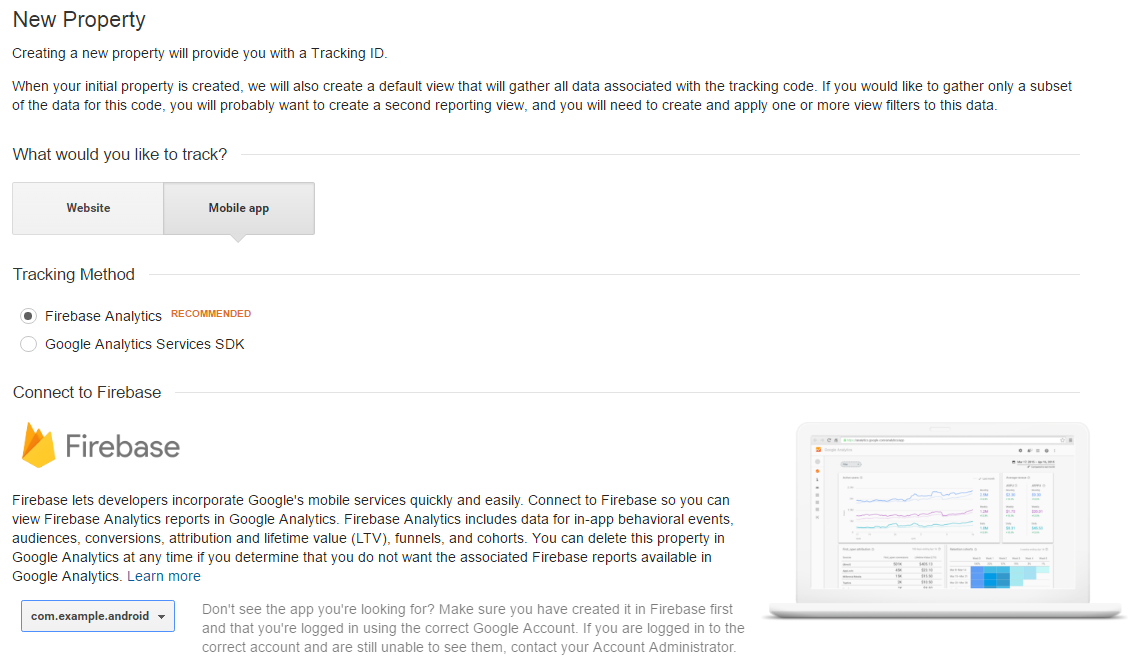
This means you can see your Firebase reports in the Google Analytics interface rather than having to switch to Firebase to see your app data. I kept this piece of information out of the original list of Additional Opportunities in order to prevent confusion throughout the setup instructions – this is not as useful as setting up a mobile app Google Analytics property, in my opinion.


