Marketers: Install Google Tag Manager On Your WordPress Site In 4 Minutes

50% of the top million websites use Google Tag Manager, the incredibly powerful analytics/marketing tool that quickly deploys tagging across your website. Want to do Facebook remarketing? Subscribing to HubSpot, Pardot or another marketing automation service? Need to add an AdWords conversion tag?
So many actions marketers take require additional tracking code to be placed on website code and Google Tag Manager will handle that for us. Best of all, you don’t have to be an analytics nerd to implement this! Tag Manager empowers marketers to own and make changes without development or technical help. I’m not a coder at all, and I’ve launched GTM on a few dozen WordPress websites.
In the simplest configuration, Google Tag Manager fires and controls the Google Analytics tag on your website. See our post “What is Google Tag Manager? (And How Does It Work With Google Analytics?)” below for more gushing.
Here’s What You’ll Need:
- Knowledge Of Self: Critical for all marketing projects but for today, ask yourself: Does my website have tons of traffic and lots of QA checks and dev process to do anything? If so, go talk to IT about this just to make sure it’s cool. If you are working on small-to-medium sized business or non-profit, proceed!
- WordPress Admin Access. This needs to be a WordPress site you control and have access to make admin-level changes.
- Google Account. Ideally the one you use for Google Analytics.
- Google Chrome Browser. You can download Chrome here.
- Egg Timer. Mine looks like a Penguin because I'm stationed at our Pittsburgh office.

1. Set Egg Timer for 4 minutes
Easy, right?
2. Sign Up for Google Tag Manager
Navigate to the Tag Manager page and to sign up for free.

Create a new GTM account. Account name best practice: Use your company name (e.g. Alice’s Wonderland Resorts LLC).

Now name your container and choose what you want to track. Since we’re talking about WordPress websites here, select Web. Container name best practice: Use the domain name of your website (e.g. www.aliceswonderlandresorts.com).

3. Get Dat Code
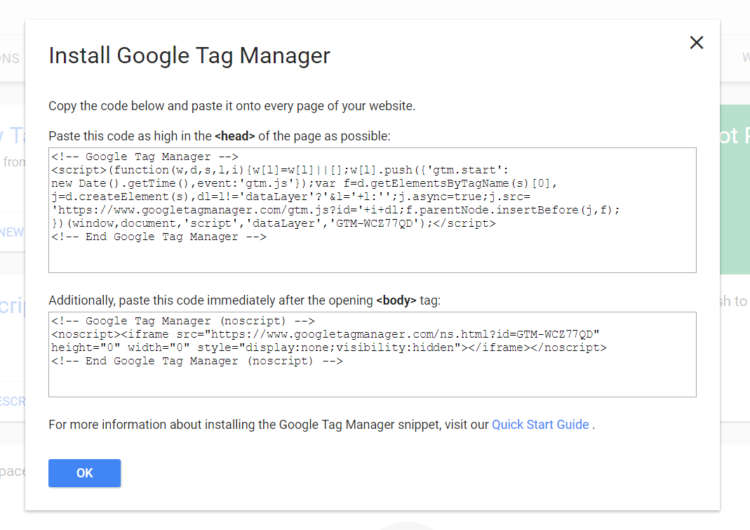
Yes, I told you this wouldn’t be technical. It’s not! We just need to do a few copy / pastes. Once you click create, you’ll be presented with the following popup that contains the code that needs to be added to your site. This code snippet will have your Container ID, which is super important! Mine below is just an example. Don’t use it.
4. WordPress Editor
In WordPress, navigate to Appearance, then Editor. If you don’t see this option, then you do not have Admin access to your site.

Look on the right-hand side and you’ll see the files the make your WordPress template work. Look for Header.php and edit. This files controls all page templates in WordPress.
Paste the top portion of GTM code right after the opening <head> element (see screenshot). Use your browser search to locate the <head> if needed.

Paste the second portion of GTM code right after the opening <body> element.

Don’t monkey around with other stuff! Seriously.
When you’re done, click Update File.
5. Import a Recipe (If you Want to do GA Stuff) Or Add a Tag for a Non-Google Service
Head over to our website and grab our basic recipe pack for GTM to do some Google Analytics tracking. This GTM pack will allow you to easily add ready-to-go tags to your new GTM container. If you have Google Analytics installed already, the recipe instructions will tell you how to add your tracking number to GTM.

Note: you don’t have to set up Google Analytics through Tag Manager, but it’s recommended. You can install Tag Manager and leave your existing Analytics in place. Learn about how Google Tag Manager and Google Analytics can work together.
Super Important Note: Google Analytics should only load on your page once. If you’re using a different WordPress plugin to load Google Analytics, then do not also load Google Analytics through Google Tag Manager.
Maybe you just need to install a Facebook remarketing snippet without a developer, use Tag Manager! But if you would like to migrate your Google Analytics tracking to Tag Manager, see our blog post that covers some other points about migrating your on-page Google Analytics to Google Tag Manager.
If you need to set up tracking for external service because you want to do some advanced marketing tracking or measure conversions from social or paid ad spends, it’s easy! Google Tag Manager comes pre-loaded with tons of external tags (view list) or you can use a special tag called a Custom HTML Tag to paste in other tags.
Here are GTM instructions for integrating popular marketing tags:
Remember to test your tags before publishing them. Google Tag Manager has built-in previewing and debugging. We also cover a few Chrome extensions for debugging that will come in handy!
6. Verify Your Install
Tag Assistant is a nifty freebie will look for the GTM container in your site source code and let you know that everything works. Add Google Tag Assistant to Chrome from the Chrome Store.

Now, re-load your website and open Tag Assistant. You should see a happy little face with your container ID:

Ding! My timer just rang. Did you make it? Remember, you don’t have to migrate Google Analytics right away if you just need to get one advertising tag on your site via GTM. You can do that step next (Spoiler: it takes longer than 4 minutes) and we’d love to help. Have you done a quick & dirty GTM launch like this in the past?