Updated Instructions For Implementing Google Optimize

Getting Google Optimize installed on your website isn’t the most straightforward process. While the tool itself allows users with even minimal technical experience to begin testing simple changes on their website in a matter of minutes, installation may require an upfront effort with close collaboration with your development or IT team.
Recently I wrote a guide to getting started with Google Optimize. In it, I briefly covered the implementation of Googles new A/B testing tool. It hasn’t been long since we published that blog post, but already the best practices for implementing Google Optimize have changed. Consider this your updated guide for implementation. We’ll cover how to add the Google Optimize snippet and how to make sure it plays nice with Google Analytics and Google Tag Manager. Let’s get started.
Getting Started
In-order to setup and use Google Optimize, you’ll need the following things:
Google Analytics Account. You likely already have one of these. If not, you can get one here. You’ll need a Google Account to sign up, which can be a Gmail account or a company email address associated with Google.
Specifically, Optimize requires Universal Analytics to operate.
Google Tag Manager (recommended). We strongly recommend using Google Tag Manager. Tag Manager will allow you to easily add Universal Analytics and Optimize to all pages of your website. It will also allow you to track events (i.e. link clicks, form submissions, etc.). Optimize requires that you use GA goals as experiment objectives, so you can use GTM to track events, and GA to count those as Goal Completions.
In the past Tag Manager was implemented immediately following the opening body tag. With the release of Optimize, Google has updated the Tag Manager container so that it can be placed immediately following the opening head element.
We have instructions for installing Tag Manager here.
Google Chrome Browser. Optimize requires a chrome extension to modify test variations. That extension can only run on a Chrome Browser. Download Google Chrome here.
Google Optimize Chrome Extension. The Optimize chrome extension is what powers the Optimize visual editor. It is required for you to be able to modify variants of a page. Download the Optimize Chrome Extension here.
Setting Up Optimize
The process for setting up Optimize looks like this:
- Create an account and container
- Link the container to Google Analytics
- Install Optimize on the site
1. Create an Optimize Account and Container
Once you have access to Optimize, you’ll be able to login and create an experiment. An account allows you to run experiments on one or more websites, you’ll likely only need one account per company. The container is where all your experiments and configuration settings will live.
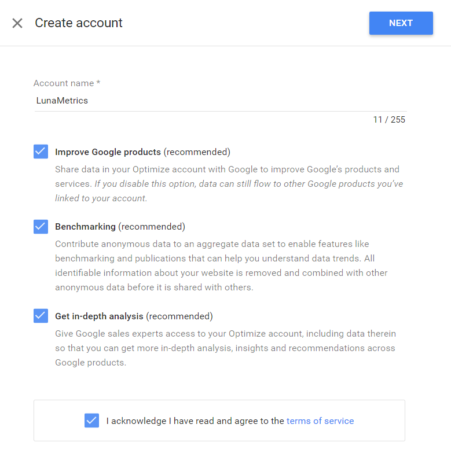
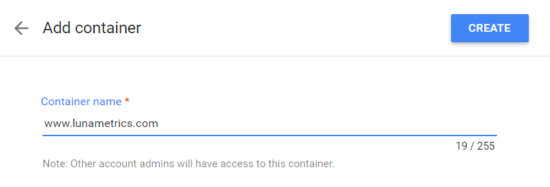
Click “Create Account” and you’ll be prompted to enter an account name and container name. After you accept the Optimize Terms of Service your account will be created and you’ll be sent to the container pages.
Our Naming Best Practices
You’re typically the only one who will see your Optimize Account name and Container names, so really, you just want this to make sense to you and your organization. We have a few suggestions:
Account Name(s). use your company name (i.e. Bounteous)
Container Name(s). Use the domain name of your website (i.e. www.bounteous.com)
2. Link the Google Optimize Container to Google Analytics
Linking a container to Google Analytics allows data to flow between the two products.
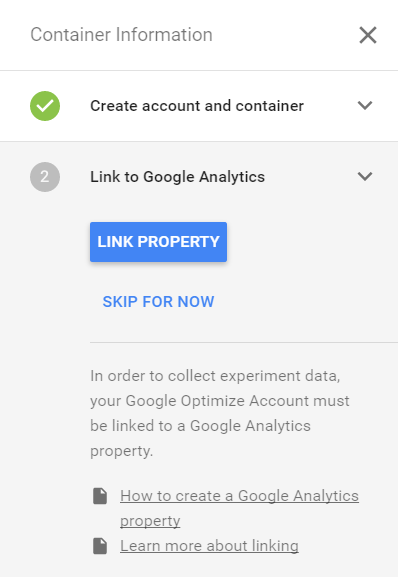
On the right-hand side of the container page you will see a 5-step process for completing the setup.
- Expand the “Link to Google Analytics” dropdown. Then click the “Link Property” button.
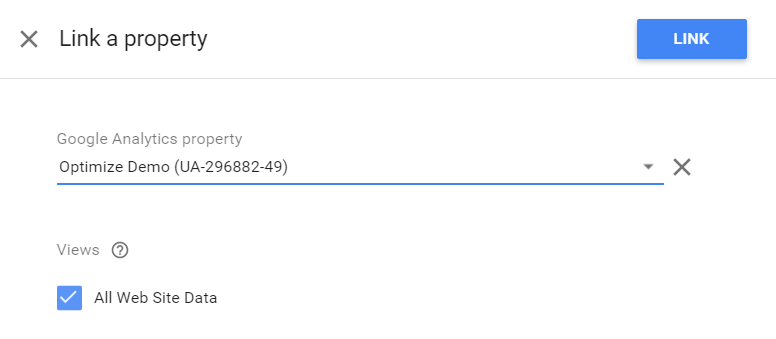
- Select the property you want from the dropdown, making sure that the property you select corresponds to the domain on which you’ll be running experiments.
- Then select one or more views that you would like to connect to Optimize.
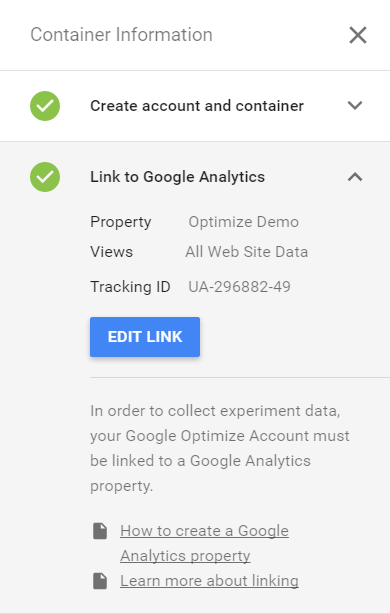
- Click the blue “Link” button and Google Optimize will be linked to your property and views.
View Selection is Important. The maximum number of goals a Google Analytics account can have is 20. And because Google Optimize requires events like link clicks or form submissions to be recorded as a goal in Google Analytics before it’s used as an experiment objective, you’ll need to think about how many goals you’re currently using and what additional goals you’ll need to set up for testing. If you are close to the maximum number of goals allowed by GA, then you may want to set up a testing view that can accommodate additional goals.
There are other things to consider with your View selection. This View is where you’ll see all of the results from your experiment inside of Google Analytics. Filters on your View will also affect your experiment results data. If you’re filtering out internal traffic from a View, for instance, they may still see the experiment, but their data will not be included in the results.
3. How to Install the Optimize Snippet
Now that you’ve created an Optimize account and container, and have linked your container to GA, you’ll need to install the Google Optimize snippet on your website.
I’ll stop here to say that there are lots of different options, depending upon your previous implementations of Google Analytics and Google Tag Manager. These options range from the easy (add a Tag in Google Tag Manager) to the complicated (add extra code to your page.) There are pros and cons to each method, which is enough material for a completely separate blog post. As Google Optimize is still in beta, these instructions may change at any time.
Our Recommended Installation
We believe that the Google products all work really well together, and we like using them all. Our recommended approach comes straight from the Google support documentation, and is the best way to both ensure that your experiments load as quickly as possible while still maintaining the flexibility that Google Tag Manager offers.
- Google Analytics and Google Optimize, but no Google Tag Manager – Instructions
- Google Analytics, Google Optimize, AND Google Tag Manager – Instructions
The recommended way of doing this is by adding specific code on your site to load Google Analytics and thus Google Optimize as soon as possible. We’re going to call this the “Analytics-Optimize Snippet.” This is a small bit of JavaScript that will get added to every page. Because this may kick off an experiment, there are certain things that should load above this snippet.
These things should come before the Analytics-Optimize Snippet:
- <meta charset>
- Data layer initialization (can use this information in Optimize and GTM!)
- Setting cookies.
- Any scripts that you may want to use or that declare JavaScript variables that you wish to use in Optimize experiments. For example, jQuery and JavaScript used to target an Optimize variant.
- Page hiding snippet.
These things should come after the Analytics-Optimize Snippet:
- Other trackers, Analytics tags, ad tags and/or a tag-management snippet.
- Other scripts that you won’t target Optimize experiments against.
Here’s what it looks like all put together:
<head>
<meta charset="UTF-8">
<!-- initiate data layer -->
<!-- set cookies -->
<!-- declare JavaScript variables need for the experiment -->
<title>Example Page Title</title>


<!-- Optimize Page Hiding Snippet -->
  <style>.async-hide { opacity: 0 !important} </style>
  <script>(function(a,s,y,n,c,h,i,d,e){s.className+=' '+y;h.start=1*new Date;
  h.end=i=function(){s.className=s.className.replace(RegExp(' ?'+y),'')};
  (a[n]=a[n]||[]).hide=h;setTimeout(function(){i();h.end=null},c);h.timeout=c;
  })(window,document.documentElement,'async-hide','dataLayer',4000,
  {'GTM-XXXXXX':true});</script>

  <!-- NOTE: Replace GTM-XXXXXX with your own Optimize container ID -->

<!-- end Optimize Page Hiding Snippet -->


<!-- Analytics-Optimize Snippet -->
<script>
  (function(i,s,o,g,r,a,m){i['GoogleAnalyticsObject']=r;i[r]=i[r]||function(){
  (i[r].q=i[r].q||[]).push(arguments)},i[r].l=1*new Date();a=s.createElement(o),
  m=s.getElementsByTagName(o)[0];a.async=1;a.src=g;m.parentNode.insertBefore(a,m)
  })(window,document,'script','https://www.google-analytics.com/analytics.js','ga');
  ga('create', 'UA-123456-1', 'auto');
  ga('require', 'GTM-XXXXXX');
</script>

  <!-- NOTE: Replace UA-123456-1 with your own Analytics tracking ID -->
  <!-- NOTE: Replace GTM-XXXXXX with your own Optimize container ID -->

<!-- end Analytics-Optimize Snippet -->


<!-- Google Tag Manager -->
  <script>(function(w,d,s,l,i){w[l]=w[l]||[];w[l].push({'gtm.start':
  new Date().getTime(),event:'gtm.js'});var f=d.getElementsByTagName(s)[0],
  j=d.createElement(s),dl=l!='dataLayer'?'&l='+l:'';j.async=true;j.src=
  'https://www.googletagmanager.com/gtm.js?id='+i+dl;f.parentNode.insertBefore(j,f);
  })(window,document,'script','dataLayer','GTM-XXXX');</script>

  <!-- NOTE: Replace GTM-XXXX with your own Google Tag Manager ID -->
  <!-- Note: GTM-XXXX of tag manager is different than GTM-XXXXXX of Optimize -->

<!-- end Google Tag Manager -->


<!-- Other Head Elements -->
<link rel="canonical" href="http://www.example.com" />
<link rel="stylesheet" href="http://www.example.com/stylesheet.css" />
<script type="text/javascript" src="http://www.example.com/js/jquery/jquery.js"></script>
<!-- etc, etc, etc -->
<!-- end Other Head Elements -->

</head>
<body>

<!-- Google Tag Manager (noscript) -->
  <noscript><iframe src="https://www.googletagmanager.com/ns.html?id=GTM-XXXX"
  height="0" width="0" style="display:none;visibility:hidden"></iframe></noscript>
  <!-- NOTE: Replace GTM-XXXX with your own Google Tag Manager ID -->
<!-- end Google Tag Manager (noscript) -->
About the Page Hiding Script
Using the page hiding snippet is not required, but is highly recommended. The snippet prevents what is known as the flicker effect. The flicker effect occurs when the user sees the original page before being shown the variation. This effect can have a negative impact on both user experience and experiment results. Here is the flicker effect in action:
For the page hiding snippet to do its job, it needs to be placed as high up in the head as possible – after <meta charset> and before the Optimize, Analytics, and/or Tag Manager snippets.
Page Hiding Snippet Timeout Function. The page hiding snippet has a timeout function that stops Optimize from trying to load an experiment if too much time has passed. The default time is 4 seconds, which is represented as 4000 milliseconds in the snippet. This time can be changed, just know that changing the timeout might affect how many people are included in your experiment.
About the Analytics-Optimize Snippet
Let’s talk about that Analytics-Optimize Snippet and what is included and what is not included. Again, make sure you read the right support documentation. Here’s our desired order of operations.
- Page starts loading.
- Page Hiding Snippet loads.
- GA Loads from JavaScript snippet on page.
- Optimize Loads from JavaScript snippet on page. Experiment may or may not fire.
- GTM loads from JavaScript snippet on page.
- GA – Pageview Tag is fired from Google Analytics.
- Rest of page loads…
The commands that are included in the Analytics-Optimize snippet above contain two commands:
ga(‘create’, ‘UA-123456-1’, ‘auto’); – This translates to: “Let’s load the Google Analytics tracker. When we’re ready, we’re going to send our data to this specific property, UA-123456-1, but nothing yet. Also, we’re setting our cookieDomain to auto, which means we’re making sure this works on subdomains.
ga(‘require’, ‘GTM-XXXXXX’); – This translates to: “Let’s load this Google Optimize container.”
That’s it. Notice that at no point did we send information to Google Analytics. We’re going to continue using our Google Tag Manager to handle that.
About the Google Tag Manager Snippet
We’ve been recommending Google Tag Manager for years, so if you haven’t upgraded yet, now’s a great time! The installation instructions changed for Google Tag Manager recently, which split the code into separate parts, one in the head and one in the body. Whether you have Google Tag Manager installed the old way or the new way won’t really matter here, but if you’re making changes to the on-page code, then why not fix everything.
Double-Check Your Installation
As a last reminder – you should only fire a pageview once into a Google Analytics property. So your setup will look like either of the following:
ON PAGE: Yes ga(‘send’,’pageview’) code on the page
IN GTM: No GA pageview tag in Google Tag Manager.
OR
ON PAGE: No ga(‘send’,’pageview’) code on the page
IN GTM: Yes GA pageview tag in Google Tag Manager.
Installing Google Optimize can get complicated. Following our instructions closely will get you there, but also be careful and check your Google Analytics and Google Tag Manager to make sure there are no major changes to how things fire, or changes to metrics like Pageviews or Bounce Rate inside of Google Analytics.
