Track More Click Detail With Data Attributes And Google Tag Manager

Tracking when someone clicks on a link is pretty easy in Google Tag Manager. Tracking PDFs is relatively simple, if the link they click on ends in a PDF. It gets a little trickier when we want to know more details about a particular link. If it was a PDF, was it for a Quarterly Report or Client Testimonial?
Custom data attributes are a speedy way to capture additional information about content on the page. It’s a streamlined solution that helps you better understand how a user steers through the site’s content. Custom data attributes are a construct of the HTML 5 spec and are widely supported in all major web browsers. Since it’s valid HTML and HTML is very user-friendly to implement, this makes it all the more attractive to take for a spin.
Published: October 15, 2013
Let’s avoid additional unnecessary on-page Google Analytics (GA) code obstacles. Let’s veer around clunky, fragile solutions in Google Tag Manager (GTM) and head for easy street!

There are several benefits to implementing and using data attributes:
- Your analytics becomes turbocharged with more detail.
No other method lets you as easily track extra info about external links, downloads and more. The previously untrackable, can be quickly become trackable with specific details. - Your site tracking becomes less prone to flying off course due to technical errors.
Rather than 100 lines of tracking code all over the place, or even on specific links, now your actual code is in one place (Ideally GTM) and it’s less likely to wreck your entire visitor session. - You can easily add additional tracking down the road.
By following the rules below you can almost immediately track any clickable things on your website. - Adding data attributes isn’t highly technical.
A non-technical person with a CMS can begin implementing data attributes manually pretty easily. For best results though, a developer can help surface server level information and repetitively add that info to individual links.
What are Custom Data Attributes?
Custom Data Attributes let you add your own information to HTML elements. Let’s say you have an automobile blog with a number of resources on your site , some involving Cars, and others involving SUVs. If you want to be able to differentiate which is which, it’s not always obvious looking at their linked URLs. For instance, maybe they look like this:
<a href=”/M5Review.pdf”>M5 Review</a>
<a href=”/X3Specs.xls”>X3 Specs</a>
As it stands, there is very little information in those links about the types of documents. To help differentiate them, we can add the following Custom Data Attributes:
<a href=”/M5Review.pdf” data-bodystyle=”car”>M5 Review</a>
<a href=”/X3Specs.xls” data-bodystyle=”suv”>X3 Specs</a>
The format is “data-” followed by a unique word to identify the Custom Data Attribute (bodystyle). Now because of this Custom Data Attribute, “data-bodystyle“, we can better tell which link refers to which type of automobile. You can also have multiple custom attributes and have them refer to other information you want to convey. For instance, in this case, you could have the make of the automobile, or even the date of publication:
<a href=”/M5Review.pdf” data-bodystyle=”car” data-make=”BMW” data-published=”august 2017″>M5 Review</a>
<a href=”/X3Specs.xls” data-bodystyle=”suv” data-make=”BMW” data-published=”may 2017″>X3 Specs</a>
Custom data attributes are a great way to attach metadata like this to HTML elements without having it be visible to the user (other than by viewing the source code of the page). Because these data attributes happen behind the scenes and they are explicitly for tracking purposes, you know they will are not likely to be meddled with by your content team as they make changes to the site. Bonus!
“Pulling Over” Custom Data Attributes Into Google Tag Manager
Google Tag Manager is a great way that we can interact with these Custom Data Attributes. It’s easy to create a variable that references the custom data of a clicked element. Here’s how we do it:
Create Some Variables from Your Custom Data Attributes.
Each attribute you set up on the page should have its own data layer variable in GTM. The key is in its name. Each Custom Data Attribute has two parts as we mentioned above, the first being “data-” and the second being something unique like “make” or “published“.
Tag Manager takes care of the heavy lifting and makes this information available within the interface.
Here’s what happens behind the scenes – but feel free to skip this paragraph if needed. Google Tag Manager adds the clicked item, that is, everything we know about the clicked link like all the attributes that define it, to the data layer as “gtm.element.” Everything you click a new link or submit a new form, this variable gets updated. Using this, GTM knows the “href” value, the CSS class and other pieces of information about whatever was just clicked. What’s more, any data attributes on the element, it nests these values in the data layer under “dataset.” This is where you’ll find that second unique part we added.
Putting this all together, you would fetch your attributes by putting something like “gtm.element.dataset.bodytype” into the Data Layer Variable value field. For our other examples, we could use either “gtm.element.dataset.make” or “gtm.element.dataset.published“. Beware of mixed letter casing! There are very specific guidelines regarding data attributes the could adversely affect your tracking. It just might be safer to stay in your lane keep all your data attributes lowercase.
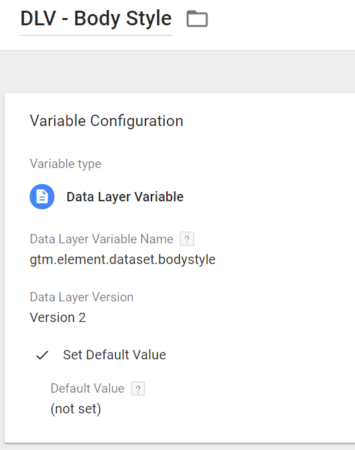
To capture all three, create a variable for each Custom Data Attribute you have included on your link. You can even modify the default value to “(not set)” if there is no value.
From there, you can use these variables in the same way you would use the built-in “click” variables, as they are essentially extensions you built into the click element.
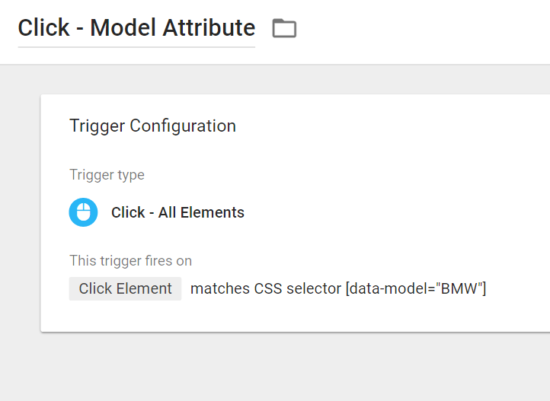
Use Custom Data Attributes to Fire Triggers.
Using the “matches CSS selector” filter within a trigger, you can use data attributes to help you send off tags. In this case, we could fire an event whenever BMW content was clicked.
Use Custom Data Attributes in Tags.
With the above implemented, we use GTM to send an event into GA. Whenever a user clicks on a link on the page, the trigger captures that link as the “click element”. Then, the variable pulls the data from that element. If you were to click the “M5 Review” PDF link, the variables you set up will contain the values of those data attributes until the next click (or page load, etc.) is processed by Google Tag Manager.
To use these in GA, you’ll you need to set up a GA Event tag to pull these all together. Here’s a GTM tag that sends an event into GA whenever someone clicks on a BMW resource.
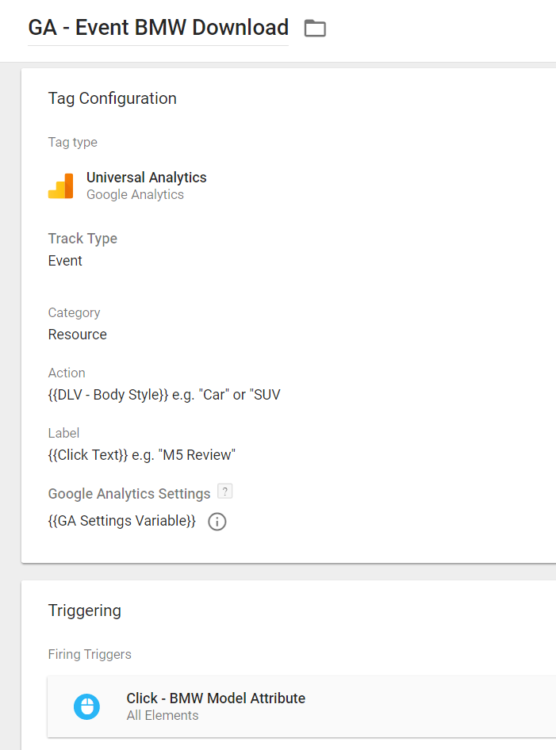
As you can see, it also uses the body style attribute we set up as well as the click text of the resource. (I’ve added the examples, that part is not actually part of the tag.)
Tracking these Clicks in Google Analytics.
From this point, it’s easy to create tags to fire events based on the Custom Data Attributes. But we can even leverage these attributes as Custom Dimensions. When someone downloads a resource on our site, we can use Custom Dimensions to Capture the publish date of that resource as well.
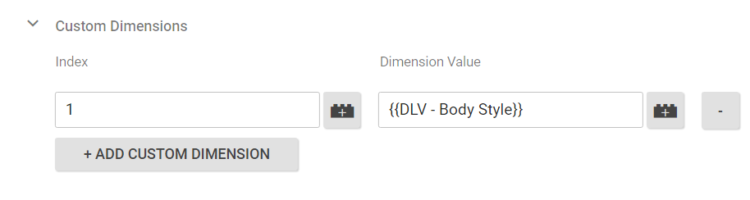
Once this is set up, you will be able to track clicks to your site and apply Custom Dimensions as well for additional reporting and analysis. Not only would you see which of those documents were being downloaded, but you would be able to tell the body style that is more popular!
What Else Can We Do?
There are many applications. You can send data attribute-based variables to other sources via GTM. For instance, you could track clicks to a “Get More Information” button and then pass along the Make (a Custom Data Attribute GTM Variable) a user was interested in to a remarketing tag.
Conclusion
Using Custom Data Attributes along with Google Tag Manager is a great way to easily implement a variety of Google Analytics tracking Tags on your website now, as well as giving you a very flexible mechanism for easily adding new tracking in the future.

Published: September 22, 2016
News & Insights
Related Perspectives