Recreate Google Analytics Cross Device Reports in Data Studio

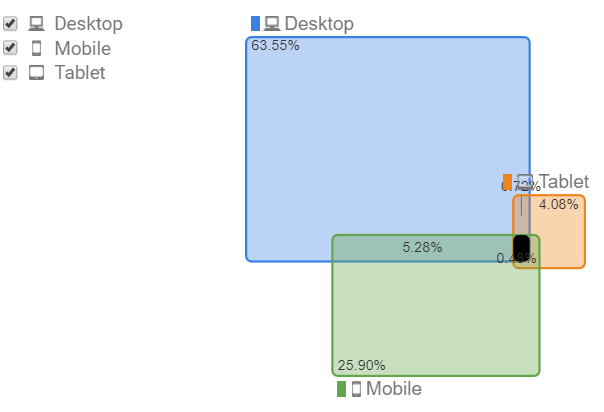
If you’ve set up a User ID view in Google Analytics, you’ll see a new set of reports called Cross Device reports. These reports include Device Overlap, Device Paths, and Acquisition Device, all of which can help you understand different touchpoints your visitors interact with and how they ultimately lead to conversions. These reports can provide valuable information about reaching your visitors, but if you’re creating and sharing dashboards in Data Studio you won’t see the Cross Device dimensions available.
I will preface this post by saying if you have Google Analytics 360, then you’ll likely be better off using Google BigQuery if you want to recreate the Cross Device reports. I’m going to cover how to get started with Cross Device reports using Google Sheets and Apps Script so that anyone on Standard Google Analytics can follow along. Keep in mind that using the Google Sheet method opens up the door for sampling.
Let's Get Started!
I’m going to focus specifically on the Device Paths report, but the Device Overlap and Acquisition Device reports take a few modifications. There will be a few steps to creating Cross Device reports. First, we’ll need to set up a User ID create a User ID view in Google Analytics. Then we’ll configure Google Sheets and Apps Script to get the data. Finally, we can link to our Data Studio report!
Step One: Set up User ID & Enable User ID View
My colleague, Amanda Schroeder, has already written up instructions on how to set a user ID, configure GTM to collect the user ID, and enabling the User ID view in Google Analytics. You can check her post for detailed instructions. Keep in mind that you should never pass personally identifiable information as a user ID.
For recreating the Cross Device reports, we will need to store the user ID as a custom dimension as well. Remember, you get 20 custom dimensions with the free version of Google Analytics (and 200 with Google Analytics 360!)
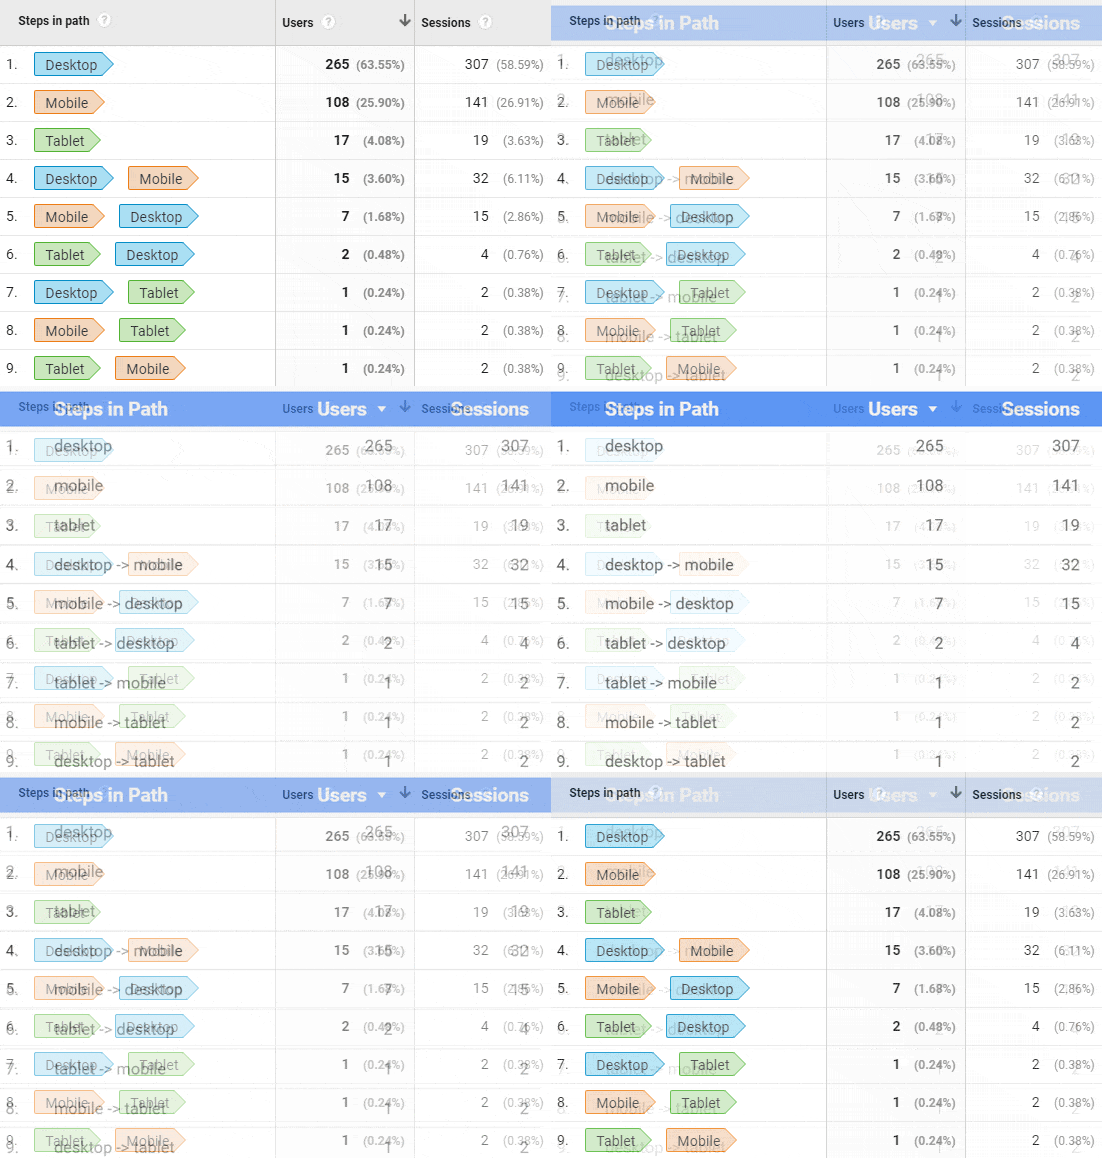
Once you’ve identified your users and set up your User ID View, you’ll find the Cross Device reports under the Audience reports in Google Analytics.
Step Two: Configure Google Sheets (Easy Version)
To make things easier, we’re providing a customizable Google Sheet that will do the work for you. To get a copy of this sheet, start by clicking the button below.
This step is important. Do not "request access" to this document. Instead, choose the File menu option, then Make a Copy.
Once it’s in your drive, you’ll need to change a few items. Change the View ID on the Report Configuration sheet to that of our Google Analytics View. This can be found in your View Settings inside of the GA interface. Change the Custom Dimension to point to the correct one that you configured above.
You’ll need to install the Google Analytics Sheets Add-On, using the Add-On menu. Now, you can run the report to update the report with your own info!
Step Two: Configure Google Sheets (Hard Version)
If you want to go through it step by step, we've got you covered. Let's set up a Google Sheet to pull in the data we need. You’ll need to have the Google Analytics add on installed (instructions here). Create a new report by selecting Add-ons > Google Analytics > Create new report.
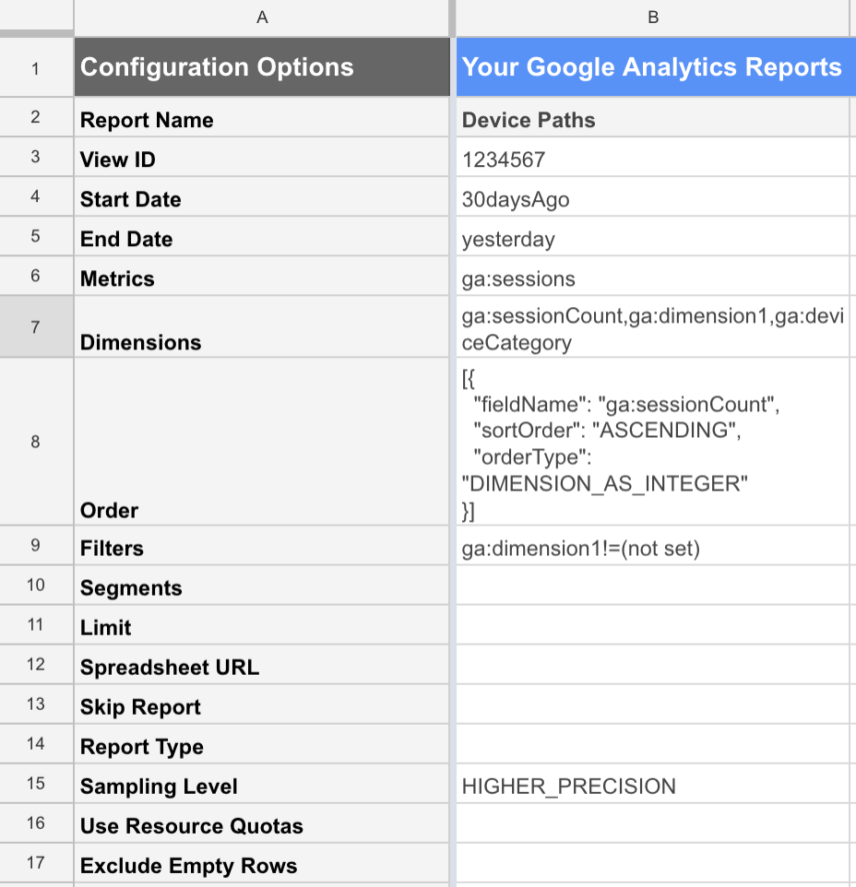
You should see the report configuration pop up in the right-hand side of our sheet. You’ll give your report a name and select your account, property, and view. For this example, we’ll be using the sessions and session count metrics, and then we’ll choose dimensions for the user ID custom dimension we set earlier and device category
You can also apply a segment before creating the report. We’ll be using the user ID custom dimension in combination with the device category to identify which devices user are on, and the Count of Sessions dimension will help us distinguish the order.
Once you select create report from the pop-up, you’ll see a new tab for the report configuration. Here, we’ll add in a few more details. In the Order row, enter the following:
"[{
""fieldName"": ""ga:sessionCount"",
""sortOrder"": ""ASCENDING"",
""orderType"": ""DIMENSION_AS_INTEGER""
}]"
You can apply any filters for your data. I’ve used the following filter to exclude any instances where the user ID custom dimension is equal to (not set):
ga:dimension1!=(not set)You might also want to filter for something like a traffic source or geolocation for targeting a specific audience. Here’s a list of filters and operators to reference.
Finally, I’ve added a parameter to the Sampling Level row. Without a parameter, sampling levels will be the GA default. You can also user FASTER to get faster results at a higher sampling level. I’ve chosen to use HIGHER_PRECISION for a lower sampling level, although the report will take longer to run.
Once you’re done with configurations, you can run the report by selecting Add-ons > Google Analytics > Run reports. You can also schedule your reports to run automatically every hour, day, week, or month by selecting Add-ons > Google Analytics > Schedule reports.
Step Three: Configuring Apps Script
Google Apps Script allows you to run JavaScript across several G Suite applications. We’re going to use Apps Script to run through the Google Analytics data we’ve pulled in Google Sheets and rewrite the data into device paths. You’ll find the Script Editor under Tools in the menu bar.
Copy and paste the following function into your code file to add the getDevicePaths function to your sheet:
function getDevicePaths(input) {

// Get Count of Session
  var userDict = {};
  for (var i = 0; i < input.length; i++) {
    var val = input[i];
    // Check to see if the user exists in the user dict
    var userId = val[1];
    var device = val[2];
    var numSessions = val[3];
    if (!device) {
      continue;
    }

    if (userDict[userId]) {
      // d is the same structure as the thing we create below in the else, it's { path: (array of devices), numSession: (int) }
      var d = userDict[userId];
      // rip the path out
      var path = d.path;

      // If the last place they visited from is the same as the current device we are looping through, don't add it
      if (d.path[d.path.length - 1] !== device) {
        d.path.push(device);
      }

      // Always increment the number of sessions the user took
      d.numSession = d.numSession + numSessions;
    } else {
      userDict[userId] = {
        path: [device],
        numSession: 1
      }
    }
  }

  // We want to create a new representation of path dictionaries
  var pathDict = {};
  for (var key in userDict) {
    var d = userDict[key];
    var numSessions = d.numSession;
    var path = d.path.join(" -> ");
    if (pathDict[path]) {
      var p = pathDict[path];
      p.numUsers = p.numUsers + 1;
      p.numSessions = p.numSessions + numSessions;
    } else {
      pathDict[path] = {
        numUsers: 1,
        numSessions: numSessions
      }
    }
  }

  var arr = [];
  for (var key in pathDict) {
    var p = pathDict[key];
    var numSessions = p.numSessions;
    var numUsers = p.numUsers;

    arr.push([key, numUsers, numSessions]);
  };

  return arr;
}
Be sure to save your script!
Copy and paste the following function into your code file to add the getDeviceOverlap function to your sheet:
function getDeviceOverlap(input) {

// Get Count of Users
  var userDict = {};
  for (var i = 0; i < input.length; i++) {
    var val = input[i];
    // Check to see if the user exists in the user dict
    var userId = val[1];
    var device = val[2];
    var sessionNum = val[0];
    var numSessions = val[3];
    if (!device) {
      continue;
    }

    if (userDict[userId]) {
      // d is the same structure as the thing we create below in the else, it's { path: (array of devices) }
      var d = userDict[userId];
      // rip the path out
      var path = d.path;

      // If the device already exists, don't add it
      if (d.path.indexOf(device) == -1) {
        d.path.push(device);
        d.path.sort();
      }

    } else {
      userDict[userId] = {
        path: [device]
      }
    }
  }

  // We want to create a new representation of path dictionaries
  var pathDict = {};
  for (var key in userDict) {
    var d = userDict[key];
    var path = d.path.join(" | ");
    if (pathDict[path]) {
      var p = pathDict[path];
      p.numUsers = p.numUsers + 1;
    } else {
      pathDict[path] = {
        numUsers: 1
      }
    }
  }

  var arr = [];
  for (var key in pathDict) {
    var p = pathDict[key];
    var numUsers = p.numUsers;

    arr.push([key, numUsers]);
  };
  return arr;
}
Back in your Google Sheet, add three new tabs. This is where we’ll recreate the Device Paths, Device Overlap, and Acquisition Device tables. In cell A2, we’re going to call the function from our script by entering:
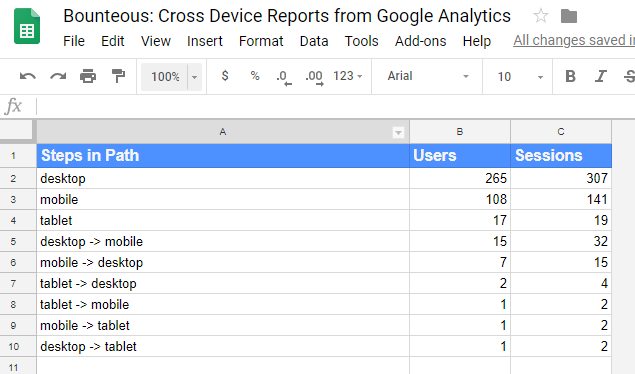
=sort(getDevicePaths(filter('Device Paths'!A16:D,'Device Paths'!A16:A>0)),2,0)Here, we’re referencing the tab with all of our Google Analytics data, and running the data through our Apps Script function. Add headings to your table in row 1 to label the metrics and dimension.
Continue doing the same thing for the Device Overlap tab. Here's the formula you'll need.
=sort(getDeviceOverlap(filter('Device Paths'!A16:D,'Device Paths'!A16:A>0)),2,0)For the Acquisition reports, we can actually create these just using formulas - no custom code required. It's not pretty, so check out the sample Google Sheet for the specifics.
These custom functions may take awhile to run, especially if you have a large dataset. Also, if your numbers don't match *perfectly* - you may have some inconsistencies with how your User ID field is being set versus your Custom Dimension field.
Step Four: Connect to Data Studio
You’ve made it this far and the end is in sight! Now we just need to add our Google Sheet as a data source to Data Studio. Open a new Data Studio report, or add your Sheet as a new data source to an existing report. Add a table to your report with the Google Sheet as your data source, and then choose the dimension: steps in path, and users and sessions as your metrics. Voilà!
What's Next?
Use this as a starting point for recreating Cross Device reports in your Data Studio dashboard. Our Google Sheet brings in the basic metrics for Users and Sessions, but you can continue to build on that for other metric calculations. You can also try different filters or segments in Google Sheets report configuration.
