Ten Adobe Analytics Implementation Best Practices For Retail

Let’s discuss best practices that are essential for your Adobe Analytics practice and will make the implementation of your commerce tracking much smoother.
1. Use Adobe Launch
Even though you could use other tag management systems (TMS) out there, using Adobe’s next-generation TMS Launch will be the most frictionless experience.
Libraries and extensions are updated on a regular basis and Launch makes your job of implementing Adobe Analytics and integrating it with other Experience Cloud solutions like Adobe Target, Adobe Audience Management, or Adobe Experience Platform (AEP) much easier.
If you're still using Dynamic Tag Manager (DTM), we encourage you to migrate to Launch before DTM sunsets in April 2021.
2. Strategize an Event-Driven Data Layer
Unlike object-based data layers like the W3C Customer Experience Digital Data Layer (CEDDL), the array-based Event-Driven Data Layer (EDDL) removes the need for using different tracking mechanisms for event context and event action.
The EDDL can be observed and read by Adobe Launch using the Data Layer Manager extension and is a proven, unified tracking vehicle that other TMS, like Google Tag Manager (GTM), have been using for quite some time.
Since Launch doesn’t come with its native data layer, it’s up to you to strategize and document your own EDDL. Unlike with other TMSs, you are not obligated to follow a specific naming convention dictated by the vendor and are, therefore, very flexible in building what’s best for your organization.
All you need to do is give your developers clear instructions on what to fire when. Ideally, you spare your developer from going through a spreadsheet with countless tabs and columns. (Yes, that was a blow against the traditional way of doing SDRs). We recommend using scenario-based instructions instead as shown below:
Example: Product Views
If a visitor views a product detail page, fire the following:
var analytics = window.analytics = window.analytics || [];
analytics.push({
    "event": "prodView",
    "product": [{
        "name": "<name>", // The user-friendly product name
        "sku": "<sku>", // The product SKU
        "color": "<color>", // The product color
        "brand": "<brand>" // the product brand
    }]
});
This method doesn’t require your developers to understand Launch-specific concepts like Direct Call Rules (DCRs) since they are already familiar with the general concept of pushing data into JavaScript arrays. Plus, the instructions resemble the logic of JavaScript conditions (“if - statements”) and leave no room for ambiguity.
The root of the data layer in our example above is called “analytics”, but you can literally name it “whatever,” even though using more descriptive names like “analytics” is probably a better idea.
3. Use a Launch Extension for Building the Product String
As we learned in Understanding Products Variable & commerce Events in Adobe Analytics, the Products Variable (s.products) follows a rigid syntax.
Understanding the underlying logic is key for a successful commerce implementation. If you have been implementing Adobe Analytics for quite some time, you are probably used to writing a lot of custom code to get commerce tracking up and running.
Fortunately, some great minds built Launch extensions to make the implementation of s.products much easier.
They all have one thing in common: The product data needs to present in a data layer.
Currently, there are three Product String extensions available in the Extension Catalog:
- AA Product String Builder (By SDI)
- Adobe Analytics Product String (By Blast)
- Adobe Analytics Product String (By Adobe)
We found the AA Product String Builder to be the most comprehensive extension. It works well with event-driven data layers, makes adding merchandising eVars and custom success events easy, and comes with a solid debugging feature.
4. Leverage Merchandising eVars
Now that your developers implemented an EDDL and you used an extension to build the Product String, we recommend you look more into Merchandising eVars.
In a nutshell, merchandising eVars allow you to tie the value of an eVar to a specific product for a specific event.
The most common use cases for Merchandising eVars we see across our commerce clients are:
- Storing additional product metadata to avoid having to use classifications or data imports
- Attributing product purchases to onsite search terms
- Attributing product purchases to product finding methods (browsing vs. searching)
- Attributing product purchases to onsite promotions
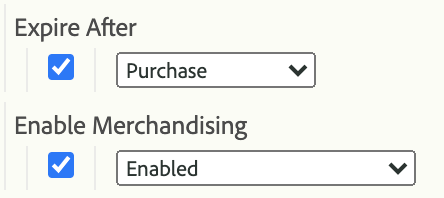
Any eVar can become a Merchandising eVar if you enable the merchandising feature.
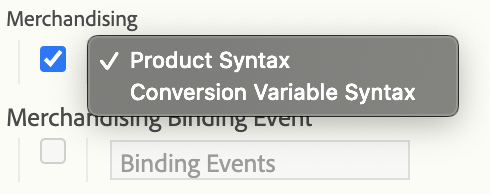
Once enabled, you have to specify the implementation method. Your two options are Product Syntax & Conversion Variable Syntax.
The Product Syntax requires you to set your merchandising eVar as part of the Product String. Choose this option when your merchandising value is available at the same time you set s.products, so that they can be sent together in the same hit.
The Conversion Syntax enables you to set the Merchandising eVar outside of the Products Variable, even in a previous hit. Choose this option if your merchandising value, e.g. the onsite search term, is not available at the same time you set s.products.
For this to work, you need to specify a Binding Event in the eVar configuration to associate the value of the Merchandising eVar with a Products Variable. Think of the Binding Event as the next possible event where you’d set s.products. If a visitor searches for a product, you could, for instance, associate the search term with the next product that gets viewed or added to the cart. Product Views or Cart Additions are excellent binding events for this scenario.
5. Create Calculated Metrics
Calculated metrics in Adobe Analytics are very powerful and easy to build.
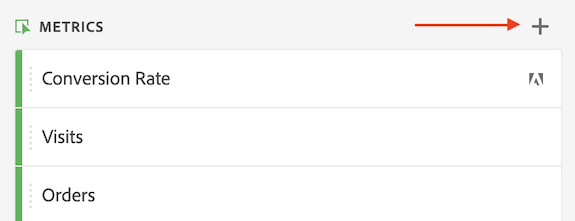
You can create them on the fly when working in Analysis Workspace.
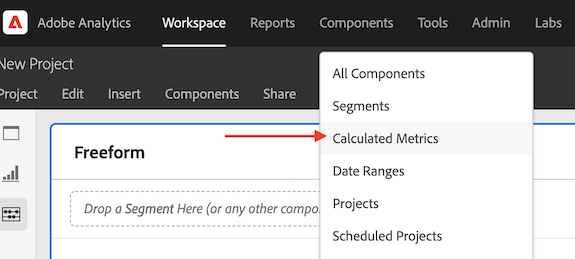
Alternatively, you can go to Components > Calculated Metrics to build a new calculated metric or to view all the calculated metrics that are shared with you.
Conversion Rate and Bounce Rate are probably the most well-known calculated metrics in digital analytics. That’s why most digital analytics solutions give you those two metrics out of the box. But, since you spend a lot of time customizing Adobe Analytics to your needs, let’s not settle for mediocrity. Instead, let's implement some additional calculated metrics to enrich your analysis.
The prerequisite for calculated metrics is having the tracking in place for the source-metrics we want to use to build our calculated metric. For instance, if we don’t track Orders & Revenue, we can’t calculate the Average Order Value (Revenue / Orders).
Below are some calculated metrics our commerce clients found value in:
| Calculated Metric | Purpose |
|---|---|
| Missed Revenue | Understanding how much money you lose along the checkout process |
| Checkout Abandonment Rate | Understanding the performance of your checkout flow |
| Repeat Purchase Rate | Understanding customer loyalty |
| Subscription Rate | Understanding the performance of the first relevant micro-conversion of the funnel, where an unknown visitor turns into a known potential customer |
| Revenue / Visitor | Quantifying and comparing the value of your site traffic across different dimensions |
| Add To Cart Rate | Understanding product desire. This calculated metric becomes most powerful when you compare it across different products and categories |
Missed Revenue: Understanding how much money you lose along the checkout process.
Checkout Abandonment Rate: Understanding the performance of your checkout flow.
Repeat Purchase Rate: Understanding customer loyalty.
Subscription Rate: For understanding the performance of the first relevant micro-conversion of the funnel, where an unknown visitor turns into a known potential customer by providing us their information, e.g. their email address.
Revenue / Visitor: For quantifying and comparing the value of your site traffic across different dimensions. This calculated metric is already available by default and you can find it by searching your components. Default metrics have the Adobe logo next to them, so thanks for making our lives easier, Adobe.
Add To Cart Rate: For understanding product desire. This calculated metric becomes most powerful when you compare it across different products.
6. Import Product Costs
Understanding which products drive the most revenue is a great start. We recommend you take your product performance reporting to the next level by also bringing the product costs into the Adobe Analytics platform. This will enable you to identify your most profitable products.
First, identify a designed custom currency event for storing the product costs.
Then, navigate to Admin > Data Sources, where you can set up a new data source with the purpose of importing product costs.
Before you proceed any further, keep in mind that fully processed data source hits count towards your server calls. If this is your first time working with them, I recommend reading Adobe’s Data Sources FAQ first.
After you hit the Activate button, a seven-step wizard will guide you through the setup process.
Throughout the process, you map the cost metric to the product dimension (and others) and once you are done, you will be presented with the Upload/FTP information in step seven.
You can reconfigure or update your data source at any time by navigating to Admin > Data Sources > Manage.
7. Integrate your Advertising Data
Advertising Analytics
By leveraging the Advertising Analytics feature of Adobe Analytics, you can bring your paid search data from Google or Bing into the analytics platform.
This will enable you to analyze & report on ad metrics like:
- Impressions
- Clicks
- Costs
- Quality Score
Across dimensions like:
- Campaign
- Ad Group
- Keyword
- and many more
The integration comes at no additional cost and does not count against your server calls. However, there are some limitations to be aware:
- Advertising Analytics is available for the three Adobe Analytics SKU—Select, Prime, and Ultimate, and is not available for the Foundation SKU.
- Advertising Analytics only works for Paid Search data, not for Display Network data.
- Advertising Analytics only works with individual ad accounts and does not work with manager accounts (MCC accounts).
Data Sources
Alternatively to Advertising Analytics, you can leverage Data Sources again, this time for uploading Ad Campaign data.
The process is similar to the process for uploading product costs. But, instead of uploading product dimensions & metrics, you’d upload campaign dimensions & metrics instead.
Adobe Advertising Cloud
The most elegant solution for integrating your advertising data with Adobe Analytics is the native, bidirectional integration with Adobe Advertising Cloud. For a quick, five minute overview of the integration, check out the video Introduction to the Analytics for Advertising Cloud DSP Integration.
8. Customize the Calendar
If you work in retail, you’ve likely used or heard of the 4-5-4 calendar. The “Retail Calendar” was initially invented to ensure comparability of monthly sales figures by assuring each period contains the same amount of weekends. The numbers 4-5-4 hereby represent the number of weeks within a month.
If you go to Adobe Analytics > Admin > Report Suites > General > Customize Calendar, you can easily change your report suite’s calendar settings from the default Gregorian calendar to the 4-5-4 calendar. Keep in mind that changing the calendar settings will not alter existing data but will only apply onward.
9. Share Data and Segments Across the Experience Cloud
By itself, Adobe Analytics is already a super-powerful, industry-leading digital analytics solution. In the context of the larger Experience Cloud Architecture, Adobe Analytics plays an essential role in delivering on the data-driven experience promise. Let’s take a look at the benefit of integrating Analytics with the other Adobe Experience Cloud solutions:
Analytics for Target (A4T)
A4T is a bidirectional integration between Adobe Analytics and Target, Adobe’s powerful testing, and personalization solution.
This integration allows you to use Adobe Analytics metrics and reporting to analyze your Target activities, eliminating the need for dual-tagging conversion actions (e.g. a purchase) with custom Target mboxes AND Adobe Analytics success events.
With the A4T panel in Analysis Workspace, you can analyze lift and confidence for up to three success metrics using the powerful, familiar analytics canvas.
Adobe Analytics and Adobe Audience Manager
Via server-side forwarding, you can share data and segments from Adobe Analytics with Adobe’s DMP Audience Manager (AAM). There, your analytics data can be used to build and enrich segments together with other first, second, or third-party data sources. All to help you find and target your advertising to the most valuable segments across your digital channels.
What’s required from a technical integration point of view is to enable the data sharing with Audience Manager from the Adobe Analytics Launch Extension.
Adobe Analytics and Adobe Campaign
The Adobe Campaign integration allows you to understand the success of your email program directly from the familiar Adobe Analytics interface. With this integration, you can analyze your favorite email KPIs like deliveries, opens, and clicks directly in Analysis Workspace.
Through Experience Cloud triggers, you can use the behavioral data from Adobe Analytics to trigger a tailored email in near-real-time. For instance, you can follow-up with visitors who added a particular product to their cart and never started the check out flow or you could reach out to the visitors that initiated the checkout flow but didn’t end up placing the order.
Measures like these can help you bring down the revenue you lose along the checkout flow and reduce cart abandonment.
Adobe Analytics and Adobe Experience Platform
If you are using AEP, you have a variety of data sources to report from. The Adobe Analytics Data Connector is one of them.
Depending on whether you have the Analytics For Target (A4T) integration set up or not, your Adobe Analytics becomes available within 2-15 minutes for usage by AEP’s real-time customer profile.
If you use the AEP Web SDK for deploying analytics instead of the legacy AppmeasurMent.js library, your Adobe Analytics data becomes available instantaneously. Beware that this implementation method is fairly new, relies heavily on Adobe’s XDM format, and requires a processing rule for mapping each analytics variable. If you can live with the delay mentioned above, there is no rush for re-architecting all your Experience Cloud solutions.
10. Set Up Alerts
Unlike an analyst, alerts monitor your data 24/7. They can become your best friend for monitoring data anomalies and play an essential role in ensuring the integrity of your data. We’ve all heard of cases where tracking suddenly flatlined due to a website (re-)launch. Alerts are your insurance policy for catching data anomalies early enough.
You can build alerts on-the-fly from within Analysis Workspace using the right-click function.
Alternatively, you can also open the alert builder by navigating to Components > Alerts in the main navigation.
Depending on your use cases, you can have both very broad or very specific alerts.
An example of a broad alert would be to fire when no page views were recorded during an hour.
An example of a specific alert would be to fire when the conversion rate of the paid search channel drops below the expected 99 percent threshold.
Get Started Today
Launch extensions in combination with an event-driven data layer (EDDL) greatly reduce the amount of custom code needed to implement commerce tracking in Adobe Analytics. Once the data is flowing into the platform, we recommend you don’t stop there! Start building calculated metrics, import product costs, integrate your advertising, and share out segments across other Adobe solutions to leverage the true power of your investment in the Adobe Experience Cloud.


