Rich Text Editor Plugins for Adobe Experience Manager

Out-of-the-box (OOTB) plugins and their features cover many text editing use cases, but there will always be a need for customization. Recently, I came across a requirement where authors wanted the flexibility to add data attributes to the HTML elements for analytics tracking using the Text component RTE capabilities in Adobe Experience Manager (AEM).
Learn how to add a custom tool to RTE that will add data attributes to a specific element within HTML by following the steps outlined in this article. This same process can be used for any other custom RTE Tools you have to add as well.
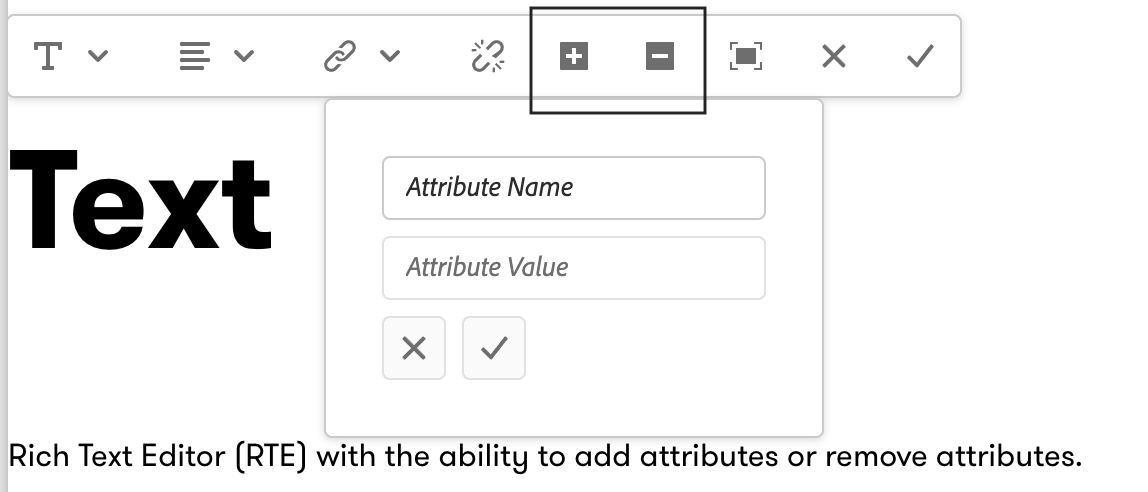
By following these steps, you will enable the author to add attributes or remove attributes using the in-place editing toolbar in AEM, as can be seen below.
How to Add a Custom Plugin to RTE?
Adding a new plugin to RTE is a five-step process and involves JavaScript coding.
- Create a new Clientlib and provide Categories
- Create a new Command and Register it with CommandRegistry
- Create a new Plugin and Register it with PluginRegistry
- Create a custom dialog if there is a need
- Enable plugin
Step 1: Create a New Clientlib and Provide Categories
The clientlib name required to load the custom RTE plugin in AEM Author editing mode is rte.coralui3.
Create a clientlib directory and set the categories to rte.coralui3:
Sample code:
<?xml version="1.0" encoding="UTF-8"?>
<jcr:root xmlns:cq="http://www.day.com/jcr/cq/1.0" xmlns:jcr="http://www.jcp.org/jcr/1.0"
    jcr:primaryType="cq:ClientLibraryFolder"
    categories="[rte.coralui3]"/>
Step 2: Create and Register Command
There is a predefined interface to create the RTE commands; each command must extend this and write implementation:
Interface: CUI.rte.commands.Command
Create the custom command and Register it with CommandRegistry that manages the commands for rich text editing.
Sample Command code:
CUI.rte.commands.SampleCommand = new Class({

   extend: CUI.rte.commands.Command,

   toString: 'SampleCommand',

   isCommand: function (cmdStr) {
       return (cmdStr === 'command_name');
   },

   getProcessingOptions: function () {
       var cmd = CUI.rte.commands.Command;
       return cmd.PO_SELECTION | cmd.PO_BOOKMARK | cmd.PO_NODELIST;
   },

   execute: function (execDef) {
       // add implementation
   },

});
// register command with CommandRegistry
CUI.rte.commands.CommandRegistry.register('command_name', CUI.rte.commands.SampleCommand);
Step 3: Create and Register Plugin
Like Command interface, there is a predefined Plugin interface and each plugin must extend and write implementations.
Interface: CUI.rte.plugins.Plugin
Create the custom Plugin and Register it with PluginRegistry that manages the plugins.
CUI.rte.plugins.SamplePlugin = new Class(

   extend: CUI.rte.plugins.Plugin,

   features: null,

   pluginId: SamplePlugin,

   config: {...},

   // write implementation
   getFeatures: function () {return [];},

   // write implementation
   initializeUI: function (tbGenerator, options) {},

   // write implementation
   execute: function (pluginCommand, value, envOptions) {},

   // write implementation
   updateState: function (selDef) {},

   getTooltip: function (command) {
       return (this.config.tooltips ? this.config.tooltips[command] : null);
   },

});

// register plugin
CUI.rte.plugins.PluginRegistry.register('sample_plugin', CUI.rte.plugins.SamplePlugin);
Step 4: Plugin Dialog
If there is a user input needed for the plugin or its features, there are two ways to create the Plugin Dialog.
- Extend the
DefaultDialogand add fieldsCUI.rte.ui.cui.DefaultDialog - Create a custom dialog
CUI.rte.ui.cui.SampleDialog = new Class({

 extend: CUI.rte.ui.cui.AbstractDialog,

 initialize: function(config) {
   this.config = config;
   this.context = this.editorKernel.getEditContext();
 },

 onShow: function() {...},

 onHide: function() {...},

 preprocessModel: function () {
   // this method may be overridden by implementing dialogs to pre-process before passing it to other methods
 },

 dlgFromModel: function () {
   // this method may be overridden by implementing dialogs to transfer basic data from model to view
 },

 validate: function () {
   // run validations
   return true;
 },

 dlgToModel: function () {
   // this method may be overridden by implementing dialogs to transfer basic data from view to model
 },

 postprocessModel: function () {
   // this method may be overridden by implementing dialogs to post-process
 },

});
Note: There is a Helper class available which has some useful methods when instantiating the dialog - Class: CUI.rte.ui.DialogHelper
Step 5: Add plugin to RTE
Based on the requirement, add the plugin and its features configuration to RTE for content editing.
Enable the RTE Plugin features
Add the following code to the rtePlugins node inside the dialog and for inplaceEditing.
| Dialog rtePlugins Location | <dialog-richtext-field>/rtePlugins |
| InplaceEditing rtePlugins Location | <component>/cq:editConfig/cq:inplaceEditing/inplaceEditingConfig/rtePlugins |
<sample_plugin
   jcr:primaryType="nt:unstructured"
   features="*"/>
Configure Editor Toolbar
There are four supported types of RTE editors and configurations for them explained in the below table. Add the plugin and feature to the toolbar list.
Format: plugin_name#feature_name
| Editor Type | Config Location | Property |
|---|---|---|
| Dialog Inline | <dialog-richtext-field>/uiSettings/cui/inline | toolbar |
| Dialog fullscreen | <dialog-richtext-field>/uiSettings/cui/dialogFullScreen | toolbar |
| Inplace editor | <component>/cq:editConfig/cq:inplaceEditing/inplaceEditingConfig/uiSettings/cui/inline | toolbar |
| Inplace editor fullscreen | <component>/cq:editConfig/cq:inplaceEditing/inplaceEditingConfig/uiSettings/cui/fullscreen | toolbar |
Reference: There is an OOTB rich text clientlib that has the definitions, helper classes, and OOTB Plugins, features, and Commands. Path to the library on your local AEM environment.
While OOTB plugins cover most scenarios for text editing, the above custom tools allow for data attributes to be added to a specific element within HTML in Adobe Experience Manager. Download the example package below to see the functionality of adding and removing attributes.
Glossary of Terms
- RTE - Rich Text Editor
- Command - This performs the action that the plugin passes to
- CommandRegistry - Registry that holds all the RTE Commands
- Dialog – It is a Plugin Dialog, which provides the input forms for user inputs and DOM management.
- Plugin – Identifiable with a unique name and consists of 1 or more features for editing
- PluginRegistry - Registry which manages all the RTE plugins