AEM's Built‑in CSV Editor
Few people know about the built-in editor, and it still needs polishing before it’s useful for production sites. This post highlights the relevance of the editor and gives an example illustrating how developers can implement missing features.
CSV Editor Features and Limits
Once the file is uploaded, you can select it like any other file or page in AEM. Clicking on “Edit” brings you to a page that looks like this:
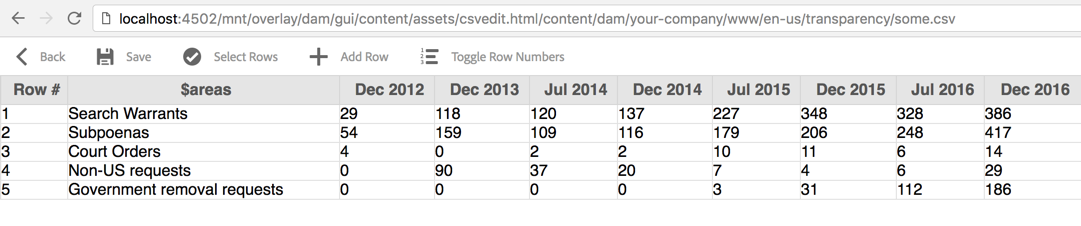
By default, new rows can be added and existing ones can be deleted. That’s it until at least AEM 6.3. You can not add new columns, move rows or update existing cells.
This is where the polishing starts and development becomes tricky. As opposed to building AEM components, improving AEM’s admin interface is barely documented and thus rarely done. However, especially if you have a large team of people managing your websites and assets in AEM, improving the authoring experience can greatly increase employee satisfaction and efficiency.
We believe that visitors of a website should have a great user experience, and the humans who create and maintain that experience should have a great experience as well.
How to add a new feature
You will learn about:
- Creating a clientlib that is only loaded with the CSV editor
- Identifying AEM’s JavaScript used for the CSV editor
- Using the contenteditable HTML attribute
- Adding an edit button using Coral UI
We assume you know how to write JavaScript, how to navigate in CRXDE, and how to create clientlibs.
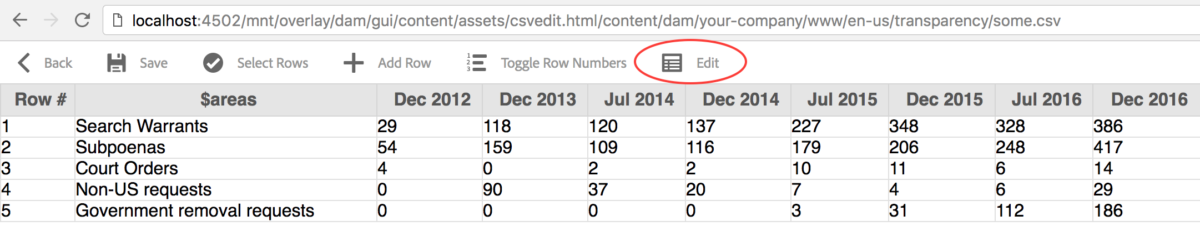
This is what the result looks like. Note the extra edit button:
Create an Editor-Specific Clientlib
<?xml version="1.0" encoding="UTF-8"?>
<jcr:root xmlns:cq="http://www.day.com/jcr/cq/1.0" xmlns:jcr="http://www.jcp.org/jcr/1.0"
    jcr:primaryType="cq:ClientLibraryFolder"
    categories="[dam.gui.components.admin.csv.edit]"
    dependencies="[granite.ui.foundation,cq.siteadmin.common]"/>
Now your custom JavaScript loads on the CSV editor page. Next question: How do you write code that works well with AEM’s default JavaScript for the editor without overriding AEM’s default scripts?
Identify Default JavaScript
In order to extend an AEM feature, it is helpful to look at the source code. For AEM’s client-side JavaScript, you can find the uncompiled code in CRXDE. Before we open CRXDE, though, let’s find the path under which the file can be located in CRXDE (unless you want to manually tangle through the folder tree).
First, go to the edit page of a CSV you uploaded into the assets directory of AEM. It has “csvedit.html” in the URL and looks similar to what the above screenshots show.
Then look at the HTML source of the page you’re on using DevTools (or alike). You’ll discover a bunch of included stylesheets in the code. This is the interesting one:
<link rel="stylesheet" href="/libs/dam/gui/components/admin/csv/edit/clientlibs/edit.min.css" type="text/css">Use this to find the uncompiled JavaScript in CRXDE Lite so you can use Adobe’s existing code as a base to write your own JavaScript:
/libs/dam/gui/components/admin/csv/edit/clientlibs/edit/js/edit.jsMake content editable
The HTML standard defines the contenteditable attribute, a powerful and simple way to make any element editable. It is surprisingly unknown among developers despite it is well supported across internet browsers. Using JavaScript, we append the contenteditable attribute to every table cell whenever editing is enabled, and remove it when editing gets disabled.
Add the edit button
Inspect the existing action bar on the page (thus, the bar with buttons such as “Add row” and “Save”). Using JavaScript, you can insert your own button into that bar mimicking the structure of existing buttons.
Then adjust the button’s text, CSS classes and HTML attributes to your needs. Fortunately, Adobe’s CoralUI provides a set of icons including a table icon which seems like a reasonable choice for our new feature. All icons and their respective CSS classes are available in the CoralUI documentation.
Example JavaScript
Finally, below is a JavaScript snippet that can be loaded as part of a clientlib. It adds a clickable edit button that enables/disables editing of cells and toggles between two CoralUI icons accordingly. The code structure follows Adobe’s default JavaScript for the CSV editor. It does neither replace nor alter Adobe’s code. It is to be used in addition to existing scripts in order to ensure compatibility with future versions of AEM and easy maintenance.
(function (document, $) {
  "use strict";

  var csvNS = ".csv-table";

  var EDIT_BUTTON_HTML =
    "<button class=\"coral-Button--graniteActionBar coral-Button " +
    "coral-Button--quiet\" type=\"button\" autocomplete=\"off\" data-edit-enabled=\"false\">" +
    "<coral-icon class=\"coral-Icon coral-Icon--table coral-Icon--sizeS\" " +
    "icon=\"table\" size=\"S\" role=\"img\" aria-label=\"table\"></coral-icon>" +
    "<coral-button-label class=\"coral-Button-label\">" +
    "Edit" +
    "</coral-button-label></button>";

  function enableEditing() {
    // We select all cells except for cells in table header and system fields that are not part of the CSV
    var $cells = $("#csv_table").find("td:not('.system-field')");

    // `contenteditable` is great. It even works in IE 5.5!
    $cells.attr('contenteditable', 'true');
  }

  function disableEditing() {
    var $cells = $("#csv_table").find("td:not('.system-field')");
    $cells.attr('contenteditable', 'false');
  }

  function handleEditButton(event) {
    var $this = $(this);
    var $editIcon = $this.find('[icon]');

    if ($this.attr('data-edit-enabled') === 'false') {
      enableEditing();
      $this.attr('data-edit-enabled', 'true');
      $editIcon.attr('icon', 'tableEdit')
    } else {
      disableEditing();
      $this.attr('data-edit-enabled', 'false');
      $editIcon.attr('icon', 'table')
    }
  }

  $(document).on("foundation-contentloaded" + csvNS, function () {
    var $editButton = $(EDIT_BUTTON_HTML);
    var $toolbarIcons = $('.content-header .toolbar .left.icongroup');

    $editButton.fipo("tap", "click", handleEditButton);

    $toolbarIcons.append($editButton);
  });

})(document, Granite.$);
The CSV editor is a powerful tool the AEM community barely knows about. This tutorial gives you key insights illustrating how to extend AEM’s administration interface. Based on this tutorial, you and your team can polish this hidden gem and improve the authoring experience. If you want to take full advantage of Adobe’s Marketing Cloud, let’s talk.
News & Insights
Related Perspectives