Leveraging Session Storage for Enhanced Click Attribution in Google Analytics 4

Objective
Attribute ecommerce conversions to navigation clicks (e.g., Top Nav > Sub Nav) by capturing the last clicked navigation items using sessionStorage and sending that value as a custom GA4 event parameter.
Understanding which navigation paths lead to purchases is critical for optimizing site architecture and UX. Traditional GA4 reporting may show that users engaged with the navigation, but without this implementation, it's difficult to tie those clicks to downstream outcomes like purchases or revenue.
This solution closes that gap by persistently storing a user's last clicked navigation path and appending it to ecommerce events, such as purchase. It enables analysts and marketers to directly answer questions like:
● Which navigation flows lead to the most conversions?
● Do users who click into “New” or “Bestsellers” convert at a higher rate?
● How much revenue is driven by specific nav paths?
This tactic also serves as a scalable proof of concept for upper-funnel engagement attribution. Once validated, the same approach can be extended to:
● Homepage hero banners
● Promotional carousels
● Landing page CTAs
● Internal search links
● Featured content blocks
By replicating the sessionStorage approach for these elements, organizations can systematically attribute revenue and engagement outcomes to specific content, moving beyond correlation into true performance accountability.
Disclaimer: the following implementation requires a developer to create a navigation dataLayer event or for the user to write custom javascript functions to scrape nav levels from the DOM.
Step 1: Download Container File
Download the container JSON file.
(You may need to right-click on the link and choose “Save Link As” or “Save Target As” to save the JSON file to your computer)
Step 2: Import JSON File into GTM
Log into your own Google Tag Manager container and go to the Admin section. Under Container, select Import Container.
Choose the downloaded JSON file and follow the prompts to import the tag setup. Check out this blog post on importing a GTM container.
Step 3: Set Up Navigation DataLayer Push (If Not Already Present)
Ensure your site pushes a navigation event to the dataLayer when users interact with the nav menu.
Example:
dataLayer.push({
  event: "navigation",
  level1nav: "Jewelry",
  level2nav: "Necklaces"
});
Step 4: Review the Custom HTML Tag
The tag “Set Nav in SessionStorage” (imported via the JSON file) stores the level1nav and level2nav values in sessionStorage. The logic is outlined below:
<script>
  (function() {
    var level1 = '{{DL - level1nav}}';
    var level2 = '{{DL - level2nav}}';

    if (level1 && level1 !== 'undefined') {
      sessionStorage.setItem('last_level_1_nav', level1);
    }

    if (level2 && level2 !== 'undefined') {
      sessionStorage.setItem('last_level_2_nav', level2);
    } else {
      sessionStorage.setItem('last_level_2_nav', '');
    }
  })();
</script>
What it does:
● Stores level1nav and level2nav in sessionStorage
● Clears level2nav if undefined (e.g., top-level only click)
No manual edits are needed unless you're adapting the tag for different dataLayer keys.
Step 5: Review the Custom JavaScript Variable
The imported variable pulls values from sessionStorage and returns a formatted string like Jewelry > Necklaces.
Function logic:
function() {
  var level1 = sessionStorage.getItem('last_level_1_nav');
  var level2 = sessionStorage.getItem('last_level_2_nav');

  if (!level1 || level1 === 'undefined') {
    return ""; // Return empty string if level1 is not present
  }

  return level1 + ' > ' + (level2 || '');
}
Step 6: Pass Custom Parameter in GA4 Tags
In your GA4 configuration tag, pass the {{Session - Combined Nav}} variable as a parameter. Give the parameter a distinct name, like “last_click_nav”. Add the parameter under “Configuration Settings” so it can be used with all GA4 events.
Step 7: Register the Custom Dimension in GA4
1. Go to Admin > Custom Definitions > Custom Dimensions
2. Click Create Custom Dimension
○ Dimension Name: last_click_nav
○ Scope: Event
○ Event Parameter: last_click_nav
Step 8: QA in Preview Mode
Use GTM’s preview mode and GA4 DebugView to confirm:
● navigation events push correct data
● “Set Nav in SessionStorage” tag fires on navigation events
● {{Session - Combined Nav}} values populate properly
● last_click_nav is present on conversion events
Step 9: Analyze in GA4 and Looker Studio
Use the last_click_nav custom dimension in a variety of reports. Below are some examples:
GA4 Explore:
● Funnel breakdowns by nav path

● Product performance by navigation click (item name redacted for client confidentiality)

Looker Studio:
● Tables/pivot tables to visualize which navigation paths drive the most revenue (item name redacted for client confidentiality)
● Visualize the navigation funnel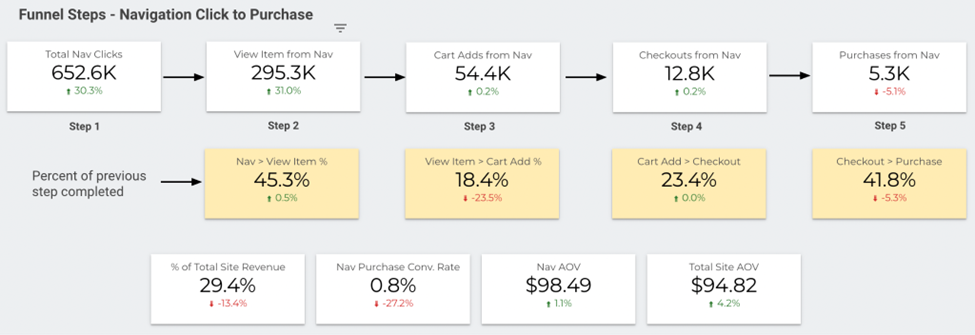
Bonus: Expand the Use Case
Apply the same sessionStorage concept to other upper-funnel elements like:
● Hero banners
● Promo tiles
● In-page CTAs
● Landing page entry points
● Blog Content
Track and attribute revenue impact beyond just navigation.